Hands-On Mac 181 transcript
Please be advised this transcript is AI-generated and may not be word for word. Time codes refer to the approximate times in the ad-supported version of the show
0:00:00 - Mikah Sargent
Coming up on Hands-On Mac. Let's take a look at using Spotlight in macOS Sequoia. Stay tuned Podcasts you love From people you trust. This is Twit. Welcome back to Hands-on Mac. I'm Micah Sargent and today we are taking a look at the built-in search tool for the Mac. It's called Spotlight and it is a very powerful application that lets you do all sorts of things when you are looking for something on your Mac. So let's head over to macOS Sequoia and take a look. Here we are on macOS Sequoia and, as you can see, I am on my desktop.
So, first and foremost, I want to talk about the ways that you can access Spotlight, because there are multiple ways to do so. By default, you will find a small little magnifying glass in the top right corner of your screen, somewhere along that menu bar. If you click on it, it brings up Spotlight. The way that many of us power users access Spotlight is by holding down the command key and hitting spacebar to access Spotlight. To access Spotlight. And the final way is, if you have a Mac that has a function row or a keyboard that has a function row, you will find that above likely F4, you will see a little magnifying glass and tapping that will also bring up Spotlight. Any of those ways will access Spotlight, and something kind of cool about Spotlight is you can actually take the Spotlight window, click and hold and drag it to somewhere on your screen so you can kind of decide oh, I want this over to the left so that I can have a window open on the right while I use Spotlight to search for stuff. Important to note that if you want Spotlight to return back to where it is supposed to be, clicking and holding on the magnifying glass in the menu bar will bring Spotlight back to the place that is default.
Now there are multiple things that you can do with Spotlight when you are doing a search. So let's say, I want to look up a file, but I'm trying to think of a file that could also exist on the web. So I'm going to type in the word Chihuahua, and when I type in the word Chihuahua, spotlight will show me some results. Now if you see an arrow that is pointing to the top right corner, then that is going to be an indication that it's going to take you to the web. But below that you can also see some different files that Spotlight was able to find and the great thing is, it will actually show them in their type and also give you some information. You can see websites here. You can see images of Chihuahuas, you can see images in the photos library, a music suggestion called Chihuahua and even an archive that mentions Chihuahua as well. Now, any of these results, you can use the arrow keys to move down to them. You can also double click on them to actually get to that result, and that will take you to that page. Now you'll notice that in the last part of the spotlight option, there's something that says Chihuahua cheese. Clicking on that will actually do a search for that item. So it essentially replaces your current search with a suggested search based on what it thinks you might be looking for. I don't know why I'd be looking for chihuahua cheese, but that is the suggestion that it came up with.
Next, you can do things like, for example, a search for a setting. Maybe I want to type in voiceover and within voiceover. There will occasionally and it's actually surprising that this isn't popping up give you a toggle to actually turn on or off a setting when you search for it in spotlight. So let's see if we can't get one that will actually pull up a toggle. So it's not in this case, but we can easily click to go to appearance and head into the dark mode section directly. To give us that ability. You can also take a quick action with certain content. So if, for example, I were to type in let's go with an email, micah at twittv and see what results appear for us, we have the option there and it did just disappear, but we have the option typically to send that person an email. So you will see what are called quick actions, which are three little dots or three or four little dots that appear, which are three little dots or three or four little dots that appear, giving you the ability to send that person a message.
Next, you can also show the location of a specific file. So if I type in Chihuahua again, chihuahua again, and we look at the results here, you'll notice that there are some documents that appeared in the PDF document. If I move my selection down to that document and I hold down the command key, I can actually see the location where it's stored on the Mac. At any time I could take one of these files, click and drag it to the desktop or to a finder window to make a copy of it, and I'm also able to. If I don't want to access these files via Spotlight, maybe I want to do a specific search. You've probably seen an earlier video of mine If you haven't, you should go back and check it out that talks about using Finder for your results, so you can actually click to search in Finder instead and come across information directly that exists somewhere on your Mac.
Now, spotlight isn't just for finding files that's the great thing about it. So let's take a look at doing calculations and conversions with Spotlight. So, first and foremost, I could type in a temperature conversion like 98.8 degrees Fahrenheit, which immediately tells me the Celsius. You could also do something like, let's say, 300 yen in USD, and it will give me that. What about 300 yen in CAD? It will give me that as well. And then you can do easy conversions like 32 feet to inches, and it'll tell you 384 inches, if you want. This is a really handy one that I use all the time, especially if I want to make sure that I am getting in touch with Rosemary at the right time. You can type in something like time in London or Japan, local time or whatever it happens to be, and get that information really quick right there in Spotlight.
Now I want to talk about how, and then we want to click Spotlight in the sidebar. So down here in this sort of second section, you can see these are the different options that are available. Now you can at any point deselect any of these to say no, I don't ever want you to show me tips. For example, I don't want you to show me events and reminders and only show me these categories. That's a way to do that. Beneath it, you'll also notice that there's an option that says help Apple improve search. This says send information in a privacy protecting way to Apple about how I use Spotlight so it can kind of take that information and improve upon Spotlight searches in the future At any time. If you don't want it to be able to do that, you are able to get rid of that simply by toggling off the Help Apple Improve search.
Now there are some different types of options when it comes to actually using Spotlight for some of the results, and so if you are trying to turn off Siri suggestions so that essentially all Spotlight does is look at the files that are on your Mac and doesn't have, you know, special queries or anything like that, all you have to do is turn off Siri suggestions in that Spotlight. So under spotlight you turn off Siri suggestions and it will stop doing that. You know, specifying different content on the web and just becomes a way for you to search the content that's directly on your Mac. So that is one way to pull that off. You can also turn off location services if you don't want to have it pull up information that has to do with you know where you are in relation to where something else is. If you were doing a search for you know a place to eat.
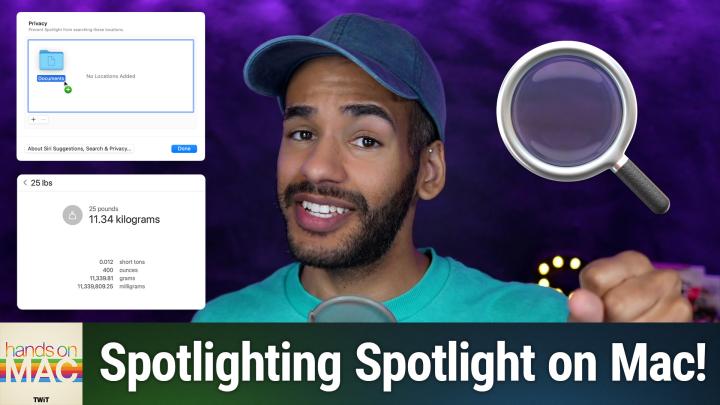
Mention is that, if you would like, you can decide what files and folders are actually included in Spotlight search results. So in this section you can say when I'm using Spotlight, I don't want you to also check this drive that I have connected, because there's nothing on there that I want you needing to search through, which could take a lot longer. That's a lot of the time why someone decides to sort of exclude a file or a folder or a disk from searches, and this is the way that you do it. You can also include a. You can say I don't want you to look at the time machine backup disk, so that that way, spotlight isn't searching through something that already exists on your machine. That is a way to make that possible. By default, spotlight does exclude items that are stored on a backup disk that aren't part of a time machine backup. So you are able to kind of set that by default.
But let's take a look at how we tell it no, no, no, Don't look in this specific place. So once again, we go into system settings, we choose spotlight, we scroll down and we choose search privacy. Here you can see I have no locations added currently by hitting plus I can say you know, what I don't want you to do is look in the example folder that I have on my desktop. So when we do a search, like for the word Chihuahua, we will see, after it takes a second to load, that the only place it's showing a file called Chihuahua, which we can figure out by moving down with our arrow key, holding down the command key, is at iCloud Drive desktop, even though we know that that file technically exists in that example folder. So it will stop looking elsewhere for that file and then at any point we can go into search privacy again, we can take this and remove it and now it will be added back to the system. Now, importantly, if you ever find yourself in fact, let's, let's switch away, let's switch away here from from macOS for a second.
Occasionally, I hear from people who are having trouble finding files on their Mac. For some reason, spotlight is just not doing what it used to do. That is something that can be solved. Yes, there's likely something wrong with your Spotlight index, as it's called, which is essentially Spotlight, looking through your whole system and kind of making notes about where things are, and that's how it determines. You know, when you do a search, how to find stuff. As you add new stuff, more gets added to the index, the index gets bigger, etc. Etc. Sometimes that index gets messed up, in which case how do I go and find things? Well, you can fix your Spotlight index, and it's kind of funny the way that you do it because it feels a little hacky, but it's actually Apple's recommended suggestion itself. You can find it in the support documentation from Apple.
So let's take a look at what we do. We go back to system settings. We click on Spotlight, we choose search privacy at the bottom, we hit plus and we want to go to our Mac in the sidebar and we want to choose the entire hard drive. When you choose the entire hard drive, it tells the system I don't want you looking anywhere and it flushes the index. And then you need to let it sit for a little while while it flushes that index. Go ahead and do a restart. After a little bit of time, when you log back in, hop into here, remove your hard drive from that section, from the privacy section here, and click done. Give it a little bit of time. Don't do a restart this time, but let it. What it's going to be doing in the background is indexing and what you'll find is that when you launch Spotlight, either by command space or by clicking on Spotlight in the menu bar or using the keyboard option, and you type in a word, a little bit of text will appear at the top, right below your search result that says Spotlight is currently indexing. So that kind of makes it rebuild the index, which can fix those problems. So that is a look at Spotlight how to access it, how to troubleshoot it, what you can do with Spotlight and so much more.
I know some of you are going to get in touch and say what about Alfred? Yes, that is a third-party option. I have always been a Spotlight stan fan and everything in between. I'll continue to use Spotlight, but if you love Alfred, totally understand For people who are like, well, what's Alfred? It is a Spotlight-like tool that people really love. That gives you the ability to do much of what Spotlight is, and some people say, do it better than what Spotlight does? I don't necessarily agree, but it is an option that's available to you as well. Thank you so much for tuning into this episode of Hands on Mac. I love bringing this show to you every week.
Of course, you can get in touch Micah at twittv, and let me remind you, join the club. Twittv, slash club, twit $7 a month, $84 a year. When you join the club, you get access to some great stuff ad-free content. Yes, all of our content ad-free. Access to the TwitPlus bonus feed. Access to the members-only Discord server where we regularly have events. Leo and I will be covering WWDC live in the club and even likely be talking about the developer state of the union afterward too, so be sure to tune in there. Join the club. We've got two weeks free. So you know, give it a go, check it out and I look forward to seeing you in the club. Have a great day, evening, whatever it happens to be for you, and I'll catch you next time. Bye-bye.