Know How... 83 (Transcript)
Father Robert Ballecer: On this episode of Know How, Brian is going to show you some Linux magic then I’m going to make these LED’s dance. Dance my dear boy, dance!
Net Casts you love, from people you trust. This is Twit.
Bandwidth for Know How is brought to you by cachefly.com.
This episode of Know How is brought to you by lynda.com. Learn what you want, when you want with access to over 2000 high quality online courses, all for one low monthly rate. To try it free for 7 days visit lynda.com/knowhow.
Fr. Robert: Welcome to Know How, it’s the show where we build, bend, break and upgrade. I’m Father Robert Ballecer.
Brian Burnett: And I’m Brian Burnett.
Fr. Robert: For the next half hour we’re going to take you through some geeky projects that give you the knowledge to break down your old geek imagination. Brian, how are you feeling today?
Brian: I’m feeling alright. I just got back from a trip to LA, so that was fun.
Fr.
Robert: Was Disneyland the happiest place on earth?
Brian: It was. It really was.
Fr. Robert: Hopefully it refreshed you, you’re ready to go, you’ve got some imagination about the projects we’re going to build to give to the good folks at home?
Brian: Absolutely not. But we’re going to do it anyway.
Fr. Robert: We’re going to do it anyway. Fantastic. Now I thought that we should probably start with this little story that we picked up from PC Probe. Now remember last week we talked about DNS.
Brian: Right.
Fr. Robert: And we talked about the different ways to adjust your DNS settings in order to make it more secure, make it faster.
Brian: On your machine, right.
Fr. Robert: Either on your machine, in your router or in the host file.
Brian: Okay.
Fr.
Robert: Well we got the story from PC Pro talking
about how somebody, I won’t say who, but somebody compromised 300,000 soho, that’s small office, home office, routers to change
their DNS entries. Now Brian do you
remember what DNS servers do?
Brian: I’m pretty sure you did a show about it, but
I hardly ever listen to what you say so….
Fr. Robert: That hurts me!
Brian: No, I’m sorry! Basically you send a request to the DNS server with an IP address and it sends you where it’s supposed to?
Fr. Robert: That is reverse DNS but yeah, you’re on the right track. DNS you give it an address like google.com right? And it give you the actual number that that server lives at. Because your computer can’t do anything with google.com until is has directions to the server. The DNS server resolves it and gives you the number that your computer needs to get to the server that you are trying to get to.
Brian: So I think that I remember you said something about if I go into Terminal or any other command line I guess on Windows or something like that and I type in Ping, space, google.com that should give me their IP address, right?
Fr. Robert: Right, exactly. So Ping is a program that is build into pretty much every operating system; Windows, Linux, Mac OSX, whatever it is going to be. That lets you send out a very small packet of information to a specific IP address and say, “Hey are you responding? Are you alive, are you there”? But what we see with this attack is that they were able to re-direct that traffic so let’s say that google lives at 74.x.x.x, because they were able to compromise these 300,000 soho routers they were able to send back a resolution for google.com of 24.x.x.x which was their own server. They would mimic what google looked like, they would even mimic the services of google but then you started putting in your own information and they could scrape it off the top.
Brian: Okay. So oh. That’s not good.
Fr. Robert: That is not great. That’s not great. What they probably did was they ran a semi-legit DNS server so most of the requests they would actually send off their merry way, off to their real server. But the few servers that they were targeting, like the ones that had your financial information or your login information they would intercept and essentially run a man in the middle attack trying to get your personal information. Very nasty, very horrible and we don’t know exactly how long it was running.
Brian: Wow.
Fr. Robert: Now, here is the good thing. The DNS episode that we showed you, two out of the three ways that I showed you to speed up your DNS could have defeated this attack.
Brian: Right, so you would bypass it if you changed the DNS on your host machine, right? Even if your router had been compromised?
Fr. Robert: Right, exactly. Even if your router had been compromised. So I showed three different ways to speed up your DNS. The first way was to change the DNS settings on your laptop. The second one was to change the DNS settings in your router which would then push it out to all the clients on your network and the third way was to set up a host file. That was the hard coded file that resolved names to numbers. So if they had attacked me and I had run either that first one or that last one, it wouldn’t have affected me at all.
Brian: Hmm. Well then that is a good reason to do it then.
Fr. Robert: It is not just for speed, but security. Now, speaking of security. Brian, you’re going to give us a way to, how do we say, lead a more Linux life?
Brian: Yeah, well if you are like me you have a bunch of USB sticks lying around and I do like to tinker with a lot of things. For example, you use Windows, I use Mac but I also have a PC at home. I use an Android phone, but I haven’t been playing with Ubunto in a while. And I wanted to put it on a USB stick and then carry it around with me. It is basically a persistent OS so you can save your files to it, have your tool bars, book marks, things like that all saved on USB and just carry it with you where you want and mess around with Linux. So it is a pretty easy way to play with it.
Fr. Robert: It sounds to me like there are two big benefits with it. The first is, as you mentioned, to have your desktop, your stuff, in the right place you just plug it in and you go. But I think this is also a really good solution for people who just want to dip their toe into Linux.
Brian: Yeah, exactly.
Fr. Robert: Maybe not completely zap your system, drop it onto a removable piece of media so you can plug it in and play and see if you can learn it more quickly than if you were just immersed into it.
Brian: Exactly. And you don’t need a really big flash drive or anything. Recommended is 4 GB or bigger. I’m using a GB flash drive, but depending on the Linux you are using you could do a puppy Linux and you could use something like a 2 GB or less.
Fr. Robert: Puppy Linux is adorable.
Brian: I think it takes like 500 MB or even less than that.
Fr. Robert: Now we do have to say off the bat, that yeah, you could get really, really small distro’s but the way they get small is that they strip off all the services. Most of the time that’s a good thing, like when you want something to load on a Raspberry Pie you can’t have too many services attached because it is going to slow it down to an unacceptable level, but know that the smaller distro gets, generally the less bells and whistles it is going to have. So when you get Puppy Linux it is bare bones.
Brian: It is pretty basic.
Fr. Robert: Ubuntu is nice because it is easy to use, it’s got some eye candy and it’s not that big.
Brian: Right, and one of the added benefits, it is a bit more difficult for Mac users to do this, but I did find a very simple program called Mac-Linux USB loader made by Seven Bits and it is a pretty trick little piece of software that allows you to quickly make the USB bootable. And you can even go through their menu systems and download the distro. So here we have my laptop screen and I’ve already gone ahead and downloaded the Mac-Linux USB loader up here in the right hand corner. If I open that up it will be approached by this menu system and for time basis, I’ve already downloaded the distribution that I wanted, which was Ubuntu 13.10 for Mac. If you downloaded it this way it takes a little bit longer, if you prefer to torrent your ISO’s then make sure if you’re doing this on a Mac that it has the plus Mac at the end of it, because it otherwise it will not work with your hardware. I should also mention that this is for Mac’s are running Intel Processors. So anyway, I’ve already gone ahead and downloaded Ubuntu 13.10 desktop and there you can see the little +Mac on the ISO. Go ahead and create the USB, you want to format your USB drive first. Because you need to put it into Fat 32 at the very least. So right here we go into Disk Utility on your Mac, select the drive, erase and you want to make sure that you have MSDOS fat selected so that your Linux drive is readable. So once you’ve formatted your drive, then you go into Mac-Linux USB loader, install it to your drive by creating a live USB and it will pop up with a progress bar showing that your bootable drive is being created. Now once you’ve done all that, the next easy step is just to restart your Mac.
Fr. Robert: Typically how long does it take to create a live image of a drive?
Brian: It is pretty short. It took about 15 minutes and I’m running a 2011 MacBook Air right now.
Fr.
Robert: Are there anythings that someone should know if they are creating this live image on a USB drive
and you’ve got a relatively okay MacBook, what happens if you’re running older
hardware? Are there any hardware tips
they are going to need?
Brian: Well if you are running on older hardware it
shouldn’t be too much of an issue. The
software for making this USB is pretty universal. And you don’t have to have crazy hardware to
run Linux.
Fr. Robert: That’s one of the nice things about Linux right? You can run it on older hardware and give it life again right? Because Linux isn’t as hardware dependent.
Brian: That is part of the reason why it is fun to do this project. So what you are going to need to do after you’ve created your USB bootable Linux drive is to reboot your Mac, hold down the Alts and Options key and that will bring up the different options for selecting which drive you want to boot off of. If you use boot camp it is pretty much the same thing. And then I will load that up, it’ll take a second. It takes my Mac, with this SSD, not very long. About 15 seconds here to load up.
Fr. Robert: We’ve got people in the chat room saying, “Wait a minute. That is for a Mac, what about a PC”? Well that is actually very simple The process is the same if it’s going to Mac or for PC. This particular one was designed for MacBook but you can download these images for PC’s. Follow the same procedure and you’ll get a drive that is formatted for PC, readable by PC and bootable by PC.
Brian: Well see, so this is exciting for me because for a long time it was hard to get something like this to work on a Mac. PC is pretty easy. I’ll have links to how you can do it on a PC, but if you just do a simple google search there is a lot of information out there for that.
Fr. Robert: It is general knowledge.
Brian: General knowledge. So, I’m all booted up. And it works great. Everything loads fast. All the drivers work fine. I’m not connected to the internet right now so that is why that is showing that. But it runs just like if I had it installed on the computer.
Fr. Robert: Now let me ask you this, because I’m a Linux guy from way back and I remember trying to install the first distro and being frustrated out of my mind that the drivers just weren’t there. Really bad video, horrible resolution. But we’re past those days right? Most of the popular distributions of Linux have really good driver support. They can support the higher end hardware and they can actually give you decent performance.
Brian: Right. It has come a long way. It works on a lot of machines, like I said, with Intel processors and stuff. I can’t read your name right now, but he points out that it is difficult with support for the Bios. EFI, so the firmware.
Fr. Robert: But this is the nice little trick for people who want to play with Linux who maybe don’t want to make that commitment to wipe out their current operating system, and if you’ve got the chance and you’ve got a free USB drive, then why the heck not? Brian, thank you.
Brian: Sure.
Fr. Robert: Awesomeness. Now, you talked about Linux and we’ve been doing a lot of projects using the Raspberry Pie and there’ve been people saying, “Wait a minute. Wait a minute. Where can I learn more about this Raspberry Pie”? In fact, we got a really good comment in our GooglePlus pages talking about that they were a little concerned that we had glossed over some of the commands. We do that a lot because we don’t necessarily explain exactly how you use Chrome and all it’s permeations. We don’t also explain what Pseudo means or why we use Nano as our editor. Well the reason why we don’t do that is because it is going to take too much time for us to explain all those little bits and pieces. Our episodes would be like 12 hours long if we decided to give everyone all the information leading up to the installation of Pie.
Brian: And if only we started on time every day, maybe we’d be able to!
Fr. Robert: Yeah, maybe we would. But I’ve got a better solution. How about this? Why not come to us for general information about projects and go to lynda.com to find out the specifics? To learn up on everything you’ve ever wanted to know about Linux, Linux drivers, Linux software or even developing for Linux itself. Now lynda.com is a premier provider of online education. I mean what do you want to learn, Brian? Do you want to learn photography? Audio and video editing? Maybe software skills? Well with easy to follow video tutorials on lynda.com you can learn at your own pace at your own terms from top industry experts. With a lynda.com subscription members receive unlimited access to thousands of online video courses that cover a variety of software, creative and business skills. Now, Brian, here we’ve got Linux. lynda.com is all about the Linux, they’ll teach you how to install PHP and Mysql on Raspberry Pie and how to develop Python for Linux devices. They are all about giving the Linux community the knowledge that they need to develop, to build, to process the information into something that is usable by others. Now with lynda.com you can improve your skills, learn more software and keep up to date with technology. They have over 2000 courses with new courses added daily. Including the new courses this week: Final Cut Pro 10.1.1, Essential Training, Web Design Fundamentals, Up and Running with Chrome OS, Garage Band Essential Training, and Making Beats in Logic Pro Ten. Serious stuff.
Brian: Hopefully they have a tutorial on how to beat box.
Fr. Robert: Absolutely. I think they do! Now lynda.com instructors are working professionals at the top of their fields and expert teachers. They make high quality video productions from state of the art studios. these aren’t the home made videos that you find on YouTube. Now we also get people that say, “Wait a minute. Why are you bashing people on YouTube”? We’re not. People on YouTube are fantastic. We’re on YouTube. We try to teach people what they want to learn, but with lynda.com you get a lithe better. Better production values, better audio, better video. All with lynda.com. Now you get curated course content. Each lynda.com course is carefully structured so that users can learn from start to finish, or jump to a specific chapter for quick answers. You get easy to follow videos that help you find the answers that you need, and searchable transcripts. I love this. Searchable transcripts from the dialog within the video that lets you search inside that video to save time and find exactly what you’re looking for. linda.com offers courses from all experience levels that cover a wide range of technical skills, creative techniques, business strategies and more. They also let you watch from your computer, tablet, mobile device and you can switch and pack up. You can start on your laptop and switch to your tablet, then move from your tablet to your mobile phone, from your mobile phone back to your PC. It’s all part of your lynda.com package. Now here is what we want you to do. We want you to try lynda.com. Learn something new in 2014 with lynda.com. It’s only $25 a month for access to the entire lynda.com course library. Or for $37.50 a month you can subscribe to the premium plan which includes exercise files that let you follow along with the instructors projects using the exact same assets. You can try lynda.com right now with a free severn day trial. Visit lynda.com/knowhow to access the entire library. That is over 2000 courses free for seven days. It is all at lynda.com. And we thank lynda.com for their support of Know How.
Fr. Robert: Brian, how about some dancing LED lights?
Brian: Sure. You got something in mind?
Fr. Robert: I do, I do. But first let’s break down some of the basic tech that is going to make this little project possible.
Brian: Okay.
Fr. Robert: What do you know about LED’s?
Brian: Well I know they don’t take a lot of energy to use.
Fr. Robert: They are very efficient.
Brian: They are very bright for how tiny they are.
Fr. Robert: Yep. Yep.
Brian: So, what did you do to make it cooler than just LED’s as they are?
Fr. Robert: Well, these are LED’s. LED stands for light emitting diode. It’s a diode, which is an electronic component. And like any diode, it is going to have a few interesting pieces of performance tech that is built into it. The first thing is that diodes only work in one direction. It isn’t like an incandescent light where you can run power through either side and it is going to light up. A diode will only work when you’ve got power applied to the positive and negative side as designed.
Brian: Okay.
Fr. Robert: Actually, I’ve used LED’s in the past to prevent current from reversing. So if you want to keep the current from going backwards you drop a diode in there and it keeps the current from going the other way around.
Brian: Okay.
Fr. Robert: It is kind of cool.
Brian: And these LED’s that you have right here are just single color?
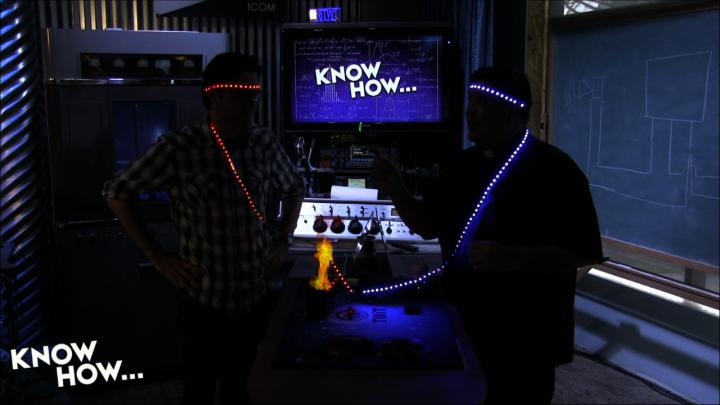
Fr. Robert: Yes, these are all blue. Now if you go to the project site you’ll see that these have been wrapped in this little spool. What I like about this, these are called SMD’s - surface mounts, and these are a strip of 300 LED’s. Again, very, very low power, incredibly bright for what they are and incredibly inexpensive. This entire roll of 300 LED’s, I believe cost about $8.00 from amazon.com. If you have prime free two day delivery. The nice thing about this is that you could take this, which also has an adhesive backing, and stick it to anything. Right? It becomes a really cool way to do projects. Let me show you one of the really cool things about this. We are going to light this up right now. We’ve got a 12 volt battery on this table and if I do this, it shows you, even in the roll these things are pretty darn bright. And again let me demonstrate that other principle which is if I take this and reverse the current you can see that nothing happens. So it’s not going to light up, it’s not going to give me weird color, it’s not going to smoke, it just won’t allow current through. Go back to the proper way to light it and I’m back to my super bright LED’s!
Brian: Nice. Yeah.
Fr. Robert: Now we have a lot of applications for this project, but I thought maybe we could combine it with another component that I wanted to play with.
Brian: Yeah. Why stop there?
Fr. Robert: Go ahead and bring the lights back up and you can see this in the product shot! This is a 10/31C transistor. Now a transistor is a semi-conductor. Here. Hold that in that product camera. Let me drag it. That’s all it looks like. And actually transistors are a lot smaller than this. The only reason why it is this size is that it’s more difficult to work with it the smaller they get it. Remember when I was growing up, this was the size of transistors but now we could pack trillions of them into a piece of silicone the size of your thumbnail.
Brian: They had transistors when you were a kid?
Fr. Robert: Okay. How dare you? Now let’s talk a little bit about transistors. They are semi-conductors,which as the name might lend, sometimes conduct and sometimes don’t. And that is what all of computers are built on. The fact that we can have devices that sometimes will conduct the charge and sometimes will not. But here’s the key. Why does it sometimes conduct and why does it sometimes not? That is the secret of the TIP31C transistor. Let’s go to the board so you can see really quickly the kind of circuit we are going to draw. This is, very crudely, our. This is our TIP31C transistor, it’s got three pen. Pen one, two and three. Now, the way it is going to work is there is a current flowing through pen one and pen three. That is the current coming from this. It could be anything. Anything generating a low voltage. In this case it is a sound device, like a media player. So our media player has a current that is going between pen one and pen three. The way a transistor will work is that every time there is enough charge to move between pen one and pen three it’s also going to move a charge between two and pen three.
Brian: Which is connected the LED?
Fr. Robert: Which is connected to the LED and the battery.
Brian: Right. Okay.
Fr. Robert: So, if you really want to look this up, got to Wikipedia and look for an NPN transistor. IT will give you all the technical details. The long and short of it is that this allows us to take something with a very, very low voltage. So this sound source is like one to two volts - like 20 mili-amps. Which is not enough to run anything. It will bring it all the way to this, which is a 12 volt battery. This particular transistor can support 100 volts, 40 watts. So I can trigger 100 volts, 40 watts with something that is 1 volt, 20 mili-amps.
Brian: What is your end game here, Padre?
Fr. Robert: My end game is to make the LED’s dance!
Brian: Dance?
Fr. Robert: Alex, run it!
Fr. Robert: Before we get started let’s make sure you have everything that you are going to need. You need a power source, 12 volts. I’m using this battery here but you could use an AC to DC transformer. You’re also going to need a few tools. Things like snips and wire strips, and needle nose pliers, scissors and of course a soldering iron. I also suggest you have some sort of helping hand assembly. Something like this that will hold things when you need to start soldering because when we start working with the transistors it’s going to get frustrating because you don’t have three or four hands. You’re also going to want a length of heat treat tubing and some sort of heat source to be able to shrink it down so that we can prevent shorts. Finally, you’re going to need the strips. That’s right. You’re going to need the LED strips and along with them you’re going to need some sort of 3.5 connector to connect it to your audio system. The last piece are these. The magical transistors. The TIP31C’s which are going to allow us to convert our audio into video motion. Now you’re going to need two pairs of wires to connect from the audio source into the TIP31C resistors, you’re also going to need to have leads on each of your LED strips. That is a positive and a negative for each, plus one more lead per 1031 transistor to get back to the negative terminal on your battery. Now make sure that you tend them, now the reason why we tin our wires is because we want to have a solid connection to whatever we are soldering them to. Especially if you are using stranded connectors. Now disclaimer: my soldering skills are horrible and it is late at night and I’m not thinking all that straight. Whenever you are soldering you always want to make sure that you apply heat to the component or to the wire, not to the solder. That’s because you don’t want the solder to be “cold” when it hits the wire or the component. What you’ll get is that you’ll get a blob of solder but no real connectivity. Now that we are done tending our wires we need to connect them to the audio jack, that’s the 3.5 mm audio jack. Now hopefully you can buy something like I’ve got here, which is a 3.5 mm jack with an unscrewable boot. What you are looking for is something that is very easy to solder and something with these clamping down tines so that it’s make the cable stay. Go ahead and solder your wires to the connectors on the jack. You want two common wire to go to the large plug. That’s the one that goes all the way back from the tip of the connector. That’s your ground. That is the negative. You also want one wire each. I’m using red and black, that is the typical positive and negative, to touch the left and the right output. The reason why we want to do this, is because we want stereo output. We want to be able to control two TIP31 transistors. One for the left channel, one for the right channel. It really doesn’t matter which one is which. So don’t get all in a tizzy if you can’t remember which one is left and which one is right. We can sort that out later. One thing that I like to do, is I like to put heat shrink tubing to make sure that not going to short out. Especially if I know my solder joints aren’t going to be great. Now here is a pro tip: make sure that the heat shrink tubing is on the wiring before you start soldering, otherwise you’re going to have to cut it lose and start all over. Once you’re done with the soldering go ahead and put the boot back on and any strain relief that might be part of the plug and screw it back in. It is time for the transistors. Now remember I’ve got two of these because I want one for each channel. One thing to remember is that there is a front and back. The back is going to be part with the middle. And easy way to remember is that they are shaped a little bit like an L, well the back of the L is the back of the transistor. So looking at the front of the transistor from left to right we’ve got pens 1 - 3. Pen 1 is going to be the positive from your audio connection. The middle pen, pen #2, is going to be the negative that leads out into my LED array and the pen 3 is the common ground, that is going to connect both to the negative terminal of the battery and also to the negative of my audio source. Go ahead and ten your connections and then connect your wiring, your new found wiring, to your TIP31C transistor. The next step is to solder the negative terminal of your LED strip to pen #2. That’s the pen that is going to trigger this LED strip when there is sound coming through the transistor. Now you’re going to need a short length of cable that is going to connect it to the battery terminal. Go ahead and snip ten and then connect that to pen 3. That’s the common ground of the TIP31C resistor. Once you are done, go ahead and shrink the heat shrink tubing to protect those connectors and then repeat the process for the other channel. You should now have an assembly that looks a little something like this. Two LED strips connected to their respective channels. Now you want to combine the negative and the positive terminals into single bundle. The reason for this because the switching is actually going to take place in the transistors. So I just need to worry about getting positive to positive and negative to negative from my power source. All that is left now is to connect this to my audio source and then use some alligator clips to connect the positive and the negative to the positive and negative terminals of my battery. Once I’ve done that…….
Fr. Robert: Now Brian, what I like about this project is that we can continue to elaborate. So what we’ve given them right now is we’ve given them the basic structure to create something like this right? Transistors, some LED’s and a battery.
Brian: Right.
Fr. Robert: But what we want to do in the future is we’re going to take this stuff, we’re going to put it in some sort of enclosure, maybe add a diffuser and I’m thinking maybe we could use some of these color changing LED strips.
Brian: That would be cool. We’re already so cool with these LED’s, I’m not sure we should do that!
Fr. Robert: That might be beyond the legal level of coolness allowed.
Brian: Awesomeness!
Fr. Robert: Something else that I want to do is these transistors. I really want to start using them in all of our Rasp Pie projects. There’s people in the chat room saying, “It’s just like a relay”. But no, it’s not. See a relay can only be on or off. And as you can see from these LED lights, they have levels. This is an analog circuit. So it will search up and down based on how much voltage is coming through. A relay would really only be on or off. This gives you much better gradation when you are trying to do a project that is artistic. Maybe you are trying to play with lights, or play with mood.
Brian: Totally.
Fr. Robert: The other thing we can do with this, is we can hook it up to the 3 volt or 5 volt output on a Raspberry Pie which we can control, which means we could use a Raspberry Pie with one of these larger transistors to trigger something like a 120 volt AC device.
Brian: Oh.
Fr. Robert: Which then becomes home automation.
Brian: There you go. I like that idea.
Fr. Robert: But until that time, I think it is maybe time us to tell the good folks at home where they can find all the notes about these projects. Now people, we know that we went through a lot of this stuff really, really quickly. Especially with the Linux boot drive, especially with a lot of the electronics, and the theory that runs behind building something like transistor powered LED’s. So we put everything in our Show Notes. Right Brian?
Brian: That’s right. And you can find those awesome Show Notes at twit.tv/kn and you can also find past episode and further Show Notes for those too. So I highly recommend you go there.
Fr. Robert: Seriously. If you get lost at any time during the show, the Show Notes will give you the step by step. Just follow that and it will let you get to the finished project and then you could go back and research the pieces that you don’t understand. It is part of the way that we learn. Speaking of the way that we learn, if your have any questions about this show you could write us at knowhow@twit.tv which we will promptly never check because we don’t do email.
Brian: Do we have a password for that?
Fr. Robert: No, I think it goes straight to our spam filter I think. But if you really want to contact us you want to jump into our Gplus page, right Brian?
Brian: That’s right. I think we’ve hit 6,000 followers now and if you post a question there we are more than likely to see it and someone else is probably going to answer it for you.
Fr. Robert: There are some smart people on there. And you know what? At the beginning, it used to be just the hosts and maybe the producer who would get in there and answer questions. I jump in there every once in awhile and the people that live in that community are really good about answering any questions. Ask them anything and they will either give you a reference to KnowHow that already covered that or they will put you off in a direction that will help you solve it.
Brian: And if you have ideas for show that you want to see, just let us know. That is where to do it.
Fr. Robert: And remember we do a feedback once a month so that if you have a project that you are really proud of, please…
Brian: Show it off! We want to see it.
Fr. Robert: Put it in that group, be part of the Know It All community. Also, if you don’t like Gplus you could also find us on other forms of social media. I’m personally on twitter, you can find me at twitter.com/PadreSJ, that’s @PadreSJ.
Brian: I’m Brian Burnett and mine is @Cranky_Hippo.
Fr. Robert: We’ve also got one more member of this crew and we’d like to welcome him because I believe he’s been permanently assigned to Know How. You may know him as the Flow Master Mr. Alex Gumpo. Let’s see if he’ll throw a camera on himself.
Alex: You’re going to regret this.
Fr. Robert: I’m sure we’re going to regret, but you know what? I think three is a good number.
Brian: I know I like having Alex on there. He is definitely way better at it than I am, so I’m really glad to be over here than over there now.
Fr. Robert: You know what Brian? For once, we finally agree on something.
Brian: Oh, thanks Padre.
Fr. Robert: Until next time, now that you know…