Know How... 80 (Transcript)
Net casts you love, from people you trust. This is Twit!
Bandwidth for Know How is brought to you by Cache fly. At cachefly.com.
This episode of Know How is brought to you by IFIXIT. You can fix it. And IFIXIT makes it easy. With step by step repair guides and quality replacements parts and all the tools you need. For $10 off your purchase of $50 or more go to ifixit.com/twit and enter the code KNOWHOW at check out.
Father Robert Ballecer: On this episode of Know How you'll want to build something for your Valentine. We are going to show you how. But before that, folks, I know that this show has been a little different with just one host. It just doesn't work that way. It's supposed to be a little bit of a give and take so we have been searching for the right co-host. Far and wide. Everywhere, looking at geeks, tens, hundreds and thousands of possibly co-hosts until we found the one! The man who makes sense. And guess what ladies and gentleman? He was here all the time. I introduce to you the new co-host for Know How, Cranky Hippo Mr Brian Bernett.
Brian Bernett: Hello!
Fr. Robert: You had me at hello! But wait a minute. If you're here, who's TDing the show? Welcome to Know How. It's the Twit show where we build, bend, break and upgrade. I'm Father Robert Ballecer.
Brian: And I'm Brian Bernett.
Fr. Robert: And for the next 30 minutes or so we're going to show you a couple of interesting projects that you can build for your Valentines. That's right. Its a geek Valentine episode of Know How! Well Brian, this is your first episode. Welcome! Welcome to the show!
Brian: Cool. Thanks. It's a little strange vein on this side of the camera.
Fr. Robert: Although, I have to say you've actually been on Know How longer than I have right? Because you were here in the beginning.
Brian: Yeah, I think with the people that started doing Know How, I'm the last person. I wasn't even on from the very beginning.
Fr. Robert: See folks. We try to give you the people that you know. And you definitely know Cranky Hippo.
Brian: We're just going to rotate through.
Fr. Robert: We're just going to rotate through. So you're not going to be on every show
right?
Brian: Well, we'll see how it goes.
Fr. Robert: I'd really like you to be. But you keep telling me, "It's hard to build projects, Padre".
Brian: Well, not everyone can make it look as easy as you do.
Fr. Robert: Flattery will get you absolutely nowhere. But you know what will, is this! So you decided that for a Valentines gift we should build the… what is this - jewelry?
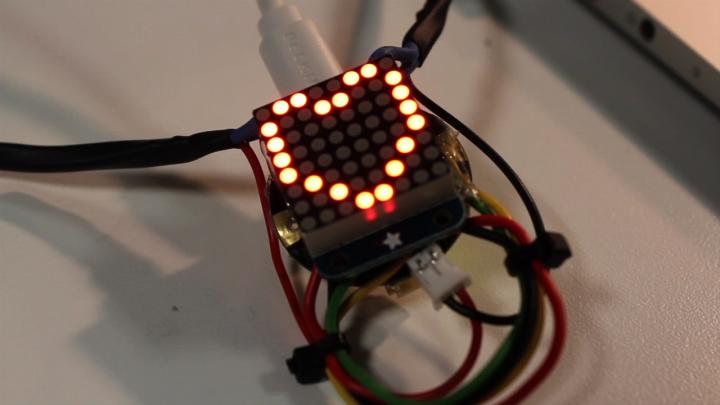
Brian: Yeah, I'd say wearable text is pretty hot right now. Google glass, all that sort of thing. But yeah, this is something you could turn into a necklace for a Valentine's gift. The best kind of gifts are the ones you build yourself too. It's a fun little project.
Fr. Robert: That looks a lot like PacMan.
Brian: PacMan?
Fr. Robert: Yeah, PacMan, you know gobble, gobble, gobble?
Brian: I've heard of dot gobbler. But PacMan?
Fr. Robert: Well, I guess PacMan is copyrighted.
Brian: You can design your own little animations for an 8 by 8 square. This took me about an hour to make this little PacMan. But I'm going to make it all available for people to download so they can do their own animations to it. I'd like to encourage people to do their own animations and show it off on GooglePlus too.
Fr. Robert: That's good stuff. So what do you say we take a look at it?
Brian: Yeah, let's watch this pre-recorded video I did.
Brian: I first came across this project on adafruit.com. They have a lot of cool tutorials here and this one caught my eye as it could be maybe the ultimate geeky Valentine's gift. Now here are the parts that we need to get started. This is an 8 by 8 LED screen that we will be using to show our animations. This next piece is the back plate that we'll connect to the 8 by 8 LED and we'll be soldering this ourselves. And this circular little thing is called the Gemma micro controller. This is what we'll be using to give instructions to our LED screen. And this little guy is USB adaptor for charging out battery. Here are all the parts together. Along with our 500 mAh battery. On the Adafruit website their tutorial has the 150mAh battery. That was out of stock when I was about to do this project, so I went with the 500 and the only con is that it is a lot bigger but you will get a lot more battery life out of it. Alright, so the first step is going to be some soldering. What we have here is the 8 by 8 LED screen and we are going to need to attach it to this backplate. Now it does have some wires that we to thread through the holes on the plate and once you have them all lined up we're going to solder them together. Now these are pretty tiny so take your time, be meticulous. A little tip is to heat up the pad at the bottom and then push the solder on to it. Don't try to get globs on the soldering iron and then do it. Just keep going down the line with the soldering on the backplate. And just being careful the whole time you do it and once you have them all soldered together take a clipper and just take off the excess amount of wire. Next we'll be soldering the 8 by 8 matrix to the Gemma. You'll need four separate pieces of wire. About two inches long. And typically when I strip the ends of the wire, I like to twist the metal so they don't fray when I'm poking them through the holes. You want to reference this awesome and well made diagram by Adafruit. Now we are going to carefully solder the wires to the LED board. I made sure to have four different colored wires so I didn't lose track. The first one I'm going to do is the red wire to the plus on the LED back board. Then I'm going to do the black for the minus, the yellow for the D, and green for the C. Now just clip off any excess wires that you have. Next we're going to be soldering to the Gemma itself. So like before, reference the diagram so you don't make any mistakes. I will be soldering the red to the volt, the black to the ground, the yellow to the DO and the green to the A1. Once again soldering is all about taking your time so don't rush this. And the large pads on the Gemma make it a lot easier for soldering than it was on the LED backpack. All right. So now that completes step one. We've got the LED screen soldered to our Gemma micro controller and now we are going to get into the software. Now if you are not a programmer, don't worry. If you know how to download and unzip a file from the internet, you'll be fine. Also, the code that we'll be using is one you can completely do copy and paste. And I'll be doing this on a Mac, but there are, on the Adafruit website, there are tutorials for Windows and Lenox. Now we need to set up our Gemma using the Ardunio IDE download. Fortunately, Adafruit has made a package titled the Fast Way. Download the Ardunio IDE version 1.05 with trinkets Gemma and flora. For your corresponding OS. Unzip the package and you'll see a little window pop up. Here is where we'll be inputing our code later. Before we start pasting code, we need to make sure the Ardunio IDE has all the info it needs to set up properly. Now go back to the Adafruit website and download the TinyWireM library. Unzip the file and rename the folder without the "-master". If you leave the "-master" on there it won't be able to read the file folder. Now find your recently installed Ardunio folder. On the Mac, the default setting is in documents/Ardunio. And drag the TinyWireM folder into the library folder. Restart Ardunio IDE and you should, under the file sketch book or examples, be able to see TinyWireM library. Now there is only two more things to do before we upload our code. Under Tools, Board make sure to select Adafruit Gemma 8mkz and under Tools Programmer select USBtinyISP. Alright now it is time to copy and paste some code. I have this source code available on the GitHub with the rest of my code but you can also find it on the Adafruit website. And paste that into this window. For the extent of this tutorial you won't need to edit any of the code in this. All this is just instructions for the LED and the Gemma to talk to each other. Next going back to the Ardunio IDE you're going to want to select the down arrow on the far right of the window and make a new tab. Now you're going to want to name this new tab, anim.h. This is the file name and it's for animation. This is what the source code is going to be looking for to tell the screen to display. Now it is time to copy over the animation code. I've made a Valentine specific code myself that's available on GitHub and there is also a dot gobbler/PacMan code that I did myself available for download on GitHub. So pick whichever code you want or make your own and paste it into our anim.h file. Now before we upload the code to our Gemma make sure that it works by checking the box in the left hand corner and you shouldn't get any errors if you're just copying directly from what I've shown you. Now with your Gemma plugged via the USB to your computer, press the small button on the back. This is what initiates the boot loader. You'll be able to tell because the light on the Gemma will, instead of flash, it will oscilate. Now on the Ardunio IDE press the upload button and in just a moment you should see your animation loaded up on the LED. As far as the animations go, feel free to make adjustments or add any code to the existing stuff that I have. And if you want to show it off, you are more than welcome to post it on our Know How community on GPlus. A website I've found that animations making a lot easier is Pial's Blog. We'll have a link to that in the show notes. But what this allows you to do is kind of visualize what your animation is going to look like. For every zero is an empty spot on the LED and for every 1 is a light lit up LED. The format you need to follow is B at the beginning followed by eight ones or zeros and then nine lines down. The ninth line being the amount of time that the animation is displayed. So for most of my animations I stuck with 25 which equals .25 of a second. At the top of the animation code you can set how many times the animation loops. For my animation I wanted it to stay on for a long time. So I have mine set to 255 and that equals about 20 minutes of animation time. Now for our final step we'll be making this into a necklace. I chose to make a necklace for Valentine's day but if you are feeling creative there is no reason you couldn't make this into a wrist band or maybe a pin on your shirt. Now this last step is more arts and crafts. You're going to want to use a hot glue gun for some of it. Once your hot glue gun is warmed up we're going to need to affix the Gemma to the 8 by 8 LED board. Now I've looped the excess wire I've had. But if you have more forethought than I did you might be able to make your wire shorter and make it a little bit cleaner and hide them better. Carefully glue the back of the LED board to the Gemma. I filled in the edge gaps with some hot glue also and this will protect the wires from getting pulled on. Make sure all your wires are connected correctly by plugging in your Gemma and making sure the screen still turns on. I also used some small zip ties to keep my wires in some order. Next, because the battery I chose was a little bit larger than the project they have on Adafruit, I decided to have it on the back. If you did choose to use the 150 mAh battery that they suggest on Adaruit, you probably could just have all three of these pieces together and be small enough but with the 500mAh I wanted it to be a little smaller where the LED screen was. I had to cut the two pin jstph connector on the back of the battery so that I could extend the length of the wire. Carefully measure out your wire because this will be part you've been wanting to give enough room for yourself to put it over your head. Make sure to put the shrink wrap tubing over the wire before you start soldering otherwise you might have to cut the wires to put the shrink wrap on afterwards. I also threaded a third blue wire to connect to the mounting holes on the LED board. I wanted to make sure not to put any extra excess stress on the power cable when the necklace was hanging. I put the heat shrink tubing all along the length of the wires and then down towards the Gemma I pulled it back and there I was able to solder the wire to the two pen connector and this is what we'll use to plug into the Gemma. Now it's time to play with some fire! Carefully heat the tubing so that will hold tight to the wires. You don't want to heat it too much or you'll melt it, but just enough heat for it to shrink around the wires and give it a good seal around the solder points. It will hold the wires in place. Finally, plug in the battery and you've got yourself some wearable tech! A couple of notes are this battery will not charge through the Gemma. you have to have the power cable unattached and use the USB adaptor to charge it separately. Also do not get it wet and do not feed it after midnight! If this is intended as the ultimate geeky Valentine's gift make sure to upload the heart animation that I custom did or make one yourself.
Fr. Robert: Wow! So okay, how much time did that actually take to build the program to create?
Brian: You know, I'd say it would take you an afternoon to do. It's got a little bit of everything. It's got soldering involved, it's got programming involved, but it's not overwhelming. It's relatively simple if you know the basics of soldering, the basics of a little bit of programming. Most of it is just copy and paste stuff and download a program. So not too difficult. Probably six hours or something like that?
Fr. Robert: It could take longer if you want to increase the scope of the project. That's what I like about this. I know you showed me the compilers screen and it's interesting because if you've been watching our other show, Coding 101, you'll know what those functions do. And you can start messing with them. I know one of the things you wanted to do was make it a loop internally instead of 255 times.
Brian: Right. That's one of the limitations, the 255 times, depending on how long your animations are - it lasts about 30 minutes before you have to reset it and hit the button.
Fr. Robert: That's not bad. Yeah, I think that's just a memory thing with these small devices. They are not general purpose computers. They don't have gigabytes of memory. So it is designed to do one thing and do it well for a short time.
Brian: I'd say for any of our veers watching, if you haven't watched Coding 101 and you do watch those episodes it does help out if you want to do a bit of your own animations and stuff like that.
Fr. Robert: Brian, great first project. It really shows the spirit of the Know It All, but you know what else it does?
Brian: Um… tools?
Fr. Robert: IFIXIT. Now we here on Know How are all about Tools. Pretty much every project that we ever do requires some sort of specialized tools. You need drivers that can open up the cases that have specialty screws. You need spongers so that you can spread cases from Apple devices and you need all these things in one kit so that you know that that is your go to tool bag whenever you are going to be doing some Know How wisdom. That is why I'm happy to welcome IFIXIT to the Know It All crew. Now IFIIXT is the free online repair manual for everything. Their free step by step repair guides are fool proof instructions to fix all of your stuff. If you've shattered your iPhone screen, if you need to repair your game console or swap the battery on your Galaxy S3, IFixIT has you covered. They have 1000 repair guides for everything from electronics like your smart phone, table, and game console to your home appliance, clothing and even your bike. They can even hook you up with the parts that you'll need to fix it and everything they sell is tested and guaranteed. IFIXIt also makes the most trustworthy repair tools for consumer electronics, including the Protect Tool Kit which Brian is playing with right now. This tool kit has 70 tools to assist you with any mod malfunction or misfortune that may come your way The tool kit is the gold standard for electronics work from garage hackers to the CIA and FBI. But more importantly their unique tools are used by repair technicians everywhere. They include their 54 bit driver kit with 54 standard specially and security bits as well as Philips bit, pentalobe bits, torques and torque security bits, try wing bits and triangle bits. That's right the triangle bits for the McDonald's toys. If you've ever gotten a Happy Meal kid and wanted to hack that toy into something useful, they've got you covered! They also include the swivel top precision driver and the flank extension for hard to reach screws. If you've ever had one of those gadgets that includes fasteners in a corner you can now sue this flex adaptor to down in there without having to put the entire screw driver into the cavity. They have safe precision tweezers for delicate manipulation and an an anti-static wrist strap that keeps your devices safe from accidental static discharge. They include nylon spongers and metal spongers and plastic opening tools for prying and scraping as well as likely compact durable tool rolls that make it the on the go choice for repair professionals and ammeters alike. The tool kit is only $64.95 and it is backed by a one year warranty. Obvious and home DYI fixers also use the protect tool kit for door knobs, eye glasses, cabinet doors, sink fixtures and more. If you're looking for a great addition to an artist or hobbyist tool chest, look for further. Best of all, if you go with IFIXIT kit there are thousands of free IFIXIT guides to help you put your tools to use. So here's what we want you to do. Here's what we want to give to our Know It All's. With IFIXIT you can fix it yourself. So visit IFIXIT.com/twit for free step by step guides. IFIXIT also sells every part and tool that you'll need plus if you enter the code KNOWHOW at checkout you'll save $10 off for any purchase of $50 or more. That's IFIXIT.com/twit and use the code KNOWHOW. And we thank IFIXIT for their support of Know How.
Fr. Robert: Now I know we both use this pretty extensively right?
Brian: I think about every project I've ever done, like taking apart the NES, and mostly the spongers to break things open, it's so much easier.
Fr. Robert: Now one of the things I really like about this is that I used to have like four or five different tool kits I would bring out whenever I had to do a big project. But now everything is in one case. Now Brian, last week we did a segment on FreeNAS. Specifically on why you would want to use a flash drive and then we also did a segment on hard drive recovery where people wondered if this was really a hard drive burrito. It really is. I've been using this technique for years and years and years and it has shown pretty good results. Let me tell you one thing about the burrito though. I think not enough people understood me the 10 times I said it in the segment and that is if you're going to do this to a drive this is the last thing it's going to do. If you wrap it up in this burrito and you put it in the freezer it will keep condensation from forming before you get your data off but just assume that the drive is dead. This is actually still working - it is working just fine but because it has gone through that treatment I'm never going to trust it with data again.
Brian: This isn't the first time I've seen something like this. I did this with my Xbox 360 when it first died. It lived for about an hour but as soon as the power died, it was gone.
Fr. Robert: Exactly, right? You get that one good spin up, it lets you get your data off but just assume it is not there. The most expensive thing on your hard drive, is not the hard drive.
Brian: It's the data.
Fr. Robert: It's the data right. If you lose the data, that is trouble. So please use the burrito once.
Brian: It does look delicious though.
Fr. Robert: Yes it is. Although I have heard it also referred to as a data diaper. I don't like that. This is a hard drive burrito. Remember that. Alright now let's get to the quick tip of the day. Again, FreeNAS related. People have asked, "Well Padre why were you suggesting that we use the Weston Digital Raid", which is a drive that Western Digital makes specifically for NAS? You can seal all of them here if take a look at my product shot. This is the red series, this is the green series and this is a c gate Barracuda 702 rpm 1.5 gigabyte drive. These are drives that I've pulled from from NAS. From network attached storage boxes. Boxes that I have in my own network. Now Brian, these look like every other drive that you've ever used right?
Brian: Yeah. Same form factor. I've used the greens before. I have blacks in my home computer.
Fr. Robert: Exactly. Blacks are really high performance. Here's the thing and this is the reason why we were suggesting that you use a Western Digital Red in your FreeNAS. These drives are pretty much equal in terms of how you install them. But they differ greatly in performance. The Barracuda is faster than the green, which is faster than the red. The power differential is also bigger. The Barracuda pulls the most power followed by the green, followed by the red.
Brian: So the red is actually less than the green now? Wasn't that what they used to market was that the green was the low cost?
Fr. Robert: Absolutely, but here is the thing. When you are dealing with NAS, it's really all about the heat. We've got a little video that Patrick is going to roll right now that is going to show you what happened when I started looking at the temperature differentials of these different drives. I took a standard fluke probe and I took a look at how much heat these were generating. This was after one hour in the open air. The Barracuda was dissipating 90 degrees of heat whereas the green was hovering around 85 and the red went all the way down to 75 degrees. Now I know that doesn't sound like a lot Brian, but remember when you're dealing with these drives, the problem is NAS is stacked up like this…
Brian: There's not a lot of air flow in there.
Fr. Robert: Exactly. Look at this. If you look at the product shot this is not a NAS box but this is how you can expect your NAS drives to be stacked up. So if I'm using these Barracuda drives, if I'm using these Cgates, I'm not running at 90 degrees I'm running at like a 150 degrees especially if there's no air flow.
Brian: And over time that is going to wear on the hard drive.
Fr. Robert: Exactly and that is why we recommend the reds, because running at a lower temperature and drawing less power means that they are going to generate less of that heat bubble and that means longer longevity.
Brian: And that is what you want from four drive.
Fr. Robert: That is what you want from your drives. The other thing people said, was, "Well
Padre, the performance on a Western Digital Red is not nearly as good as a
Western Digital Black". You've got a
black right?
Brian: Right. But I use that for my home desk top. What I run games off of, my Windows 7OS.
Fr. Robert: And in that instance you do want the best performance possible. On NAS it is slightly different. If you're running six drives which is what this is - a six drive array. The aggregate speed will actually max out the ethernet connection so even through that they are much slower than these Barracuda's or your Western Digital black it's not going to slow down the overall performance of the system.
Brian: Nice. And I imagine that's not something you would be accessing all the time, streaming data back and forth or would you be doing video on them and stuff?
Fr. Robert: Yeah, it really depends. I typically don't do video over the network. I do on some of my projects where I just need a little bit, but if I'm going to be doing anything for a serious project I'll copy it over to my local drive.
Brian: You just want something to be backed up.
Fr. Robert: Exactly. Now something else that we need to look at and people have asked in the question section of our community is all about SSD's. They wanted to know, "Well Padre, what about SSD's. Could we install SSD into our FreeNAS and get crazy performance"?
Brian: Yeah. They are low heat.
Fr. Robert: Low heat. Very low power. The problem is, no.
Brian: They are expensive.
Fr. Robert: They are expensive so you are not going to get as much capacity. The big thing has to be the fact that, again, you're doing to be maxed out by the interface of the NAS. Right? You've only got a GB connection, maybe a 2 GB connection if you bought it. Maybe a 10 GB connection if you got really, really fast network speeds, which you probably don't. So the speed of an array of SSD drives in a NAS - no good. Where it does make a difference…
Brian: I use it in my desktop. That's where I would want them.
Fr. Robert: We've seen them from Kingston before, if you go to my product shot we've got images that we'll put into the finish show, of Kingston running these in an 8 array inside of a local box. So they had 24 of these in a performance array, a striped array in a box that was designed for speed. I've got to tell you in that instance because it has local access to the mother board it is crazy fast.
Brian: I'd like to play with that!
Fr. Robert: I would too! Hey, Kingston. Do you want to send us about 24 high speed SSDs? Let's make that happen!
Brian: We'll find a use for them. We could so something with them!
Fr. Robert: Brian, you made us a nice little Valentine's gift in the shape of a gobble man - what was that called?
Brian: Gobbler.
Fr. Robert: Yeah, Gobbler. But I wanted to do something a little different. Maybe for the ladies in the audience who want to build something for their geek boyfriend or husband. Now you know what this is, right?
Brian: Antennae?
Fr. Robert: Yes, it's a wifi antennae. the nice thing about an antennae like this is that it's designed to give you increase insensitivity in one direction and increase isolation in one direction. In other words, rather than being like this - this antennae will spread wifi energy in 360 degrees, it's directional. Which gives us better sensitivity, better RF directionality, which means better performance and most importantly, better distance. Have you ever had a problem with wifi?
Brian: Constantly. Especially on opposite ends of my apartment. Where the cable comes into the house is in the front and whenever I'm in the bedroom you can't use the wifi hardly at all.
Fr. Robert: Let me guess. you've probably got your wifi access point against the wall right? Do you have anything on the other side of that wall?
Brian: A couch?
Fr. Robert: A couch, well wouldn't it be nice if you could take all the energy that was being wasted on that dead wall and instead direct it in the area that you actually lived.
Brian: Are you going to show me how?
Fr. Robert: I'm not going to show you how. But you know who is?
Brian: Who?
Fr. Robert: Your brother!
Brian: My brother??
Fr. Robert: When you're building a cantenna, there are a few parts that you are going to need. The first piece is this. A female anti-connector is what is going to allow you to put the antennae rod inside the can. The second piece is this, some heavy gauge copper wire. This actually should do just fine. You're also going to need a pigtail to connect the anti-connector to an adaptor and an adaptor that supports an external antennae. The last piece is the can. Now ideally you want something that is 3.5 inches wide and is close to 5 inches long as possible. Unfortunately those dimensions are really hard to find in the real world so I've gone with this clear broth soup can. What I like about it is that it is plenty long and because it is clear broth it's easier to clean! You're going to have to open it up and clean it out but of course we here at Twit TV hate to waste things so I've tasked Greg here with helping us to consume all the broth!
Greg: Padre, do you want to untie me?
Fr. Robert: We tried that, Greg, remember? You kept trying to run away. You can't be trusted. Once you've emptied and washed the can, measure the diameter of the container and then plug that number into the cantenna calculator linked in our show notes. The calculator gives us two important pieces of information. How far from the back of the cantenna we need to drill our antenna port and how long our cantenna should be. Anything over 4 inches wide is really too big but it makes it easier for us to show you the steps. Mark off the antenna port location on the can. You should also mark off the approximate size of the antennae flange. You want the flange to fit easily through the hole but you also want the hole small enough to be able to support the connector. To do this project you're going to need a few tools. You'll need a power drill and some drill bits of varying sizes. you're also going to need some steel files so you can remove the rough edges and the sharp corners as well as a soldering iron and some solder. Of course we are working with power tools so we need to have safety goggles. I've asked Greg to help us with this little drilling project. Now Greg, we're all about safety so remember, Safety First.
Greg: Are we going to use a clamp or something?
Fr. Robert: You know what, Greg? We probably could. Drill a pilot hole at the mark that you previously measured, starting with a pilot bit and gradually moving up to a larger bit. You want to make the hold large enough to just barely fit the mounting flange of the N-connector. Once the hole is large enough file off the the burrs and the sharp edges. Clamp the N type connector and then solder approximately 2 inches of copper conductor into the receptacle. You may need to sand the eyes of the conductor to guarantee a clean solder joint. Measure off 1.21 inches on the copper conductor and then snip the conductor to the proper length. You can now choose to hot glue the N-connector into the cantina or use four self tapering screws to secure the connector. Give the can a rough sanding if you plan to paint it. Technically you are done. Your can will work. But I would suggest you give it one light coat of paint to protect it from the elements. Greg, could you make sure that this gets painted?
Greg: Yeah. So I was thinking. Should I wear a respirator and do this in a well ventilated area like outside maybe?
Fr. Robert: You know what Greg? Yes, you should! Yes, you should!
Fr. Robert: With this kind of antenna design, you could expect between a 6 and 12 decibel increase of RF sensitivity. Not only that but you will get an increase in the amount of RF directionality, which means that if you were to say, oh I don't know, climb the top of a tall antenna or a tall building you could shoot a wifi link for miles. Won't that be fun, Greg?
Greg: Please, please no.
Fr. Robert: That's right. Freaking science. What I like about this design is how cheap it is. something like this isn't that expensive you could buy a good directional antenna for $20 or $30 but I can make this entire project, including buying this connector and this spool of copper wire for something like $5.
Brian: Most of this stuff it seems like you might be able to find at home.
Fr. Robert: Exactly. If you've got copper wire, if you've got cans then you really don't have to buy anything. And it will do in a pinch. Now one thing I do have to say is that you mentioned during the break….
Brian: So this is like some kind of hard plastic and I imagine so it's water proof?
Fr. Robert: Yes, it is water proof.
Brian: So you could mount this outside?
Fr. Robert: Yes, You could actually do that to this. But give it a coat of paint to keep it from rusting and then you have to wrap the connector inside with electrical tape.
Brian: Because it is copper.
Fr. Robert: It is copper and the RF signal, the 2.4 GHZ signal, goes through.
Brian: It goes through electrical tape no problem?
Fr. Robert: And it will keep it nice and fresh and it won't rust out.
Brian: Leave it outside and forget about it. Cool.
Fr. Robert: This is something hat you should try with smaller cans. As I mentioned in the video this is actually too big. This is 4.5 inches and that is on the outer range of what is acceptable for 2.4 Ghz signal. If you can they have the old style Stag Chile cans which are about the same height but they are 3.5 inches wide. Those are incredibly rare! So if you happen to find those, buy a lot of them even if you don't need them.
Brian: For your antenna projects!
Fr. Robert: Now one thing we will do in a future project; you can see I have this attached to a pigtail. This allows me to hook up the cantenna to an adaptor. This is just a standard wifi USB adaptor and so I can plug this into my computer. We're going to shoot a link, a couple of miles, using nothing but cantennas.
Brian: A couple miles?
Fr. Robert: A couple miles! Won't that be nice?
Brian: Think you could shoot it from my home to here?
Fr. Robert: Actually, that's not a bad idea. I think we just…. "Hey Greg! We need you to climb on top of the roof".
Brian: He's used to that stuff.
Fr. Robert: He does it all the time. Oh and by the way folks. If you want to make one of these projects at home, I would suggest you take all the necessary safety precautions. Including not doing it without Greg. Just email us and we'll send him to your home.
Brian: We'll probably get an aerial drone to drop him off. He's used to heights at this point.
Fr. Robert: So, folks what I'd like now is to say thank you very much to Brian Bernett for stepping in as Co-host. I know this is kind of daunting. But how do you feel?
Brian: I had fun! And I learned a lot too. When I'm the one pushing the buttons on the camera I just kind of tone you out and don't really listen that well.
Fr. Robert: Because normally when you are on the tri-caster it takes a lot of time to get it done right.
Brian: Yeah. Patrick. I have to give Patrick a hand. It's not easy to do that. He's doing a good job.
Fr. Robert: But I think that concludes our Valentine lesson for the Know It All's. You know, if you want to find out anything about the projects that we've done, if you want to find the steps for your Adafruit necklace or find the steps for my cantenna just go ahead and jump to our show notes page. Where is that Greg?
Brian: Greg?? Thanks, Padre.
Fr. Robert: Sorry Brian.
Brian: I know it's easy to get those Bernett's mixed up. You can find the show notes on twit.tvkh and you do great show notes and so I'm going to try to keep up the good work by giving the folks some details.
Fr. Robert: We have the best show notes in the DYI industry. We really give you the step by steps. If you want to know how to do this project, just follow those steps and you can make your own.
Brian: And even if our show notes aren't that great, we have an awesome Gplus community. And everyone out there who is involved in that talks to you because most of the time when I go through there and someone has a question somebody already jumps in and answers it for me.
Fr. Robert: That is what is nice about that community. It is so active. It's not just us in there answering questions.
Brian: Some cool ideas too.
Fr. Robert: We get the other Know It All's to answer your own questions. A nice community. Almost 6000 people. Go ahead and check it out. You will be able to get there by Gplus.to/twitkh. Right now I think there is something wrong with the link shortener but if you can't get into it, just search for Know How and we're the only community there. Finally we've got twitter addresses that you could reach us at if you want to talk to me you can find me @PadreSJ and what about you Brian?
Brian: I would be @Cranky_Hippo.
Fr. Robert: I think that about does it. So now that you know…