Know How... 122 (Transcript)
Net Casts you love from people you
trust. This is Twit!
Leo Laporte: Hi, this is Leo Leporte and if you’d like to help us
design a new website I invite you to visit twit.to/navtest.
We’ve got eight quick questions we would like to ask you that would help us
make the navigation easier to use. That’s twit.to/navtest.
Thanks a lot.
This episode of Know How is brought
to you by ifixit. You can fix It is an iFixit makes it easy with free and easy step-by-step repair
guides, high quality replacement parts and all of the tools you will ever need.
For $10 off your purchase of $50 or more go to I fix it.com/twit and
enter the code know-how at checkout.
And by squarespace. Squarespace recently launched their latest version of platform squarespace seven. Which has a completely redesigned interface,
integration with Getty images in Google apps, new templates and an incredible
feature called cover pages. Try the new squarespace@squarespace.com and enter the code know-how at checkout. To get 10% off.
On this episode of know how the
future in one word; plastics. Also fixing your Wi-Fi again
and quad copter integration.
Father
Robert Ballecer: Welcome to know how it is the twit show where we
build, bend, break and upgrade. I’m Father Robert Ballecer.
Bryan
Burnett: And I’m
Bryan Burnett.
Fr.
Robert: And for the
next hour or so we are going to show you some of the projects that we’ve been
working on so that you can take it home and be a weekend warrior geek.
Bryan: That’s right. You can surprise all
your other geek friends with the knowledge.
Fr.
Robert: You can
fill their knowledge holes with your no hole knowledge.
Bryan: That’s right. Be afraid.
Fr.
Robert: But before
we get to that, we got a little science here. A little
engineering.
Bryan: So this is a pretty cool story that
you picked up because 3-D printing is pretty big, it is getting more and more
popular. But now we are going to space.
Fr.
Robert: The promise
of 3-D printing has been the ability to fast prototype things. As long as
you've got the design and you’ve got the raw materials you could create
something. Maybe a part that you need. Well, there are
a couple of things that are in the way of having that be really possible
because the materials aren’t yet as strong as we need them to be.
Bryan: There was a question a few episodes
back where someone asked if they could 3-D print props for quad copters. But
you kind of need those to be a little bit more structurally sound.
Fr.
Robert: You could
probably 3-D print the frame for a quad copter but the prop? They undergo so
much stress when it is spinning around at thousands of times per minute it
would just disintegrate. However, thankfully we’ve got a space program because
they are taking 3-D printing to a whole new level. This story comes to us
straight from NASA. Just two weeks ago, right before Thanksgiving, the day 3-D
printed their very first part on the international space station. Now the print
is the results of the international space Station 3-D printer project, it was
from NASA’s Marshall’s base flight Center. Now the printer was created by a
California-based company called made in space. I think we have a video that we
can play that shows what they are using. And the kind of
setup that they've got. Because obviously 3-D printing
in space is a little different. No gravity.
Bryan: You've got to take that into
consideration.
Fr.
Robert: You've also
got to worry about uses flying off into the very confines of a space station.
They’ve got this set up that uses a very nice, very precise printing head. Along with the sealed environment. They set this thing up at
the beginning of November, it was installed November 17 and they did their
first test page on November 17 and they sent the images from that first test to
the ground. Now the ISS 3-D printer team looked at the data and they sent back
in structure and student IIS as to realign the printhead.
Which we both know is calibrating.
Bryan: And it is a pain in the butt.
Fr.
Robert: Oh my
goodness, yes. It is horrible. Now the second test was done on November 20 and
the results were actually good. Everything lined up. So on November 24 round
control the Senate demands to the printer and it created a spare part for the
3-D printer.
Bryan: That is cool.
Fr.
Robert: Now this is
very cool science because they are finding out that trying to 3-D print in very
near zero gravity and trying to do it in a place where you have to worry about
any remnants wandering off into critical components of the ISS. There are some
challenges that they had to overcome so that technology will eventually make it
way back into our printers, which is awesome.
Bryan: That’s not the first time that
space reaches has trickled down to other cool things. But I thought it was
pretty interesting that they mentioned in the article that it actually bonds
better in space.
Fr.
Robert: They
totally didn’t expect that. They thought if anything it would be hard to
compress the layers. Because here we rely on gravity to pull
the layers down against each other so that you get a strong bond. They
found that in 0G the part was actually sticking to the tray. They had trouble
getting it off the tray because in microgravity, the AVS actually bonds are
stronger. So you could make much stronger parts in 0G then you can in regular
gravity.
Bryan: Right. And it seems to me that
having a 3-D printer in space or on the space station would be pretty handy considering
if you break something or you need a part for something you are probably not
going to get another one sent up anytime soon. So having something like that on
hand would help a lot.
Fr.
Robert: I see that
as a act of progression.
You’ve go from a place of necessity, a place like the ISS where they are
isolated. And a spare part is going to cost you a couple million dollars
because you have to put it on a rocket. So it is obvious that they are going to
want the ability to make a part, a fine part. Even if it is not the same
strength as the original part it can be something that will make do until you
can get a part. But once you've got that technology down and it is trickling
into the printers that we can actually buy and make ourselves, then you get into a situation where it is not just places
where you absolutely need it but places where you just want to quickly. Or, the
dream is to make a self-sufficient community. Where you don’t
have to have that 10,000 mile supply chain. You don’t have to buy the
part from China you just get the design and it prints.
Bryan: The problem that I am experiencing
right now is ordering a part for my drown. It is
shipping from China and I saw it say that it was shipping January 15. And I
thought that can’t be right. It must be December 15, but no it was January.
Fr.
Robert: I’m sure
Amazon will beyond this. You get to the point where you buy the design and then
we will print it over here.
Bryan: Or the self-replicating 3D
printers. A 3-D printer that builds a 3-D printer.
Fr.
Robert: You’ve gone
too far Bryan. Now, let’s go ahead and talk about something that is a little
easier than 3-D printing. Because both of us have played with 3-D printers
and…. they can be frustrating. It is not just a lining. Imagine this. Every
time we wanted to move the 3-D printer, if you move that you’ve got to realign
it, recalibrate it. Otherwise the printhead will be
off and nothing ever lined up right.
Bryan: Something always seemed to break.
Fr.
Robert: And even if
you got it perfectly aligned and you never moved it, a lot of the software is
not super user-friendly.
Bryan: I worked with a lot of AutoCAD and
Solid Works and it still wasn’t any better.
Fr.
Robert: Well how
about this. Would you like the ability to fast prototype stuff but without the
3-D printer? How about just by using your hand as lumps of clay? We got
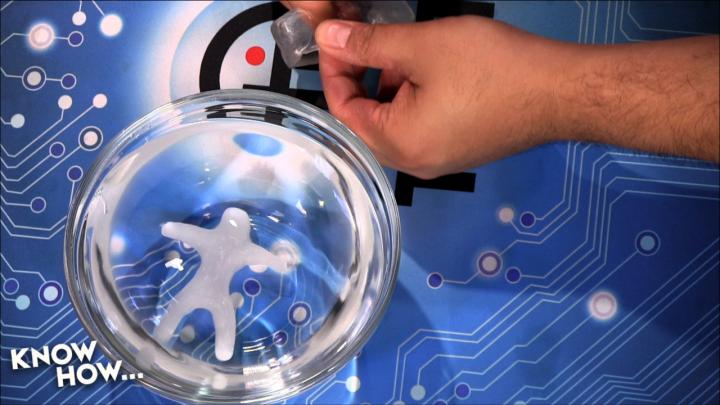
something for you. This stuff is called Instamorph.
This is 34 ounces of it and you can buy it on Amazon for about $40. This has
become very popular in the modeling community. The idea is that these plastic
pellets soften up when you expose them to hot water, temperatures of 150° or
more. And then you can mold it. It becomes like clay. It is malleable. Here is
a demonstration. Here is some hopefully hot enough water, we are going to take
some of this Instamorph and pour it into this water.
What is going to happen is that you are going to start to see it turn
transparent it will go from white to this clear color. And when it becomes the
clear color it means that it is ready for you to mold. The cool thing about
this is that you can use it like clay. Once it becomes malleable you can cut
it, you can squish it, you can scratch it and you can form it into any shape
that you need in order to make the form that you are trying to make. This is so
much faster than 3-D printing because it is no longer, I have to make the design and then print it and then re-print it when the
design is not right. It is like kindergarten.
Bryan: As long as you are good at making
clay things.
Fr.
Robert: I’ve got
one that we started a while back, it might actually have cooled off but I don’t
know. Let me see. We’ve got to drain the excess water. You take this and start
molding that.
Bryan: Whoa. That’s crazy. Ewww.
Fr.
Robert: It will
start becoming like a putty. This is a little too cold, we didn't quite get it up to the operating
temperature. But the nice thing about this is that you can cut it, you can
slice it, you can squish it. And I have seen some absolutely
gorgeous designs made with Instamorph. some people use it for masking. What you do is you make a
mask of someone’s face and then you can mold what you want on the outside. It
is great for cause play because you can get…
Bryan: It really does feel like clay. But it
doesn’t break apart as easily.
Fr.
Robert: Exactly.
And that’s not even at the right temperature so that is still a little bit too
cold. But when it cools down… oh wait we have more hot water coming in.
Bryan: I think Alex knows what I’m making
right now. We used to do this a lot in elementary school.
Alex: And in high school.
Fr.
Robert: Okay that
did it. See that is what it should look like. All
transparent. Very clear. Now with this
material, here is the best part. If I put die into this water it would take the
color of the die. So you can dye colors into this thing if you want to do color
designs. And you can cool it off. So if we had a tab of water you could flash
cool it. Or you could use a heat gun if you need to
just get a bit more.
Bryan: Can I dip it back in the hot water?
Fr.
Robert: You can
recycle it, so if your design doesn’t work out just go ahead and put it back
in. This is great. I can do this now.
Bryan: What are you going to make?
Fr.
Robert: A cross.
That is what I do. That is my deal. Mine is good. Ouch. Mine is hot. Show them
your design.
Bryan: This is pretty easy to make
actually. If you have any experience messing with clay, like I have done a lot
it is pretty much like that. It is so cool how it sticks together so well and
it feels like plastic. It has that smooth texture to it.
Fr.
Robert: If you like
it you should have put a ring on it.
Bryan: What is that? Is yours that much
clearer because…..
Fr.
Robert: When I was
a kid I made a lot of ashtrays. It started as something else and then ended up
as an ashtray. Here is the issue though. Instamorph is great but if you have no creative skills it is still going to look like this
versus that.
Bryan: I’m going to start making some
stuff with this. So is yours this much clearer because it is still hot?
Fr.
Robert: Yes. As it
gets colder it is going to get more and more opaque. And eventually it will
become stiff. This is still pretty easy to move, but if I were to put it in my
drinking water it will cool off. It actually becomes hard plastic. People have
made chassis for quad copters along with face masks. A essentially anything that you want to make available the shape or that holds an
edge, Instamorph is perfect for it. It is cheap
because the idea behind this is that once you are done with your design, if you
don’t like it you just put it back in the hot water and it will turn back into
this opaque stuff.
Bryan: I guess that is one thing you have
to be careful of though. If you make a quad copter frame out of it and it gets
too hot?
Fr.
Robert: It turns
back into modeling putty at about 150°. It starts to soften at about 100°. So
you do have to be careful. But you have a lot of time to model. See we could
still stretch this thing out.
Bryan: Padre, your creativity is showing
up.
Fr.
Robert: You could
make orthodontia bite plates with this stuff. Patrick Delahanty could make baby groots face with this stuff.
Bryan: And if you had a mold you could
just press it in to a mold and then pull it out.
Fr.
Robert: User 2422
says “how many times can it be used”? It is endless. It Doesn’t lose any of elasticity. The worst thing that can then is that it gets dirty. If
you happen to heated up when it is covered in filth that stuff is like Clay is
sticks. But you can always add new virgin material to increase the strength of
it if it is a little sticky or tacky. I use the same bits of Instamorph over and over for probably two or three months. I
have a little holder on my computer for a camera because I want to keep it at a
certain level. And I made it out of this. So, if you want to do some fast
prototyping or 3-D printer set up this is a very good alternative because it is
cheap, super easy to work with and it is pretty much good for all occasions.
Bryan: Especially if you don’t have a
drafting background or you are not used to extrude in models and making a 3-D
thing. But you have worked with Clay and you just want to make something
simple.
Fr.
Robert: If you like
to work with your hands. If you are a visual person this is a better medium
because unlike a 3-D printer where you have to have everything finalized before
you start printing, you can change the design as you go. In fact when I have
seen some more advanced 3-D printer guys do is that they use something like
this to make the first design and then they will either 3-D scan it or they
will draw their CAD from that design. So they can get the final version on the
3-D printer.
Bryan: Mine is getting harder.
Fr.
Robert: It will get
harder and harder until it becomes like hard plastic. It will become the same
consistency as these beads. If you feel this, it is going to end up this
strength.
Alex: Bryan, can we see your guy?
Bryan: See?
Fr.
Robert: So this is
something that you did a lot?
Bryan: I was wondering if you would find
those pictures. Yep that was actually in my drafting class. Back
in high school. I have a lot of practice at making these old guys.
Fr.
Robert: The longer
that you play with it, the harder it gets.
Bryan: That’s terrible.
Fr.
Robert: You know, this is why we can’t have nice things. This is a great
thing to have in your toolkit. It is something that you should have on your
shelf if you are any sort of DIYer or maker. It comes
in as handy as my modeling clay and duct tape. You know what else is really
good to have in your DIY kit?
Bryan: Something that you can use to fix
stuff?
Fr.
Robert: I’m
thinking fixing things with proper tools.
Bryan: That makes all the difference. It
saves so much time and frustration. I’m thinking of iFixit when we are talking about that.
Fr.
Robert: I think so.
Bryan: I’m also thinking about the wide
that I had to take apart and all the little screws and how there are magnetic
tips on the end of the iFixit kit. Is it out here?
Fr.
Robert: Exactly. IFixit is the place to go when you want all those special
drivers in order to get your gadgets and your gizmos open so you can fix them.
Now you know iFixit from their tear down on the
iPhone six and other gadgets and now you will fall in love with their line of
professional electronic tools. iFixit’s tools are designed by the teardown engineers who have torn apart hundreds of
devices and built thousands of repair guides. They know what it takes to work
on gadgets and this holiday season they want to arm you and everyone on your
list with the right tools that you need to tackle electronic repair work. Or to hack. I fix it offers the perfect one-two punch, the ProTech toolkit and magnetic
project management. With these you can fix just about anything and stay
organized while doing it. Right now I fix it is offering both the special
holiday bundle for only $74.95. The Pro Tech toolkit is 70 tools to assist you
with any mod malfunction or misfortune. It is the gold standard for electronics
work used by garage hackers and the FBI. More importantly their unique tools
are used by repair technicians everywhere. It includes iFixit 54 bit driver With 54 standard specialty and security bit. Swivel top precision
drivers, flex extensions for hard-to-reach screws, ESD precision tweezers,
nylon sponges, and metal sponges, plastic opening tools, it is lightweight,
compact and it comes in a tool role that makes it the on the go choice for
repair professionals and amateurs alike. High BS and home DIY fixers also use
the ProTech toolkit for
doorknobs, eyeglasses, doors, sink fixtures and more. Now this magnetic project
Matt, both of us have gotten a lot of use out of it. It allows you to take the
screws out and label them so you never forget where they go. It is an original iFixit invention that lets you organize your repair work.
The magnetic surface holds tiny screws, it is safe for hard drives, the dry erase surface lets you draw your instructions so you
will never lose another screw again. Now, iFixit has
something for every DIY, hacker or geek on your list. Head on
over to iFixit.com/twit to check out their holiday deals including the ProTech toolkit and magnetic mat bundle for only $74.95. And when you enter the
code know-how at checkout, you will save $10 off any purchase of $50 or more.
That is a iFixit.com/twit. And use the code know-how at check
out. And we thank iFixit for their support of Know
How.
Fr.
Robert: My plastic
is no longer soft.
Bryan: What is it? A
terrible onion ring? You got an A plus for effort Padre. In This is the saddest thing I’ve ever seen.
Fr.
Robert: Now, you
know we’ve been doing project quad for the last couple of weeks. And we've been
doing it the long way. There are a lot of people that say why don’t you just get to the building. This is the thing that
both the virus feel very deeply about.
Bryan: I was in the same boat and it
didn’t work out so well for the DJI.
Fr.
Robert: And that is
actually the problem. You have a lot of people who are buying high-performance
drones, high-performance quad copters. They don’t know how it works, they don’t
know how it flies and they end up crashing or what really bothers me is they
end up doing stupid things with it.
Bryan: Or hurting someone.
Fr.
Robert: Right. Like flying it up to 4000 feet in air traffic. Above the cloud level. That is just not the right way to do
it so what we have been doing is we’ve been giving you the slow approach so
that you understand all the tech that goes into the quad copter and then we are
going to teach you how to fly it responsibly so that you would be a quad copter
expert rather than just a quad copter amateur. But now it is time for my
favorite part. It is integration.
Fr.
Robert: For our
integration tutorial we want to build that everybody could do. That meant no
soldering, the simplest and strongest frame that we could get. A flight controller that did need a computer for programming and
all the little knickknacks at an affordable price. We decided on the FVP
250 from Hobby King because it is a decently priced kit that includes all the
hardware that you need, except for a flight controller, radio and battery
charger. Still, the overall procedure that we are going to
give you work on pretty much any set of hardware. Like this to 30 class
quad that I made mostly with parts from ready to fly quads.com. Once you are comfortable with soldering
and feel competent enough to choose your own parts you can use these steps to
assemble any size of quad. In the box for the FVP 250 you will find a one-piece
glass fiber body with detachable landing struts. Four multi star 1704 motors, a
set of 5.3.3 propellers, four afro version 3 twelve amp speed controllers, a
power distribution harness, a 1000 ml amp Turnigy Lipo battery, servo leads and the hardware for a FVP mount.
To complete the build you will need a 4 to 6 channel radio, a flight
controller, and a battery charger. We chose a fly sky T6 radio, a KK .1.5
flight controller and an imax v6 lipo charger. On the tool side you will want a
small Phillips screwdriver, a set of Allen wrenches to tighten the hex bolts, a
tube of Lock tight glue, zip ties, and some snaps. Since this is a Moto frame
assembly is easy. The first step is to run the included Velcro strap through
the slot at the bottom of the cage at the center of the frame. This strap will
be used to hold batteries, wires and other equipment to the bottom of the quad.
Next up is the flight controller. Our KK goes into the cage to protect it and
keep it at the center of the combined rest of the moderates. When installing
the board, make a note as to which way you want to be the front of your quad.
With this frame, the front of the quad is typically the shelf with the cutout
for the FVP mount. But as we are not using the FVP in this build, forward can
be any direction. As long as we know which way we are building. This is
important because flight controllers need to be pointed in the right direction
in order to control the craft. On the KK the buttons are always towards the
rear of the quad. But all controllers will have some way to tell which way
should be pointed forward. Four screws secure the controller and a roll cage
gives it a measure of protection in the event of a crash. The landing struts
are friction held on to the end of each arm so that you can put them on and
take them off during construction as needed to gauge clearance. Once you are
done with integration little dab of CA can keep them from vibrating free or
popping out after hard landings. The kit includes four multi-star1740 1900 KV outrunning
motors that mount directly under the frame with the included M2 6 mm bolts and
washers. It is very important if you ever need to replace the bolts that you do
not use the bolts that are too long. In this case longer than 6 mm. Longer
bolts risk penetrating too far into the can and making contact with the
windings destroying the motor. Before you install the bolts, dab some Loctite
blue onto the threads. You need only a very thin film towards the bottom of the
bolt. The Loctite will keep the bolt from vibrating out of the mount, while
allowing you to remove them when needed. Do not use Loctite red as that will
effectively fuse the bolt to the motor. With the motor is mounted it is time to
get wired up. The frame uses a honeycomb lattice and I prefer to keep my wiring
neat by dropping the motors through the bullet connectors so that I can keep
the top clear for the ESC’s. All of the following instructions will assume that
you were looking at the KK board with the buttons towards the bottom. You will
see two rows of 3 pen headers to the left and right of the board. The radio
receiver leads will connect to the left while the ESC leads will connect to the
right. The kit includes three servo leads which will allow you to connect five
panels between the receiver and the KK flight controller. I know that sounds
strange but you only need the full three pins connected for the first channel.
One pen provides the signal for Channel one. While the other
two pens will feed power from the controller to the receiver. Taking a
look at the receiver you will find the schematic for which pens are signal and
which are power. Plug the full lead into the receiver
pins for Channel one making sure to use the white or yellow wire for signal.
Take the other side of the lead and plug it into the top most set of pans on
the left side of the controller with a white or yellow signal cable toward the
inside of the KK. To connect the other channel take another leave and connected
to the signal pens on channels two through four on the receiver. Note the color
of the wire connected to channel to, now connect the other end of that lead to
the KK, remembering what color channels to wire is. And
making sure to connect only to the signal pens towards the inside of the board. Use the last lead to connect channel 5 from the receiver to the controller. Now
that you have connected the receiver, let’s connect the KK alarm. You should
have a small two wire buzzer with your KK. On the top left of the KK you will
see two pins labeled buzzer. Connect the buzzer making sure to connect the red
to the positive and the black to the negative. The ESC’s will be connected to
the row of pans to the right of the KK. With the top most set of pins for the
ESC one, the second set for ESC to and so forth. Looking at the frame, the
number of the ESC and the motor is as follows: front left is never one, from
right’s number two, bottom right is number three, bottom left is number four.
Make sure that the ground wire is to the outside of the board. The positive
wire is in the middle and the signal cable, usually yellow or white, is to the
inside. Special note: be careful with how you connect your ESC leave, B.Sc.
includes a battery eliminator circuit that provides power to the flight
controller and the receiver from the main battery. But they can fry electronics
if incorrectly connected. Check and double check your connections before you
apply power. Another note: the KK 2.1.5 can accept all for ESC’s each with
their own BEC and only take power from ciao one. However, some flight
controllers will fry if you connect them to more than one BEC equipped ESC. If
you are using such a flight controller, snip the red center wire on ESC’s other
than the first, or just pop it out of the plug and wrap it to keep it from
making contact with anything else. To read the leads from the ESC down through
the frame so that they can be connected to the motor leads. Connect each motor
to its corresponding speed controller, remembering the number. There are three
leaves from each motor and three bullet plugs from each speed controller. It
doesn’t matter what order you plug them in, just make sure that each motor is
connected to only one speed controller. With the ESC’s connected we can power
up the craft and check motor rotation. The kit includes a power distribution
harness. Connect the four red wires from the ESC’s to
the red block and the four black wires from the ESC’s to the Black block. Take
a moment to look over your connections to make sure everything is plugged in
correctly. If any connections are incorrect then the next step could smoke your
electronics. Once you are satisfied that you are wired correctly, turn on your
transmitter and connect the power plug to your battery. After a few beeps you
should see the flight controller and receiver power up. Let’s first make sure
that the flight controller is receiving input from your radio. Hit the
rightmost key on the KK to enter the menu and then scroll to receiver tests and
hit the rightmost key again. You we'll see values from inputs for your
receiver. Move your stick to make sure that the controlling the right channel.
With a mode to transmitter moving the right stick up and down should change the
value for elevator while left and right should change tell your on. Moving the left stick up and down should change throttle while left and
right should change router. Refer to the last segment on transmitters if your
input is reversed. If you are getting no more missing input from your receiver
then do the following: one, check to see if the receiver is on. If it is not
you may have reversed the channel one cable. Two, make sure the channels two
through five are connected to the signal pens on both the receiver and flight
controller. Disconnect the battery and make sure your transmitter is on once
you have conserved the proper input lets check the
rotation of your motors. It can be difficult to see which way the motors are
spending so I put a piece of tape on the shaft to help me see the rotation.
With the KK screen in safe mode pulled the throttle all the way back into the
right and the KK should arm. Now gently cycle the motors to get them spending
and watch the tape as they spend down. Motors one and three should be spinning
clockwise, motors two and four should be spinning counterclockwise. Make a note
of any motor that has to be in reverse and then disconnect the battery. If you
have motors that need reversing simply swapped any two of the three motor
connectors for that motor and ESC. It doesn’t matter which color, just remember
to swap the motor connectors and not the controller or power leads. Power it up
and try the test again. When you are satisfied that they are turning the right
way the last electrical step is to calibrate the ESC’s so they all have the
same values for start and stop. With the quads battery
disconnected, turn on your transmitter and advanced the throttle to
full. Hold down buttons one and four on the KK and keep holding them. Connect
the quads battery, the controller will go into throttle pass-through mode and
you should hear a beep that will verify that all for ESC’s have calibrated 100%
throttle. Continuing to hold the KK buttons, move the throttle to off. You will
hear another set of beats to confirm calibration of 0% model. Release the KK
buttons and disconnect the battery. Use zip ties to lock down the ESC’s, cables
and receivers. Screw the cage top onto the frame and tidy up your wiring so
that no connections are overstressed. With everything tidy, install the
propellers on each motor remembering that you want clockwise props on motors
one in three and counterclockwise on two and four. If you get confused, install
the product so that t•hey will turn in a way that
their pitch will push air down. Use the washers and nuts to lock the props and
your system integration is now complete.
Fr.
Robert: Now that
gave you instructions for assembling one of these. This is a FPV 250 from Hobby
King. We’ve both done this, we both have our distinct
builds.
Bryan:This is the one I’ve moved up from the Syma X5.
Fr.
Robert: You did
your trainer days and now you’ve actually got something that is the next level.
On the next episode we are going to be doing some flying and you get to see
these things in the air. It is impressive. But I will say even though we gave
you instructions for assembling the 250, the same basic instructions work for pretty
much any size quad copter. This is a 230 class that I built from the parts I
got from readytoflyquads.com. In fact Paul Baxter is in our chat room right
now, he runs Ready to Fly Quads. Now, he is a cool
guy. He is passionate about it. He puts his heart and soul into making the
parts he ships out. He can't be making a whole light of money for it. So it is just
his love for the field in the craft. His stuff is top notch. I built this 230
using the same steps as I did to build this 250.
Bryan: Right. And we were talking earlier
about how once you have the basic setup, you can
always just get another frame and rewire it if you wanted to do something
different.
Fr.
Robert: Exactly. We
are going to be talking about this during the feedback issue. But this is
something that I also got from readytoflyquads.com. This is a 230 aggressive
class. it is designed to stretch out the wheelbase of
bit more so you get more thrust. You can really make this thing move. If we
wanted to we could take the components off of the 250, put it in here and it
handles like a brand-new quad copter. Completely different craft with a $20
frame. I like the Lego thing. I’m done with this, what do we have next?
Bryan: What is the next thing we can
build? This one is pretty flexible for the different things that you want to
do.
Fr.
Robert: I like this
because this thing is kind of like the Sema in that
it is really hard to kill. I have crashed this into a lot of things.
Bryan: Props come and go but the frame
lasts forever.
Fr.
Robert: Exactly. So
it is a nice balance between performance and durability.
Bryan: And I jankily attached a go Pro to the bottom of it. And it worked. It wasn’t great but it
was a lot better than I thought it would be.
Fr.
Robert: A few
things. So first thing is heat shrink is your friend. You’re going to see a
live of connections like these like this. I've done a pretty good job of making
sure it the heat shrink goes all the way so that you don’t see the bullet
itself. But, you also can have things like this where the motor connection
didn’t go all the way. So you can actually see a little bit of gold. If you
take a little piece of heat shrink and you put it over that before you put the
bullets together and then shrink the heat shrink it will make sure that these
never make contact. It won’t on this quiet but be careful because if any of
these connections ever touch, you are going to blow
something out. A battery, and ESC or the flight controller. But there is this debate between bullets and soldering. There are people who
like to solder everything because it means that you can remove all that excess
cable. And wire adds weight.
Bryan: A few grams makes a pretty big difference.
Fr.
Robert: It does. It
changes the way that it flies. On this 230 class you could go straight from the
motor to the ESC like to the flight controller and power distribution board.
But on the bottom you see all this cable that I bundled up. I could get rid of
that if I soldered it. And I could get rid of the weight of the bullets if I
soldered, but I kind of like the whole leg opening. I like being able to pull
things apart. If I built something purely for performance, if I knew I was
going to be racing it. I would probably go with straight solder and get every
ounce of weight off of the craft.
Bryan: But because we are kind of playing
around with it and a bunch of different models we want to be able to
plug-and-play.
Fr.
Robert: Also I want
to say this. If you do buy ESC from readytoflyquads.com, they are not going to come
with bullets. The reason for that is because he can’t solder the thousands of
bullets that would be required. Something else. You
can always add something like this. This is cool this actually attaches to the
250. It gives you a little camera cage and that is where the FPV would go. It
would also give you a place instead of hanging the battery off the bottom of
the craft it would be somewhat protected. But remember, any time you do this
you are going to be adding weight.
Bryan: You will be reducing your flight time, you will be reducing the response. But it is all part
of the trade-off. If you are going to be doing FPV or you are going to have a
data read and go Pro, I would recommend having it because it will balance it
out.
Fr.
Robert: Weight is
your enemy. You always have to be countering the added functionality of how
much weight is it going to be adding to your craft.
Bryan: That is part of the fun.
Fr.
Robert: It is that
Lego mentality. Something else. Buy a lot of props.
You are going to be replacing a ton of props. Buy way more props than you think
you’re going to need and they won’t go to waste. I promise you. Now on the 250 that we built. These are actually super
flexible props. The reason why they are three bladed is because of this motor
configuration. It can’t really take advantage of a two bladed prop. You would
never be able to get a big enough props to maximize
out the motor. The three blade is also like this.
There are stability issues if you did two bladed props on this. But when you
start going up to these big crafts you will go to eight, 10 and 11 inch bladed props. And we will actually show you how to balance
them in a future episode. We are coming to the end of this arc for quad
copters. When we get into the advanced lessons balancing props is one of the
very first episodes.
Bryan: These are the props that you don’t
want to get hit with.
Fr.
Robert: These will
hurt you.
Bryan: Decapitation! This is pretty hard
plastic.
Fr.
Robert: One last
bit before we move on. The center of gravity. It is
not as important with a quad copter as it is with a plane. If you make a plane
tale heavy it will crash. Quad copters can compensate because the flight
controller will increase thrust on one side or the other in order to keep the thing
level. But here is the thing. If you have your center of gravity set too far
forward it means that your quad copter is going to have to increase the rust on
the front motors in order to keep it level. It has to compensate. Which means, that you are going to have less thrust range available
out of the front motors. If the front motors have to operate it 80% just
to keep it level and the rear motors are operating at 40% then you are going to
be able to go faster in one direction than another. So what you want to do is
to remember that your flight controller is your center of gravity. My flight
controller is located here, this is the brains of the
craft. The thing that will tell the quad copter what to do
with its motors in order to keep it level. So what I want is a center of
gravity that if I were to put a skewer through the middle of the flight
controller, I've balanced out the go Pro and the battery and I can move this
battery for word and back so that I can keep this thing level. If I remove the
go Pro, I have to move the battery closer to the middle otherwise it will be
tail heavy. You can do the same thing with the small ones. It is a little
harder because they don’t have natural CG point. But just imagine if I had
skewers right in the center of this craft here and once I attach my battery I
can figure out where I would have to put it to level out that CG.
Bryan: I bet there is something we could
come up with in order to test the balance before we start flying.
Fr.
Robert: We will be
testing this way because we are assuming that you are building it
asymmetrically. Now, when we come back we are going to be taking some feedback.
We are going to go over some of your questions and comments from our Google
plus group. But before we do that, let’s take a moment and thank our second
sponsor of this episode of know-how. Do you have a portfolio or a website? Or a
project that you want to put online?
Bryan: I do. I have been using it a lot
more lately because I’ve been getting back into photography and my squarespace site. I have just been hosting a lot of my
photos on there. And I just share the link from there, instead of posting it to
a bunch of different social networks.
Fr.
Robert: And the
nice thing about that is that you buy one account. You pay one fee per month or
yearly and then you don’t have to worry about the backend. I worry about who
was hosting it and who is taking care of your domain. Who is doing your front end. You don’t have to go out and get a word press framework
and spend forever configuring it. It just looks beautiful from the start.
Bryan: And they keep upgrading it and I’ve
never had to pay more. They just keep making it better.
Fr.
Robert: And that is
the reason why we love squarespace. Squarespace is the one-stop shop on the Internet to go if
you want to publish your portfolio, your photographs, your website, your
project or whatever it is. Squarespace can help you
get the word out. Some of the reasons why you are going to love squarespace as much as we do is that they are constantly improving their platform. Squarespace seven has just been introduced and it makes getting started with your unique
web presence even easier. It has a completely redesigned interface, now simpler
to navigate and operate in one seamless experience. It has easier editing. They
do this brand-new life at it on screen so rather than changing the edit and
slightly changing the page and then going to the preview it will show you in
real time what your edits are doing to the page. It is the best way to edit.
They also give you instant access to professional stock photography from Getty
so rather than having to worry about whether or not your images and your sounds
are licensed, you get a button, and interface within squarespace that lets you purchase these fantastic pieces of art from Getty and legally put
them on your page so there is no muss, no fuss and no worry about compliance.
You also get instant branded email set up with Google apps and now you can have
branded email for your small business automatically when you sign up for is squarespace account. So that your email
doesn’t look generic. It is not a Gmail address it is your domain, and
your name is your brand and you have to protect. Squarespace understands that. Also their developer platform is out of beta so you can
customize your site exactly as you wish. If you are a developer you have
control to the same platform that squarespace uses
for its own site and it gives you complete code control. Speaking of complete
code control, squarespace also gives you templates
that are designed for specific professions and let’s face it, you don’t want your page for medical information to look like the page they are
using for food reviews. Squarespace understands that
and so they group their templates so that you can choose the one that is
appropriate for your content. They also give you e-commerce with all
subscription plan levels including the ability to accept donations, which is
great for nonprofits, cash, wedding registries and school fund drives. It is also
easy to use. But if you need some help, squarespace has live chatting, email, 24 hours a day seven days a week. Plus, there are
self-help articles and video workshops for browsing at your leisure. And at
just eight dollars a month squarespace is not going
to break the bank. And it includes a free domain if you sign up for a year. The squarespace portfolio, mobile, metric and blog apps
are on the go extensions of your website. So now you can monitor the
performance of your content while you are on the go. And, squarespace takes care of the hosting as we mentioned in the beginning. So you don’t have
to. So here is what we want you to do. We want you to start a free two-week
trial with no credit card required and start building your website today. When
you decide to sign up for squarespace, make sure to
use the offer code know how to get 10% off and to show your support for. To
begin using squarespace seven, existing customers go
to the settings tab to activate all the new features. We thank squarespace for their support of Know How. squarespace, start here and go
anywhere.
Bryan: It is super easy to switch over
too.
Fr.
Robert: Let’s get
into some feedback. We have some good questions and we are running out of time.
Bryan: This first question comes from
Ronald. He has some Wi-Fi problems. “On several occasions, Padre has stated
that the modern mobile devices are smart enough to jump between wireless access points that use the same SS ID. We also know that
only three channels in the 2.4 GHz range don’t overlap. My question is this, if
I were to set up three wireless access points at my
house using the same as as ID, do I set all the wireless
access points to the same channel where do I have to switch each access point to
its own channel to avoid interference”? Yes, you do.
Fr.
Robert: Alright. Next question. No. We get this a lot and I don’t mind
covering this a lot because this is a basic set up that everyone needs to know.
I’ve told people for a while that you can have multiple access points, all
broad casting on the same SS ID. So as you wander through your house your
device will switch from one to the next as the signal diminishes on one and
then increases on the other.
Bryan: It is like a small version of a
wireless cell network.
Fr.
Robert: Exactly.
Now here is the thing. People have been writing and saying it is not working
for me. 90% of the time it is because they haven’t set up the access point
correctly. The problem is there are a lot of devices out there that are not
actually access points. They are combination routers, access points and maybe
evil cable modems. You have to turn off the functionality DHCP server, the gnat
and the gateway on all the other devices except for the primary one in the house.
So for example, let’s say I have the WRT54G, the old standard. It is only 2.4 ghz. If I had three of them, I
would set one for Channel one, one for Channel 6 and one for channel 11. Those over the non-overlapping channels inside the Wi-Fi. They won’t interfere with one another. I would give them all the same SS ID.
But only the one that is connected to the cable modem or DSL modem would have
its DHCP server turned on.
Bryan: All the others would be off because
they are in bridge mode.
Fr.
Robert: They should
be in bridge mode. Here is the other thing. You have to connect the land ports,
the primary router, to the land ports of the routers that you’ve turned into
access points. Some people go through the Lan port and that is no good as well because essentially you are still natting. Now there are some routers that let you assign the Wan port to the Lan but most
people them like that. Or the router is not smart enough to do that. And so if
you have your primary going into the LAN ports of the two routers even though
they don’t have their DHCP servers turned on you are still going to get funky
addressing in the network.
Bryan: Okay. I think I've been having a
problem.
Fr.
Robert: If you’ve
been doing that, no, no, no. Essentially what you have done is that you still
put the nat on top of the nat but you have turned off the DHCP server on that second access point. Devices
will connect to it but then they just stop.
Bryan: It is infuriating because you're
connected and you're wondering why it doesn’t work.
Fr.
Robert: And again
90% of the time that is the issue.
Bryan: I have this WRT standard version
and I put DDWRT on the other one to put it into bridge mode.
Fr.
Robert: Untoward is
saying will it still drop a stream when it is transitioning between two APs?
Yes it will. But not necessarily. Here is the thing.
It is not like a cell phone network in which the cell phone most of the time
will hand off seamlessly. The way it will work on a Wi-Fi network is when you
leave one SS ID and it connects to another, it will recognize that it can use
the same DHCP address so what won’t request another address, but the network
still has to figure out where you went. Unless you are using an enterprise
class wireless system which will automatically route you. What is going to
happen is that if you are streaming something to your computer the gateway will
be calling out to you and then suddenly it will no longer be able to reach you.
And it will try it for a while and then it will do what is called a broadcast
it will go to the network and say who is this? Now the
other AP says he is over here and then it starts routing. Now most of the time,
the buffer in your stream via the twit stream, YouTube or Netflix, will be
enough that it doesn’t seem like it drops.
Bryan: You won’t see that hick up.
Fr.
Robert: but if you
are doing a direct stream is going to disconnect. It is a soft drop.
Bryan: In my case the main router where
Comcast Comes into the house is on the other side of
the bedroom. So I am setting up a router closer to my bedroom, but not
necessarily crossing from one house back and forth. I just need a stronger
signal on the other side of the house. I probably wouldn’t notice it.
Fr.
Robert: I would
just put wires everywhere.
Bryan: I do have wires everywhere. I’m
just not sure where everything goes because I need to set up a panel and write
down where everything goes. Me and my dad didn’t do
that like 10 years ago when we wired it.
Fr.
Robert: I’ve got
some tools that will help you with that. Let’s go to the next one.
Bryan: Okay. The next one comes from Brad,
“I want to build my quad. I am looking to build a 230 mm quad copter I’m not
sure what kind of motors to use. I would like it to be pretty easy to control
but fast and this is my first build”. You want to keep it simple. What are some
of the recommendations here Padre?
Fr.
Robert: These are
all going to be in the show notes so don’t freak out if you don’t catch this
right away. I have got a couple of different build possibilities. This would be
the inexpensive 230 build. I bought all these parts from readytoflyquads.com.
And you are going to hear me say it a lot but pretty much if you go anywhere on
the internet, this guy has the really good stuff. You could buy motors from
Amazon, don’t do that. Seriously. The quality of parts
that you are going to get on Amazon, if you really want to put together a great
good quad copter, they vary so much that it is not worth it. If you buy store
motors and one of them is bunk you just lost any savings that you are going to
get. This is a nice one because it is very simple to make. This is the frame.
It is a $15 frame, a 230 mm using glass fiber. Super durable. And very easy to put together. That is about $15 and
then you’ve got the motorists. These are inexpensive at $10 apiece, 1806 2300
KV. That will cost you $40 there. The props are the son fly five by threes,
these are also inexpensive. The ESC’s right here, these are F 12 amp which is
more than enough. That is about $31 for four of them. The props cost about
$1.20. Buy a lot. This Controller is awesome. It is so incredible. Get this
one. It is only $15. And then the receiver and the radio, I’m using the fly
sky. That set up is going to run you about $116.
Bryan: And once you have the controller
and stuff…
Fr.
Robert: Now, if you
want to get a performance 230 build that is when I would suggest this. This
thing is cool. Because it spreads the motor out a bit more you can get a bit
more wiggle into it and a bit more speed. I like the
cage because it Gives you a good way to secure all
your components. Even if you want to do FPV. This
frame is going to cost you about $20. This is the RTF mini frame. The motors, are more advanced. If you buy four of them he
actually gives you a deal at $61. The 2208 2300 KV is a fantastic, really nice
motor. I Would get the carbon composite props they
cost you about $6.20 for a set. The 20 amp speed controllers
with 4F batteries is $32. Keep the same flight controller or go up to
the Flip 32. It adds things like barometer and compass so you can do things
like maintaining its heading. And then the same fly sky receiver and radio.
That set up is going to run you about $160. So you are going about $50 more.
Not bad. I’ve also got a set up for a 250 class. We will make sure that goes
into the show notes. That is what I would suggest. Just go to readytoflyquads.com because not only will you find all those parts, but they've also got a really
good deal in case you want to figure out where everything goes.
Bryan: Sounds like a good way to get into
it.
Fr.
Robert: Last one.
Bryan: All right. This is Jonathan. “Quad
copter plus Long exposure equals Tron.” He used his
trainer quad and a micro 4/3rd camera and was able to get some pretty awesome
pictures by just having the exposure on for a while. And I think if you got
really good at this you could probably spell something out.
Fr.
Robert: I just
clicked it and went crazy. You know what if you practice this it could be
awesome. People were saying how come the quiet is not visible? But that is the
thing about long exposure it is moving. But the lights are so bright.
Bryan: Have you ever seen those photos
where people draw out a word? You don’t see the person they are because they
are moving in the light is so bright compared. Unless they
stop and then you see the shadows.
Fr.
Robert: Of for
example on your quad, we’ve got the superbright LEDs
and it would look really neat. I would really like to see that.
Bryan: As soon as I saw that….
Fr.
Robert: Folks, we
know that this was a lot of information. Everything from the
instant more to how to fix Wi-Fi to a quad tutorial. We were all over
the place. We would like to give you a mix, that is
what we do!
Bryan: Keep you on your toes. If anybody
missed the previous show you should watch it live.
Fr.
Robert: Don’t
forget you can get our show notes at twit.tv/kh and
there you’ll find not just all our episodes but also a place where you can
subscribe so you get our episodes automatically into your device of choice. If
there is something that you want to follow along with, this is how. Don’t
forget you can also find us on Google plus. This is actually a great place to
go to get your questions answered or to post your projects. If
we put it into the show. gplus.to/twitkh,
join us, post your projects…
Bryan: Ask questions, show us your awesome
exposure pictures of the quads flying around and stuff. That is why I love it. It
is almost 8,000 people.
Fr.
Robert: Don’t forget that is not the only place you can find us on social
media. You can find us on Twitter. I’m @PadreSJ.
Bryan: And I’m @cranky_hippo.
Fr.
Robert: And our TD,
Alex Gumple can be found @anelf3. If you want to find
out what he and cranky hippo were like when they were kids watch his feed.
Bryan: You get to see that and more
recently was our 70’s detective show!
Fr.
Robert: Week is
actually our last episode of the year, before we shut it down for the break. But
we do have to do one pre-recording next Friday because I am going to be at CES
in the new year. But next week we will be covering the
first flight. We are going to take our quad copters and show you how to take
them to the sky. It will be a fantastic fun filled episode of know-how until
then, I’m father Robert Ballecer.
Bryan: And I’m Bryan Burnett.
Fr.
Robert: And now
that you know how…
Bryan: Go do it!