Know How... 115 (Transcript)
Net Casts you love from people you
trust, this is Twit! Bandwidth for Know How is brought to you by cachefly.com.
In this episode of know-how is
brought to you by iFixit. You can fix it and iFixit makes it easy with free step-by-step repair guides,
high quality replacement parts and all the tools you’ll ever need. For $10 off
your purchase of $50 or more, go to iFixit.com/twit and enter the code know how at
checkout.
And by SquareSpace. The all-in-one
platform that makes it fast and easy to create your own professional website or
online portfolio. For a free two-week trial and 10% off go to squarespace.com and use the offer code knowhow.
On this episode of Know How the
future of lithium batteries, Bryan is going to show you a little about Tor, and
the new Mac OSX and quad copters.
Father
Robert Ballecer: Welcome to Know How. It is the twit show where we build,
bend, break an upgrade. I’m Father Robert Ballecer.
Bryan
Burnett: And I’m
Bryan Burnett.
Fr.
Robert: For the
next 45 minutes, 60 minutes, 70 minutes… we are kind of tired and we are kind
of loopy so we may just never stop. Anyway we are going to give you some of the
projects that we have been working on the last couple of weeks. So that you can geek out on your own. But before we do that
I want to talk batteries.
Bryan: Yes. So, the main limiting factor
with batteries in electric vehicles is that it takes a while to charge them,
they are expensive, but every day there seems to be new advancement. And this
is one that you just came across?
Fr.
Robert: This is one
that we just found in this one was actually covered in a story about a bus bar.
It is discharging device for electronic buses. One of the biggest drawbacks to
batteries has always been that they do not charge quickly. And you use up a lot
of the power which is great because you can store a lot in a lithium battery.
Lithium batteries are found in our phones, our laptops and pretty much
everywhere now. Because they are easy to use, because they
hold a relatively large amount of power.
Bryan: And they are relatively safe as
long as you use the right charger.
Fr.
Robert: I believe
that I have a YouTube video that can show you what will happen if you
accidentally puncture a lithium battery. These are all held with plastic bags
called lithium poly and they are great because they can form fit the case of
different things. Don’t puncture the bag. of a CO2
extinguisher will not extinguish a lithium fire.
Bryan: What would you do in that
situation?
Fr.
Robert: You would
let it burn.
Bryan: Because even starting it with
oxygen and water wouldn’t do it.
Fr.
Robert: Saltwater
will actually destroy the chemistry that is reacting. But unless you are
walking home with a bottle of saltwater… or if you are next to the ocean that
you could just toss the whole thing in. But here’s the cool
things. Some scientist over in Singapore have figured out a way to increase the current, the charging current and the
discharging current of a standard lithium battery. We have had this technology
for a while and we’ve used carbon nanotubes. They are crazy expensive and very
rare. Hard to make. But the way that a lithium ion
battery works is that the chemistry which allows you to store electricity
actually starts to break down as we force electrons into it.
Bryan: Then that is why batteries start to
die after a certain amount of charges and things like that.
Fr.
Robert: Typically
1000 to 2000 charges on a lithium-ion battery will no longer hold a charge. You’ve
seen it on your phone.
Bryan: It seems after about a year my
battery starts to hold a little bit less of a charge from thereon.
Fr.
Robert: It is a
well-known phenomenon that what these folks have done is that they have figured
out a way to get the benefits of having carbon nano tubes. And that is inside the chemistry. A carbon nanotube greatly increases
the amount of surface area you have which means it increases the amount of area
at which the reaction can take place.
Bryan: It is using the area more
efficiently right?
Fr.
Robert: Exactly.
The chemistry doesn’t have to be stressed as much which means that it last
longer. Now they have figured out a way to get the effect of a carbon nanotube
but using titanium dioxide.
Bryan: Which is
something that is a lot more prevalent.
Fr.
Robert: It’s
everywhere. It is in the soil. Sunscreen uses titanium dioxide. It is
essentially titanium rust. And the way they are processed has allowed them to
take titanium rust and turn it into nanotube. So you have titanium dioxide
nanotubes and turn those into a gel. you mix that gel
with the lithium ion chemistry and suddenly you have a battery that doesn’t
last 1000 or 2000 charges, or doesn’t last one year or two years but that last
20 years.
Bryan: So they have increased the lifespan
of a battery by tenfold.
Fr.
Robert: Tenfold.
But it is not the lifespan they are after it is the charging capacity. How fast
it can charge. Because that is the problem. If you
look at a standard lithium battery, this is a lithium 3.7 V poly cell and the
limiting factor here is that I can only push so much current into it before it
burst into flames. Because I am overloading the chemistry and it will die. The
lithium dioxide, because it is increasing the surface area available and that
chemistry, I can now pump a few times more power. Which means for example let’s
say I had something like a performance supercar. And even then, even when it is
designed to charge quickly, it is still going to take me a good hour or two
hours even with a crazy fast charger to get it back up to 100%. And every time
I do that, every time I fast charge a lithium battery I am actually damaging it.
I am reducing a flight. This technology could potentially allow was to go from
zero to full on a test battery in about 45 seconds. And, it doesn’t damage the
battery. The battery can handle that amount of current. And it can discharge
more power than normal. Which means I can get more power to
the wheels without risking anything else.
Bryan: As far as traction will go, you
would just be spinning your tires otherwise. Have they implemented this with
the buses you were saying?
Fr.
Robert: They are actually
testing right now. It is called the best bar. And the idea is that it is an
electronic bus that is using these lithium titanium dioxide batteries, they
pull into his station a bar drops down from a post that is hanging over the bus
and it pumps super-high voltage and it charges the battery from zero to full in
about two minutes. Which is about the time of the bus stop.
Bryan: That is about the time you’re
waiting for people to get on and off.
Fr.
Robert: Right. Now
the amazing thing about this is not that it is just it is cool technology and
we can charge batteries faster, but imagine why it the current battery business
is built on in the electronic market. I need more batteries that can take more
power because I only want to charge them up once because it takes 20 hours for
me to get to a full charge.
Bryan: The more batteries you have the
more weight you have which is a diminishing return.
Fr.
Robert: It is like
putting fuel into a spaceship. Where you could put more fuel but then you need
more fuel to carry that fuel. Same thing with batteries. You could put more batteries but then you need more batteries to carry those
batteries. I knew that I could charge my car and 30 seconds rather than two,
four, or eight hours, I could potentially only carry enough for 30 miles of
range. And just count on stopping for 30 seconds at the places that will charge
up my vehicle and then I will go again.
Bryan: If this was something that was
implemented at a street intersection or something like that. If you’re at a
stoplight you are there for 30 seconds to a minute anyway. What if that was
charging your battery at the same time?
Fr.
Robert: I like that
just because it means finally we can get electronic vehicles down to a decent
curb weight. It also means since I have to carry fewer batteries I get more
brains off of my existing batteries, more performance, and ultimately it means
there is less toxic junk that goes into the atmosphere because I have to create
a new battery pack for my car.
Bryan: Right. Remember when we did that
review for BYB on the electric motorcycle? The biggest kind was that of
charging. So when I used it for my commute it made sense because it was 20
miles from my house to here so for 40 miles total a day. Bet Tony, when he tried
to go to work about 80 miles away he wasn’t able to make it. But, if you are
able to charge the battery that quickly he could have just stopped somewhere
and charged it.
Fr.
Robert: And
actually Roark in the chat room is sane what does that do to the motorcycle? And
actually we’ve talked about that because you’ve got these titanium dioxide nano tubes inside the chemistry you are not stressing the
chemistry. You are not forcing electrons into it against the stability of the
lithium polybag chemistry. That means that it lasts a lot longer. From two
years to 20 years. So you get a longer-lasting battery that can hold as much or
more power, that can charge and discharge or quickly, that doesn’t cost any
more than a current lithium poly battery.
Bryan: That is cool. And as far as battery
technology goes it is only going to get better from this point. We were
watching the something earlier today and the biggest cons
with electric vehicles is the expense and the range. It seems like every
year has been a little bit better and with the nanotube technology I’m looking
forward to that stuff.
Fr.
Robert: So you
heard it here folks. The future of electronic vehicles is rust. That is kind of
weird right? Now, we are all about battery technology. We are all about fixing
things. And a lot of it are used to having to open up
our devices to pull out those old lithium ion batteries because they do wear
out after a certain number of charges. You talked about this right? You talked
about your phone starting to die. Especially if you have a
phone that is not replaceable with the battery. You have to actually
open up the case. You need the tools to do it. Which is why
we are happy to have on the show I fix it. I fix it is the place that
you go when you need the tools to do the hacks that you need to complete.
Whether it is replacing the battery in your laptop or your telephone or let's say disassembling a gadget that you got from McDonald’s. IFixit is your one stop shop, not just for the tools but
also for the instructions manuals, videos and the forums to help you hack your
way into a better geek lifestyle. Now, iFixit offers
a free online repair kit for pretty much everything. They have more than 10,000
repair guides for everything from electronics like your smart phone, your
tablet in your game console to your home appliances, your clothing and even
your bicycle. They also have foolproof instructions to fix all your stuff. If
you have shattered your iPhone screen, if you need to repair the red ring of
death on your Xbox, or swap the battery on your galaxy S3, iFixit has got you covered with parts, tools, and repair guides. I fixed it also makes
the most trusted repair tools for consumer electronics including the ProTech toolkit. Now this ProTech toolkit offers use 70 tools
to assist with any mod, malfunction or misfortune that may come your way. In
fact I’m going to have my lovely Vanna White cohost
show you what comes in this ProTech toolkit. This is the gold standard for electronics. From
garage hackers to the CIA and FBI. But more importantly their unique
tools are used by repair technicians everywhere. This is I fix it 54 bit driver
Kit with 54 standard and specialty bits. This is important if you have ever
tried to mod a device and you haven’t had the bit or had been using the wrong
one kind of works. Don’t strip your tools don’t strip your bids. Get the right
tool and do it right the first time. This includes Phillips bits, pentalobe bits, torque and torque security bits. Tri-wing
bits which is popular in video game consoles and triangle bit in case you want
to hack McDonald’s toys. They have also included the swiveled top precision
driver to get to those hard-to-reach places and the flex extension for those
hard-to-reach screws. They include an ESD safe precision tweezer for delicate manipulation and an antistatic wrist that keeps your devices safe
from accidental static discharge. They include nylon spongers, metals spongers,
and plastic opening tools for prying and scraping without damaging your device.
If you ever tried to open up a tablet with a flat screwdriver you know that it
is going to damage the case. Then don’t do it. Get the sponge are and do it
right. It is lightweight, it is compact and it has this verbal tool roll which
makes on the go repair is easy. It is the no-brainer choice for professionals
and amateurs alike. At only $64.95 it is backed by a lifetime warranty so you
know it is going to be a good buy. Hobbies and home do it yourself fixers alike
use the ProTech toolkit for doorknobs, eyeglasses,
cabinet doors, sink fixtures and more. If you are looking for a great addition
for an artist or hobbyist tool chest look no further. Best of all, there are
thousands of free iFixit guides to help you put your
tools to use. It is not just the tools, it is what
they teach you on how to use them. So here’s what we want you to do. We want
you to try iFixit. With iFixit you can fix it yourself. Visit iFixit.com/twit for more than 10,000 free
step-by-step guides. IFixit also sells every part and
tool that you will ever need. Into the code know-how at checkout and you will
save $10 off any purchase of $50 or more. I fix it.com/twit and the code know-how. And we thank Ifixit for their support of Know How.
Bryan: I should really stop disassembling
things.
Fr.
Robert: Did you
break this? I thought, oh no what is he doing.
Bryan: It was a very tiny screw. But I was
able to get back in there.
Fr.
Robert: Okay now,
we are going to show you how to fly and build a quad copter but before that you
had an interesting tidbit for those people that want a bit more security out of
their browsing.
Bryan: So, I was browsing Reddick recently
which I tend to do far too often and I came across a kick starter that had
become super popular and I just couldn’t really figure out why. It was called
an anonbox.
Fr.
Robert: The idea is
that it is Tor in a box. If people don’t know, the Tor network is the onion
router. And the idea is you would anonymize your entrances and your exits. So
that someone who was looking at the IP address of your traffic won’t come back
to you, it will go back to a anonymous in the Tor network, which won’t lead them anywhere.
Bryan: We are not going to get into how
secure it is and you should probably be forwarned, don’t login with your passwords or credit card information
while you are logged in to the Tor network because it is not perfectly secure
anyway. But like you were saying a Tor network is a way to anonymize the way
you browse the Internet. It keeps strategic sites from keeping track of your
information, your IP address and stuff like that. But, we stumbled across the
project also called the Onion Pi.
Fr.
Robert: We are
actually assembling one of these for Know How. Super, super
simple. all it is is a wireless adapter inside
your Raspberry pi that is a custom distro so it will
run Tor, everything runs inside the Raspberry Pi so you are connected to a
wired network and you connect your laptop, your tablet, your phone to the
wireless signal coming off the Raspberry Pi and it automatically does Tor. You
don’t have to install anything on any of your devices you were just on the Tor network
as long as you’re going through that Rasp Pi.
Bryan: And it is pretty simple project to
do. It is about $40. But this kick starter made about a half $1 million when
all they asked for was $7000. I sat down and tried to figure that out but I
think the demand for it was that people are looking for a plug and play box. As
far as our viewers go I’m pretty sure that people would rather build it
themselves if they were going to use it at all. So that will be a future
project that we do. But to introduce Tor to you, it used to be that you could
just download an extension for Firefox. It is actually a little easier now. You
got to the Tor website and you download their bundle, which is basically
another version of Firefox that just has Tor implemented.
Fr.
Robert: The reason
why they did that by the way is they deprecated the plug-in. Because what they
were finding is that it was too easy for someone who was trying to get your
real identity to manipulate your computer into setting real identifying information.
Bryan: And that is why flash is disabled
so if you try and watch YouTube you cannot do that through the Tor network. You
cannot play games through Tor either because it is bouncing your connection and
so is super slow.
Fr.
Robert: Your latency
and speed are going to drop when you are running through the Tor network. you do lose a lot of speed because you have to go through a
proxy which is popping off somewhere in the world that maybe you don’t know
about. You lose a lot more even with Tor because it can be unpredictable. The
way Tor is supposed to work is that it is a lot like routing the Internet. It
is always going to look for the fastest path possible. But even then it is not
really going to give you streaming quality.
Bryan: But if you did want just to play
around with that and go to the website, you download the Tor bundle. This is
the torproject.org website and you will navigate to whatever operating system you are using. It
works on Windows, OSX, Yosemite and Linux. But once you’ve downloaded the Tor browser
and installed that it is pretty easy. What it is doing here is connecting to
the network. The Tor browser looks very similar to Firefox.
Fr.
Robert: And once
you get that congratulation screen it means you are now anonymized.
Bryan: I am now on the network. So when I
travel to different websites or anything like that I am now anonymous. Relatively.
Fr.
Robert: Again this
is going to slow you down because you are using a proxy. You are going to be
operating at the slowest speed of the slowest node that it goes through.
Bryan: It is still going. It actually was
faster when I was playing with it earlier. It seems to be even slower at this
moment.
Fr.
Robert: Unfortunately
you can’t really complain about it as that is what you are doing. You are
getting into a network that uses shared resources, even more so than the
Internet. So it is going to slow you down. But if you value your privacy and
you really don’t want people to be able to see what you’re
doing that is a really good way to do it. Here is the rub. Even if you
are using Tor, if you suddenly decided to Facebook or to Google plus or Twitter
you are identifying yourself. It is not like you plug into a Tor network and it
is magically erasing who you are, if you do anything to identify yourself while
you are connected to the Tor network someone who is looking through the logs
can still figure out who you are.
Bryan: This is abnormally slow. I think
one of the better explanations of was, if you go to a new city that you’ve
never been to before you are fairly certain that you are fairly anonymous, but
if you rent a car and use your driver’s license or if you check into a hotel
then there are chances of people knowing your identity.
Fr.
Robert: What I
would say is this. I would say that anybody watching the show should at least
get this installed on your computer. Get the Tor browser in there so you can at
least play with Tor. Know what it is, know how it works and most importantly
know its limitations. I know too many people who got something like the Onion
Pi end date.they were automatically anonymized and
they got freaked out when Amazon or Google started pitching them advertising.
How did they know? You have identified yourself after the step of anonymizing
yourself. So if you use it, you will understand how the technology works and
you will understand its limitations because it is really what we go for.
Bryan: And part of the problem I see with
these kick starter projects like the AnonBox I feel
like people are probably just going to buy this, plug it in and assume they
don’t have to change any of their habits or that it just works. So that is why
we want to do the Raspberry Pi project so that you can build it and you can
kind of understand a little bit better about how it works. And why you would
want to use it.
Fr.
Robert: And I think
that is the way that we should do it. When we finally do a real Tor hardware
project, we should do a few demonstrations to show what it will anonymize and
what it won’t. Like when you search in Google or you go to Amazon with your
browser signed in it is not going to anonymize you. If you go to a site and use
anonymous browsing and your computer is not sending out
any erroneous packets that will merge on the outside of the node, then you are
anonymous. So that is the sort of knowledge that I think our Know-it-alls need.
Bryan: Yeah, definitely. I’m looking
forward to playing with the eye guardian at some point. That was another
project that is just for monitoring your traffic going in and out of your
network. At least people are becoming more aware of some of the security.
Fr.
Robert: Exactly.
And that is my thing. I think if we can make people want to be more secure,
even if it is not being completely anonymous but protecting themselves from the
threats that are on the Internet, or may be coming from inside their network, I
think we make for a better networking experience for everyone. So speaking of
making a better networking experience for everyone, you know what does make a
better networking experience? Having an awesome site. Something that is responsive, something that is inexpensive, something that
lets you focus on the things that are important like providing
great content. Making it look good. We know on the Internet it is all about
location. And that first impression. You get about
five seconds before someone says yes I’m in or no I’m not.
Bryan: That is what I thought we were
going to do this show together
Fr.
Robert: You don’t
have to come with this. If you use SquareSpace. SquareSpace is very one-stop shop. The
place that you go on the Internet if you've got a project. If you’ve got
a website or a portfolio that you want to show off. If you are a creative
content creator and you want to be able to show off your skills. Your talent. You want to be able to show off your portfolio.
You want to be able to show off your video, your photos. You don’t want to have
to worry about your domain registration for your back end. Or whatever you are
going to be using to manage content. SquareSpace takes that all away for you. And gives you your one stop shop
to be on the Internet. I've used SquareSpace consistently over the past couple of years because they are easy to use. I work
with a lot of non-tech savvy organizations that just want to make pictures.
They want to make notices. They want to make news. They want to make articles.
And they wanted up and available for people as soon as possible. That is was SquareSpace lets them do. SquareSpace is constantly improving their platform. They’ve got new features, new designs
and even better support. They have 25 beautiful templates for you to start with
and then they recently added a local creator tool which is a basic tool for
individuals and small businesses with limited resources that allows you to
create a simple identity for yourself. It is easy to use. In fact it is
incredibly easy to use. But if you do want or need some help SquareSpace has live chat and email support 24 hours a day,
seven days a week. Plus there is a completely redesigned customer help site for
easier access to self-help articles and media workshops. Now available for all
subscription plan levels, SquareSpace gives you the
ability to accept donations. E-commerce, which is great for
nonprofits for cash wedding registries and school fund drive. It is also
just eight dollars a month and that includes a free domain name if you sign-up
for a year. So it is not going to break the bank. And it is mobile ready. The
new SquareSpace metric app for iPhone and iPad lets
you check site stats like page views, unique visitors and social media
followers. With the blog app you can make text updates, tap and drag images to
change layout and monitor comments on the go. All from your
mobile device. Even their code is beautiful. One of the other shows I do
on the twit network is Coding 101 and so I like to look at how they wrote their
code. In SquareSpace if you go past that the nearer,
the code is as beautiful as the imagery that you see in the front. That just
tells me they paid attention to detail and I like that. Also hosting is
included so you don’t have to worry about tracking down who is registering your
domain, who is hosting your site, and who is managing all your code. It is all
in one space. So here’s what we want you to do. We want you to start a free two
week trial with no credit card required. Start building your website today period when you decide to sign up for SquareSpace make sure to use the offer code know how to get
10% off and to show your support for no help. We think SquareSpace for their support of know-how, a better Web awaits and it starts with your new SquareSpace website.
Bryan: I like playing with the logo
Creator. Because you don’t realize how hard it is to come up with a logo until
you sit down to do it.
Fr.
Robert: It is funny
that they created that tool because that is one of the most frustrating part of trying to create an online branding identity. You
want something unique. You don’t want something cookie-cutter or something that
you created from a template packet.
Bryan: You can spot those right away. Speaking of spotting things right away. Quad
copters flying around the studio lately. We’ve sure had a lot of fun
with them.
Fr.
Robert: Probably…
Bryan: Probably not so much our coworkers.
Fr.
Robert: There are a
few coworkers who are terrified.
Bryan: As they very well should be.
Fr.
Robert: Actually
this one is pretty good. I do want to do this demonstration very quickly
because I think there are some people who are saying we are going to kill our
coworkers. One of the nice things about this is that even at speed if I were to
put my hand in there, it is nice it doesn’t hurt. What we want to do right now
is this is the first official quad copter episode. This is going to be an
ongoing thing where we are going to show our audience how to build a quad
copter from scratch. Choose what kind of class they want to build, choose the
capabilities, and then take off.
Bryan: When I first started looking at
quad copters I knew which one I wanted, it was the big one that can carry a
camera, without actually thinking about how good I am at flying one. I took one
that we have here at Twit to an empty field, because that is a good place to
start. Shot It entered feet in the air, panicked, let
go of the throttle and it started to plummet. It fell over onto its back and
when I got back on the throttle I shot straight into its back. Which to its
credit it didn’t just kill it, it didn’t explode or die but I definitely wrote
a lot of the blades. I could’ve saved a lot of heart ache by getting something
like this. And practicing.
Fr.
Robert: Even more
than that, the reason why we are starting with this is because once you
understand how it stays in the air it gives you a better ability to control
them. Because there is a lot of physics in here. There
is a lot of science and once you get you will be able to control it much
better. That is what we are going to do today.
Bryan: And once you get an idea of that,
it actually makes you more appreciative of the kind of technology that goes
into it.
Fr.
Robert: Even
something like this, that is a toy, it is a technology bonanza. Now let’s talk
about this. We’ve talked about remote control plane last week. It was easy to
see how it was controlled. We talked a little bit about Bernoulli’s principle,
Newton’s second and third laws for creating lift. And we talked about
deflection. So if I’ve got an engine in the front and it is making the plane go
forward, if I have a router in the back that deflects right or left enforces
air in that direction, we know because of Newton’s laws of motion that it is
going to deflect the plane in the opposite direction. The same thing goes for
the elevators and the ailerons. If I deflect air in one direction I create
thrust in another.
Bryan: Which is a
concept that is a little bit easier to wrap your head around. But then
when you look at a quad copter which has no surfaces to deflect air how does it
turn?
Fr.
Robert: Exactly.
Comparing this to a plane there are no waiting so there is nothing to get the
Bernoulli effect, except for these are actually wings.
Propellers are wings. But there is no traditional control surface like you have
in a plane. Even if you compare this to a helicopter in a helicopter you
typically have one big rotor or two and then you have a tail rotor.
Bryan: That help keeps it steady because
with the top propeller rotating around it makes the helicopter want to spend.
Fr.
Robert: Which is also Newton’s laws of motion. If I’ve got a blade that is
spinning this way, it is going to want the body to spend the opposite
direction. There is an opposite force. And to keep that from happening you
typically have some sort of tail assembly. A tail thrust assembly. Sometimes it
is sort of a ducted jet most of the time it is a tail rotor, a small rotor on
its side. What that can do is it controls how much of the torque it will go
along with. So if I have a blade spinning this way and I and I don’t want my
helicopter to spin this way I have a tail rotor right here that cancels out
that force and it keeps it true. Now a helicopter also has variable blade
geometry on the rotors so that I can tilt it forward, back, left and right.
Again, awesome tech but… there is no variable blade technology, there is nothing. The only parts that move on a quad copter are these
motors and the props that are attached to them. So, understanding why a quad
copter can go up in the air and understanding why it can go left, right,
forward, back is all about understanding those laws that we were talking about.
It is the same thing in effect, it is Newton’s second and third live it just
doesn’t work the same way as a standard fixed wing plane or helicopter.
Bryan: And unlike a airplane or some sort of fixed wing aircraft this
is fly by wire. This is all just being done by the controller inside.
Fr.
Robert: There is no
such thing as a manual controlled quad copter. You could manually control the
plane. You could have a cable that is connected to the router and the elevator.
You can’t have that in a quad copter. There is no way that a human would be
able to respond fast enough to keep this thing from falling out of the sky.
Imagine this is essentially four columns of thrust and you have to balance
those four columns of thrust in order to make this thing do what you wanted to
do.
Bryan: And then when you talk about going
forward or backwards you were saying that these propellers if you want to go
forward will slow down while the propellers in the rear would increase
throttle.
Fr.
Robert: Let’s talk
about that. One of the things that you will notice is that you can tell by the
pitch of the blades, displayed will spin clockwise, this blade will spin
counterclockwise and this blade is going to spin in the same direction as that
blade, this blade is going to spend in the same direction as that blade.
Bryan: So they cancel each other out.
Fr.
Robert: Wait for it
to slow down and you can kind of see that. The reason why I have that is
because remember the helicopter. If I have a blade
spinning this way, Newton’s law says that the body is going to want to spend
the opposite direction. So I have this propeller, which is the same weight, spinning
in the opposite direction and these two torque forces will cancel each other
out. Same thing goes for the back. If I have a blade spinning in this direction
I make this blade span in the counter direction so that it balances out those
torque forces. And that is why typically when you are building a quad copter or
a sext copter or an octi- copter it is always an even
number of motors. Because you need to be able to balance out
the force. There are tri-copters… kind of ridiculous. Don’t do it.
Bryan: I’ve seen some that have one blade
on top and one on bottom.
Fr.
Robert: It is the
same idea. As long as you've got a balanced set, so something that will cancel
out the torque, then you can control it. If all of these were spinning in the same
direction there would be no way to control it. It would just keep spinning and
spinning.
Bryan: So on an airplane that has one prop
in the front what does it do to counterbalance.
Fr.
Robert: Typically
what you do is you would use the elevators or the ailerons just to keep the
plane pushing back against that, which you can do. You don’t have that on quad
copter. Now let’s talk about motion. If I want to have her all of these props
are going to spend at the same speed. What will happen is I will have the
copter more or less hovering at the same rate so all of my propellers are going
at the same rate in two of them are going clockwise and two of them are going
counterclockwise. That is how I handle hovering. Now the question is, how do I handle direction. Because unlike a helicopter I have no
variable pitch on this. I have no tail rotor. What I do have, is I have my new
control over how fast each motor spends the propeller. So if I wanted to go
forward what would I do?
Bryan: You would decrease power to these
and increase power to the back.
Fr.
Robert: Which will
cause the quad copter to tilt forward and now any thrust being generated by the
propellers will actually pull the quad copter forward.
Bryan: That makes sense. But how does it
pivot?
Fr.
Robert: Okay, so making
this go in any direction is very simple if I wanted to go forward I drop thrust
in the forward side, I increase thrust in the rear side. So front, back, left,
right. To make it rotate it gets kind of tricky. I already know that diagonal
propellers are going to spend in the same direction. So if this is spinning in
this direction, which way will the body of the quad copter want to spin?
Bryan: The opposite direction.
Fr.
Robert: Right. SO, If this is going this way the quad copter wants to go this
way. This balances it out so that it doesn’t. But what I can do is I can
increase the thrust to these propellers and decrease the thrust to those
propellers and now the torque is unbalanced and it makes it spin. And if I want
to go the other way I reverse it. I increase thrust here and decrease thrust
there and it makes the quad copter spin back. It does all that on-the-fly. This
is fly by wire. If you look inside of your quad copter
there is a small single board computer. That is the receiver and the flight
controller. When I give it an input when I tell it to increased model, when I
tell it to go left or right, it is using the six axis accelerometer. So
forward, back, left, right and up and down to be able to be able to figure out
what it should do in order to do what I’m telling it to do.
Bryan: Now one thing you were saying about
some of these lower end models is that when you would try and pivot left, it
would actually lose altitude and pivot right?
Fr.
Robert: You see
this and a lot of the models that you cannot balance. The ones that we are
going to be building are using far more powerful flight controllers. But if you
look at this and I am increasing thrust in wine and decreasing thrust in
another if the flight controller is not really good it might over increase and
make it shoot up and in this particular case when I spin the other way it
actually drops the thrust in the other two and it drops. So I kind of have to
ride the throttle. But the more advanced ones, especially the ones that have
GPS, will be better.
Bryan: And by more advanced you mean more
expensive? This one we have been having a ton of fun flying outside the studio
and inside the studio too. We have wrecked it a ton and it still just keeps
going. You have actually made some modifications to it too which has helped.
Fr.
Robert: Quite a
few. I have lightened the load, increased the battery and I may have upped the
voltage to the motors. But you don’t have to do that. What we want to do now is
we want to show you a quick video on why you want to pick one of these up. They
are only $50 and we are going to show you where to get them but first, here is
why you should pick up yourself a quad trainer.
Fr.
Robert: The quad
force video drone is a self-contained video piloted quad copter kit with an
onboard camera from Swan. Out of the box you will find most everything you need
to get up and running in minutes. The quad, a remote, battery
and charger, the safety attachments, and spare props. Just add four AA
batteries to the remote, connect the 3.7 V 500 mL
battery pack to the charger and plug the charger into any USB power port. When
the red light turns off in between 30 and 60 minutes you are ready to fly. But
before you take flight, first take a close look at your kit. The quad force
measures 10 inches diagonally and uses two sets of counter-rotating by then a
quarter inch props. The profs are turned by four in
running motors. Slung under the quad is a CMOS camera that can shoot 25 60x1440
stills and 720p video at 30 frames per second. The camera rear loads MicroSD card up to 8 GB and a 2 GB card is included in the
kit. Sliding back the camera reveals a battery tray and just a glimpse of a
single board receiver and flight controller that keeps the quad force in the
air. The remote control is a six channel, 2.4 GHz digital spread spectrum
transmitter capable of controlling the quad out to about 120 m, or 330 feet. The
left stick controls throttle while the right stick gives you control Over the forward, back, left, right movement. The top left
button toggles between high and low power letting you choose between
performance and battery life. Pressing the top right button triggers the camera
while long pressing the button starts the video recording. A simple LCD screen
at the bottom of the remote shows you your current control inputs while the
buttons to either side of the panel activate the onboard laser. Just kidding, those
buttons are totally fake. With the battery charged it
is time to take to the air. Slide the battery into the battery tray and
connected to the quad. Attach the landing gear and the prop detectors. Put the
quiet on a level surface and turn it on. The lights will quick flash for a few
seconds while the flight computer levels itself. Once the lights turn to a slow
flash, turn on the transmitter and advanced the throttle all the way up. And
back down to bind the remote to the quad. When the lights turn steady on you
are ready to fly. If you are a beginner, start slow. Give it just enough throttle to get off the ground and practice keeping with the
quad at the same altitude and location. Then start moving the quad back and
forth, left and right to get a feel for how the controls work. Once you’ve got
that down, go crazy. The body and props of the quad force are color-coded with
yellow being the front of the vehicle, combined with orange and green LEDs on
the undercarriage it is easy to know which way your quad is pointing during
flight. Unlike most toy provides the quad force can be
used indoors and outdoors. As long as the wind isn’t too
strong. And the quad force can get up to quite a bit of speed even in
its low power. The quiet force is ridiculously fun to fly. It is responsive,
forgiving and most importantly for beginners, it is really hard to kill. I
crashed the quad force a lot. Into furniture, walls, ground and hosts. And more than its share of trees. Not only is our review
still running, I haven’t even had to Replace the
props. The standard battery will give you about eight minutes of flight but I
was able to squeeze in an extended battery into the tray for an additional
three minutes. Also the onboard camera is absolutely horrible. At everything. The stills were blurry, the lens wasn’t wide
enough and it is pointing in the wrong direction to see anything interesting.
But I found that to be an advantage because removing the camera and the prop
guards gave me an additional three minutes of flight giving me 15 minutes or so
of quad awesomeness. In all, the Swan Quad Force video drone is an affordable,
durable, easy to use platform for those who want to feel what it is like to fly
a real quad. While not paying much more than you would for a
toy.
Fr.
Robert: I would
suggest you get something like this. Because you don’t want to crash a
multi-hundred or even multi-thousand dollar drone. The nice thing about
something like this is that this will actually teach you the physics. And the
physics are very important. Once you understand the physics and once you
understand orientation like what is front and what is back in what way have to
do to make this respond the way I wanted to respond, then take your expensive quad copter out. Until then, crash this a lot.
Bryan: Definitely. And when I first started
flying the quad copter it kind of took me a little while to wrap my mind around
when you are rotating in the air the front and the back you have to remember to
do that. Because in a panic situation when it is getting
close to the wall, an expensive one goes right into the wall.
Fr.
Robert: Exactly.
But if you practice, if you train yourself to realize I’ve got reverse inputs
right now so if I want to go that way I actually need to put the control over
to the left, that will come with practice. Now I will say when we first got
this thing, when we got it as a review product about a month ago, I had never
flown a Quad at all except for one that GGI person helped me to fly. I picked
up on it very quickly because if you are not afraid of breaking it you will try
things. So what we’d like you to do is we actually have two links we are going
to be putting in the show notes and the first one is for this. You can get this
at Fry’s electronics and it is selling for $69. It has a $10 rebate. So it is
$60 which is still a decent price. Because you’re going to
get a lot of use out of it. The other one, if you are an Amazon prime
member, it is called the Sema X5C. It is the exact
same copter with a different color scheme, it doesn’t look as cool and it
doesn’t have the camera. But it is $50 prime.
Bryan: And you don’t need the camera
anyway.
Fr.
Robert: You really
don’t. It was horrible. So pick one up and fly it. Because we are going to
teach you how to build a quad copter that is far more capable than this that
has way more performance, but is also significantly more expensive. We are
talking 5 to 10 times more costly.
Bryan: Right. And one thing I wish I had known
better was the propeller system. Because you actually have to
configure the rotation.
Fr.
Robert: You don’t
realize that they don’t all counter rotate. And so if you put the wrong prop on
the wrong motor it doesn’t work.
Bryan: I just wanted to fly like this.
Pick up the remote, turn it on and fly it around. But the other when you have to
plug into your laptop, you have to calibrate the propellers which I didn’t have
enough understanding of and I could never get it to fly straight. And that’s
part of the reason I destroyed it.
Fr.
Robert: Now, don’t
feel bad because one of the segments that we will be doing in the future is we
are going to take that DGI and we are going to fix it. We’re going to show
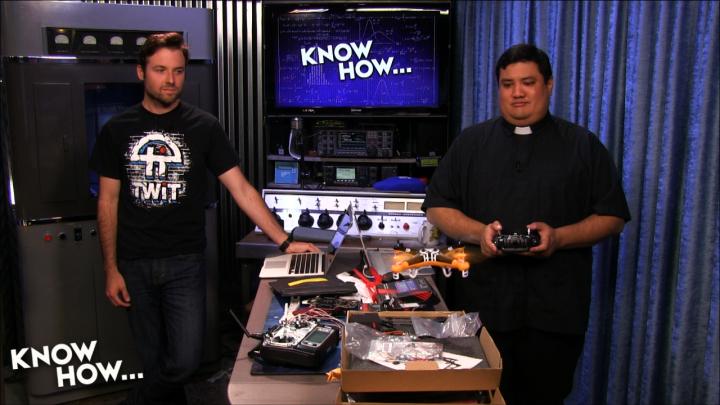
people how to fix their busted drones. Okay now what we wanted to do is there
is a lot of fear here. What we did is that we actually purchase the equipment
that we need for three different types of quad built. A few things you are
going to need is a screwdriver, snaps, a soldering
iron, heat gun or a lighter, and a volt meter. That is really all you need.
There are not a lot of tools required it is just a lot of patience and a lot of
understanding of how these individual things work. There are 10 things that you
absolutely need for any quad built. The first thing is the frame. This is the
frame for a 450 class. Typically you will have four support members, this is where the motorist will actually connect. This is the frame that is
actually going to hold these together. This is a cool frame, it is for the 450.
It includes the power distribution which is a printed circuit board so I can connect
my motors and my electronic speed controls. The second part you are going to
need is once you know what kind of frame you want, you
can determine what kind of battery, what kind of motor you are going to need.
For example this is the frame for a 250 class. The numbers just refer to the
number of millimeters between the propellers. the nice
thing about this is that the larger the frame, the bigger motor and can handle. And the bigger the motor, the bigger the prop, and the bigger
the battery etc.
Bryan: Then we can move up to the ones
that carry cameras.
Fr.
Robert: Exactly. 250 class can carry a go pro. You can also do FPV, if you
wanted to do the first person view. So now after the motors you are also going
to need electronic speed controllers. It is just like the lunchbox build. Remember
we had that device that allowed us to control electronically How fast the motor would go. The exact same thing. You are
going to need four of them. In this particular case for this 250 build these
are just 12 amp speed controllers so they are not very big. They are tiny
little ones. But I've also got other wins for the larger build. This is 12 amp
and these are my 30 amp speed controllers. They are a whole lot larger. It is
because the larger the motor, the larger the electronic speed control. You are
going to need for abuse because he will connect them to the flight controller.
The flight controller is going to be connected to the receiver. Speed
controller is the next thing on my props and again the bigger the motor, the
bigger the props. Big motor, big prop. Small motor, small prop.
Bryan: Okay that looks really tiny. And
that is a three blade?
Fr.
Robert: I’m not a
big fan of them. I prefer the two blades. But again if you have a larger motor
you can afford to carry a bigger prop. We are going to explain to people why
there are differences in props. Because you can change the
size and the pitch. The aggressiveness of the prop will change the
characteristics.
Bryan: So you could say you want it to be
super agile or something or you want more stability?
Fr.
Robert: Right. So
you could increase left, you can increase speed you could increase performance
and endurance. That is something you can control both with the size of the
motor and the size of the product.
Bryan: That is like gearing on a car.
Fr.
Robert: The next being
is the flight controller. This is the magic sauce. This is the one we are using
for these builds. This one is a KK 2.1. This is a little device that is going
to connect to the receiver and then all visible junctions are going to connect
to all the motors. This could actually control up to an eight bladed copter.
This will keep it level, this will provide the right
inputs and will provide the right power to each of the motors. This is the
brain. After that I am going to need my RC transmitter and receiver. I’m using
this one. It looks a lot like the one we used for the lunchbox but this is
really in it expensive one. This is a $64 and, 6 channel 2.4 ghz spread spectrum. We’re going
to have all the links in the show notes so you don’t have to worry about it if
you’re not copying it down. I could will use this for
any of the builds. So the 250 all the way up to the 525. Now I am also going to
need a LiPo battery pack. This particular one is a
2.2 2200 ml amp hours and it is 35C. We are going to explain what that means
when we get to the battery.
Bryan: That one looks a lot more serious
than the one on this.
Fr.
Robert: Look at the
size of this battery pack And then look at the size of
that battery pack or in there is a whole lot more power in this larger one and
that also means a whole lot more destructive power. After the battery you are
going to need the LiPo charger. This is not like the
battery for the lunchbox. Which just had two leads. It
has this. This is a balanced lead. So this allows me to specifically address
each individual cell Of my battery pack as long as
I’ve got a balanced charger. And a charger that I decided to get was the IMAX
V6 because it is the cheapest. This thing cost about $20 but it does a great
job of balancing the state of charge. So that I get the most
life in the most longevity out of my pack. The other thing that you need
and I originally had this on the optional list and I moved it up to the
mandatory list is you need this. This is a LiPo bag. LiPo batteries can be dangerous so a LiPo bag is a nonflammable way to hold your batteries so that if they do have a
runaway reaction it is not going to burn down your house.
Bryan: But are you supposed to be able to
pick up the battery and throw it in there real quick?
Fr.
Robert: No, this is
how you store them.
Bryan: This is not like, Oh I just crashed
into a wall and it is igniting.
Fr.
Robert: No but if I
did crash I would have my battery pack in the LiPo bag just to be safe. There are people who have been doing this a lot longer
than I and they suggest having a pail where you put the LiPo into sand so that even if it does ignite it is another layer of protection. And
then the last piece is going to be all the controller leads. You are going to
need to connect the receiver to the controller, the controller to the
electronic speed controller. The optional parts are something like the power
distribution harness. In the case of my 450 here the power harness is included
in the frame. It is part of my PCB. For example, in my 250 class the power
distribution looks just like this. It allows me to get from my battery into my
four electronic speed controllers. It is optional because you could actually
wire this on your own. You could just solder it. But if you buy it is a lot
easier to do. Also you are going to need heat shrink tubing because you don’t
want any exposed wires, there is a lot of current flowing through these LiPo batteries and it could really kill you. And then quick connectors. Again we’ve got three different
classes. We’ve got the 250, the 450 and then we’ve got this frame here which is
the tubular frame which is going around a chassis, this is a 525. Each one of
these gets slightly bigger and each one of these gets a slightly bigger motor
and slightly beefier electronics and can carry slightly more battery power.
Bryan: Can you use the same controller for
all of these?
Fr.
Robert: The same
controller for all of them. So be sure to stop by our show notes because you
will see the parts list for everything. We give you links in case you want to
go out and buy it. I will say this. If you are going to start with the 250, and
I actually was suggest that, because it is small enough to be flown indoors. Which is nice. You can get something from a company called
Hobby King. And we have included the links for that. It includes everything you
need to do a 250 build except for the remote and the flight controller. This is
their 250 FPV kit. It inclusive frames, the right adapter bolts, for motors,
four electronic speed controllers, the battery, not the flight controller and
not the charger. So you buy 3 things and for $240 you’ll be
up and running and ready to assemble.
Bryan: So for the very bottom of the pile
we have this which comes in about $60, then the 250 which is…
Fr.
Robert: $242 and
then about $271 for 450 class. The 525 we cheaped out
so it is actually only $242. If I were building it on my money I wouldn’t get
that… it would be closer to $300. We kind of ran out when we got to the 525. The
motors on that are tiny. But if you were going to build it honestly the 250 is
going to run you about $250. The 450 is between $300 and $350. A decent 525 is
going to be $350 to $400.
Bryan: So all the more reason to start low
and see if you can get good at it. If you like it you can start working up.
Fr.
Robert: If you
build one of these and you crash and I guarantee you are going to break something.
Bryan: You might break your spirit too. I
would probably cry.
Fr.
Robert: Now, this
is just an overview. The reason why we did this is because people asked us
where they can buy the stuff in case they wanted to build along with us. Now you
know it is going to be in the show notes. It is a lot of stuff. Over the next
couple of weeks we are going to go over each individual part. We are going to
show you why you would choose a 254 of 450 or 525, we are going to show you how
you choose your motors, how these size them out. We are going to show you what
flight controllers to get, what batteries to get, how to use your electronic
speed controllers and your flight controllers. So we are going to give you the
step-by-step on how to design, build, and assemble your class a Quad copter.
Bryan: That’s awesome. And if you are
feeling overwhelmed don’t worry because we have all the links and notes that
you will ever need at our page at twit.tv/kh. And not
only that you have former episodes which live there and is going to be really handy for people following along our quad copter arc of
multiple episodes.
Fr.
Robert: Don’t
forget that you can find us at our Google plus page. That is actually a great
resource for anyone who is building. There is a lot of
quad copter enthusiasts who have been flying a lot longer than I and I’m sure
they're going to add their two cents worth. Just make sure to go to Google plus
and look for the know-how group. There is about 7300, it is nice. Become a part
of the community and contribute when you can.
Bryan: I was just browsing through there
recently and somebody was sharing the watch faces that they had made using
facer.
Fr.
Robert: And also
don’t forget that you can also find us on Twitter. That is a great place to
find out what we do in between shows. You can find me @PadreSJ.
Bryan: And you can find me @cranky_hippo.
Fr.
Robert: And also
you can find our TD, he’s a great guy he is Alex Gumple.
His twitter is @anelf3. Does he have a camera on himself right now?
Bryan: I think he’s burning down the set. It
is already almost 9:00.
Fr.
Robert: He wants to
go home. Also don’t forget that you need to tune in each and every week because
every week we are going to give you will be more quad copter knowledge. But
until then, I’m Father Robert Ballecer.
Bryan: And I’m Bryan Burnett.
Fr.
Robert: And now
that you know how…
Bryan: Go do it!