iOS Today 656, Transcript
Please be advised this transcript is AI-generated and may not be word for word. Time codes refer to the approximate times in the ad-supported version of the show.
Mikah Sargent (00:00:00):
Coming up on iOS today, we promised you we'd do it, and we are on our way. Rosemary Orchard and I, Mikah Sargent, are going to be covering Final Cut Pro and Logic Pro, which are now on iPad Stay tuned
Speaker 2 (00:00:19):
Podcasts you love from people you trust. This is TWiT.
Mikah Sargent (00:00:29):
This is iOS today with Rosemary Orchard and Mikah Sargent, episode 656 Recorded Tuesday, May 30th, 2023. Final Cut Pro and Logic Pro for iPad. This episode of iOS Today is brought to you by Grammarly. Go. You'll be amazed at what you can do with Grammarly. Go go to grammarly.com/go to download and learn more about Grammarly. Go. And, hey, thank you for listening. As an ad supported network, we are always looking for new partners with products and services that will benefit our audience. With our tailored host Red Ads, you will get an authentic and proper introduction to your brand with every ad read, visit twit.tv/advertise and launch your campaign today. Welcome back to iOS Today, the show where we talk all things iOS, iPad, os, tv, os Watch, OS, home Pod, os sos os, o s os, not sos, just os Operating Systems. Those are the software packages, if you will, that run on the Apple devices we all know love and use. I am one of your hosts today, Mikah, Sargent
Rosemary Orchard (00:01:42):
And I am Rosemary Orchard here, ready to be playing with all of the fun things I've been, I've been having a fun weekend, Mikah. I've been giving this a try and getting generally lost in how do you edit video again. Anyway, <laugh>, and it's been great fun.
Mikah Sargent (00:01:54):
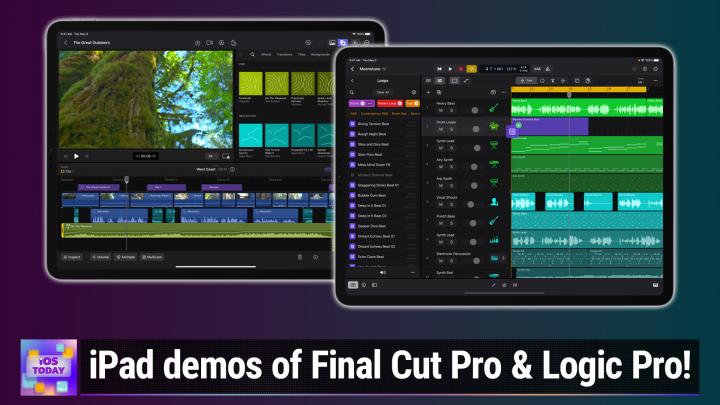
Yes, I'm so pumped about today's episode because Apple of course, announced quite a while ago now it feels like the introduction of Final Cut Pro and Logic Pro for iPad. We mentioned on the show that we would be downloading them as soon as they were available, giving them a try, and then talking about them the following week. This, of course, is that following week. We're here to talk about Final Cut Pro and Logic Pro and tell you our thoughts and kinda show you how they work. These are apps that are available. Interestingly, for a subscription price, you can get each of them independently for $4 and 99 cents a month, or $50 a year, 49 point 99 a year. And you are given a one month free trial with each of them. So when I hopped into Final Cut Pro and Logic Pro worked the same, I downloaded them, I opened them and a sort of splash screen popped up and said, Hey, this has a subscription.
(00:02:55):
You okay with that? I said, cool. And then it let me through saying, you'll have a month to use this and kind of see if it works for you before you, you know make the decision if this is where you want to do your video, audio editing, mixing, mastering I figure we'll start with Final Cut Pro. I do have Final Cut Pro here in front of me. What's great is that Apple actually provides a little project for you to start things out with Whenever you first get the app you will be able to download a, let's see, 385.3 megabytes file project rather than includes 17 videos. So I can click the play button here and see a preview of this video.
Speaker 4 (00:03:43):
Last time I got to celebrate Lunar New Year in the Bay, but I'm glad I'm finally home. Lunar New Year's in
Mikah Sargent (00:03:50):
The, and there's this great sound in the background. All of these clips that are cut into it, time to
Speaker 4 (00:03:56):
Reflect and celebrate,
Mikah Sargent (00:03:58):
And now I'm going to choose Edit. Okay, so here you can see that the clip is 32 seconds long. Resolution is 38 40 by 2160. It's shut an HDR at 30 frames per second. So I'll choose edit. And immediately we pop into something that I think will be familiar to folks who use Final Cut Pro, because much like Final Cut Pro on the Mac, you get many of the same features. I'm scrubbing through this timeline, and you'll notice if you're listening to this, which I guess that's, I see everyone who's, who's listening to this is listening to this. You can hear the audio scrubbing along. It's very impressive given that it's happening here on this iPad. Now, let's I'm gonna take my two fingers cause I've got the track pad on my iPad. I'm gonna zoom in on the timeline here so we can see some of the stuff that's going on to show you just how Feature Rich this version of Final Cut Pro is.
(00:04:54):
I've got a cross dissolved transition here in my audio. I've got a fade in for this sound called Night Wins. I've got yin and yang underneath it. I could at some point add I could, I could expand these audio components and, and sort of make adjustments to it. If I choose to inspect this file, I can see here's the audio. I can change the speed of the clip volume offset. I could pan the audio fade in and out, voice isolation, loudness, noise removal. I could add special audio effect like a single band EQ or a compressor. And let me pop out of here. It even has multi-cam features so that if you had multiple cameras set up like we have here in the studio and your recording video, and they all have the same time codes, final cut can sort of lock into that and be aware and then able to switch between those different cameras, whoa, like we're doing here, and be able to to, to make that shift.
(00:05:54):
So let's, let's take a look at some of the, the stuff that we can do. So here we've got this Golden Gate Bridge clip, and you'll notice that they took the audio out of this Golden Gate Bridge clip. And then they have the voiceover. So I'm gonna right click on this file and look at the audio components here to see that, you know, we've got the stereo audio that they removed. I could easily hit the delete key to take out this video if I didn't want it. Over here on the right, I've got a little meter that gives me the ability to scrub through frame by frame, and I'm actually using my finger in this case. So this is how you can kind of get really into the nitty and gritty which I had mentioned before when I was thinking about using Final Cut Pro on an iPad.
(00:06:41):
One thing that kind of stuck with me is I don't know how precise I'm going to be able to be on an iPad. I'm so used to using my mouse in these tiny little areas and being able to cut clips and make adjustments and move things around. And I was worried that I wouldn't be able to do the same on, on the iPad because you have these bigger touch targets. Well, whether you're using the Apple pencil or you're using the little scrubber on the side, I'm able to move that frame by frame, by frame and make those precise adjustments, those precise edits. You've got features like snapping positioning clips in different parts of the timeline. Being able to again, do audio scrubbing, which I'm going to turn off for the sake of, of this audio podcast. There's titling that we've got built in.
(00:07:33):
I mean, ultimately Rosemary, what we're looking at here is an incredibly kitted out near identical to the Mac copy of Final Cut Pro. And I think that's what's amazed me the most about this is how, how much they were able to pack into it to make it familiar to folks who've been using the the Mac version of this for so long. There's one, one quick thing I'll mention and I want to hear from you on this. There's also the ability with the iPad. I've got a camera that is built into the iPad and I am able to make use of that camera so I could easily and you'll notice I am still within Final Cut Pro. In fact, all I did, let me go back here. Let's actually create a new clip. So our new project, so I'll choose new project.
(00:08:28):
I will call this let's call it i o s today. And we'll let the timeline settings be automatic. Essentially what that does is it looks at whatever you drop into the timeline and uses that to determine how it's set up. I'll choose record with camera. And then now I've got the option, of course, on an iPad to do video and slowmo. This is a sort of pro camera mode that has features like auto white balance, or you can set your own white balance. You can change the exposure you can add flash of course, which is, you know, something I don't necessarily recommend. It does slowmo and video on an iPhone, obviously. There are more features you don't have final cut there. You can zoom in, zoom out. You can change whether you're doing 4K HD seven 20 at what frame rate you're choosing.
(00:09:18):
Perhaps I'll do 24 frames per second. And down here in the settings I can also make those adjustments a little bit better. So with the front camera, you mirror it, whether it has the shutter sound or not. Adding a grid so you can kind of frame up your shot, an aspect ratio guide, which is great. And then also where the audio is coming from. So if I had a, had something plugged into it, then I would be able to capture the audio from there. So let me just record some video right quick. And this is of course a poorly exposed shot, so let me just, I think drop that down a hair or four. And then we'll record something, da da da da da. And there's some of the studio and we come down to, oh, there's the chat room in front of me and stop.
(00:10:06):
Now after that video's done, I can tap done and bring that into final cut. I will take that clip and I have some options here. I can create a multi-cam view. If I have multiple cameras all shooting to the same thing, I can export the video right from there if I wanted. But all I wanna do is take this and drag it into, there we go. Sorry. and add it into the timeline. So you've got some options. You can overwrite, you can insert, you can connect, you can append it just depends on how you have that set up. I'm going to choose insert, and now I've got this video clip. I could zoom in on that video clip. I can make changes to the audio by tapping and holding onto it, expanding those audio components. It's of course shot in stereo at any time.
(00:10:53):
I could go through and make a cut with the video, and then I could add transitions if I wanted to. I've got, of course the snapping features there on the side. So all of the stuff, again that we're used to these effects, these transitions are all built in. So I'll do a, a nice cross dissolve to add into that and we'll do that add to both cross dissolve and add. Let me go back there, add to both. There we go. Now I can hit play and you'll see and there's some of the studio row and we come back, cross, oh, I guess it's not doing that because I do need to render it. I forgot. So once that has been rendered, there we go. It will, it will start to render things automatically. But if you are working in something and you kind of want that to happen immediately, no, it's not doing it
Speaker 5 (00:11:52):
The
Mikah Sargent (00:11:52):
Same thing. Oh, duh. Mikah <laugh>,
(00:11:57):
I need to, yes, I, yes, there we go. Thank you. Everyone at the studio is telling me, well, yeah, it's not gonna cross dissolve too. There we go. So now you get a nice cross dissolved transition, thank you studio for the help there. Then it will, it will show you that. So I would imagine too that this probably didn't even require a full on render. It would probably be able to preview that. It was just that my foolishness was getting in the way. So Rosemary, tell me your thoughts before we, you know, dig perhaps even more into what's possible with Final Cut Pro on the iPad.
Rosemary Orchard (00:12:35):
Well, one of the things I wanted to mention is of course you know, this is an Apple app and they do make take advantage of their own features, which means that there are a whole bunch of keyboard shortcuts in here that you can play with and use. And if you press and hold the command key when you've got a keyboard attached in any app, it should pop up a little dialogue rather like this one, if you're watching the video which shows you a list of the commands and what keyboard circuits you need to use to activate them. So obviously you've got copy and cut and paste, which would be command C, command X, and command B. But there's also things like being able to favorite your selection or go to your next edit or the beginning of the timeline.
(00:13:16):
Previous frames go to a range per a range in point inserting things at the play ahead nudging slightly left or slightly right and so on. And what's better, these even match up with the Mac one. So that's, that's very convenient. And there's also some nice ones for trimming the start in the end. So for example, if you were using the ability to nudge left and nudge, right, using the command and the dot or period full stop depending on where you're from to find, you know, that point in that video that that's exactly where it starts. This is where I would like it to, to go from. And then you can, you know, trim back to the start from there. Or, you know, you've n got right to the end and this is the exact point where I want this clip to end.
(00:13:58):
You can trim straight to the end from there. And I have to say, the fact that there are so many options is a little bit overwhelming to start with. If you've never edited video before or anything, then you may be thinking, oh my God, there's so much here, which there is. But it's, it's great. So that option that Mikah mentioned before, wherever on the right you've got something the playhead where you can, you know navigate very precisely to where you want to go. That's something that you can hide if that's just getting in your way. Similarly, you can in the editing mode, there's options on the timeline where you can toggle on your snapping and things like that. And whether or not control should show whether clips should be all your clips should be expanded, how tall your clips should be, making it easier or trickier to, to grab hold of them if you should be seeing audio meters in your clips and things like that as well.
(00:14:51):
And then naturally as, as well as you know, your, your gallery of project media which which you have and I'm just going to, that's not the button I was looking for swipe this down so that we, we've got a little bit more space here and pull over my project media. So I've got a little library here in lo final Cup Pro to show what media that I've actually got in my project. And of course I can change this to show it with, at the aspect ratio or show it in Square, include clip names. This can be very useful if you've actually gone through a named or clips, cuz you've got several things that look similar. And you can also sort things, you can filter as well. So you can look for just particular media types.
(00:15:34):
So if you've got a bunch of pictures and you've got some video and you've got some multi-cam stuff then you can you know, filter for those and your, your favorite or rejected items. And obviously you can also select things to be able to add them to your timeline or remove them. But in the next section over from this, you've got your effects, transitions, titles, backgrounds, and these aren't all downloaded by default. Like the app is quite junky. It's about I think it was 500 megabytes or so when I downloaded it. But the, it won't download all of the transitions and the titles and the backgrounds and the effects for things directly. It will download things on an ad hoc basis when you want to use them. So if I wanted to add something using this Fusion background then when I tap on it, it'll go ahead and download it and it's, it's just telling the one thing, it won't take that long.
(00:16:21):
And then I'll be able to go ahead and use that dynamic background in in my project to add to it. There's of course objects and some soundtracks as well. Though if you want soundtracks, then maybe, maybe you should fire up logic Pro and then you can actually go ahead and make a soundtrack instead of just, you know recording just including a default one. There is also a little search. So if you want something to do fireworks, for example, then you can like, you know, try and search and see if there's anything there. But you know, there, there isn't anything in, in that section for that. You can resize the section. So if you, if you want to have that little side gallery open with your project media for example, then you can have that open and have that quite small.
(00:17:04):
Of course, if you've got a 12.9 in Chi pad, it will take, be taking up even less space proportionately. And you can also adjust how much space is taken up at the bottom by that timeline, scrolling across. You can, yeah, all, all of these things have got, you know, so many options on them. It is just very nice. You can import from files as well, which is very nice for people who've got things that they've, they've added to their iPad that they didn't you know, record using photos or similar. And so they've imported it and it hasn't gone into photos, it's gone into files. Maybe they got it emailed to them by a friend or a family member or something, and so they just saved it. Then yeah, it's, it's great to be able to do that. And of course there's also markup so that you can go ahead and do a live drawing on your photo or vi or on your video rather, so that you can you know, if you want to maybe a little arrow or something to this dragon.
(00:17:59):
I'm gonna see if I can do it. I've left my pencil unfortunately on my other iPad. And so it looks like I'm having a little bit of trouble doing that. But yeah, this is
Mikah Sargent (00:18:07):
A, there we go. Very specific iPad feature that I think makes it, you know, worth you maybe asking, you know, what's one of the reasons I think they wanted to show the ability to do this. So let me show you really quick, and this will be poorly done as I've got the Gorilla gra the Gorilla Grip is that it were. But I will write out, for example, iOS today and then I will tap done. I'm going to, cuz now I've that I've done this before. I'm gonna, I know I need to drag this out so that the full animation plays. Now watch what happens when I play this back. You will see in the background, or you will see in the foreground, iOS today gets written out as I did in that live drawing feature. So this is a kind of a fun illustration feature that's helpful.
(00:18:58):
Now, one complaint that I did see from folks who are regular editors in fact a regular guest on this show, Christopher Lawley, I believe was one of the people who was talking about this it Final Cut Pro for iPad does not let you currently, we hope this changes in the future. Plug in an external hard drive and edit video from that external hard drive, meaning, unlike Final Cut Pro for the, for the Mac, where I could plug in an S S D and I could open up those files from the s s d, edit those files from the s s D and do what I needed to do all from the SSD with Final Cut Pro for iPad, you have to take those files and import them into the iPad, and at that point you're able to edit them. So it's a little bit different.
(00:19:55):
And it basically boils down to if you've got enough space on your iPad, it won't be too big of a deal. But if you don't have a lot of space on your iPad, you may be frustrated to learn that you can't have an external hard drive that has a bunch of space. Be able to edit those video files from there and kind of move on through the process. So one thing that I have read is kind of holding some folks back from feeling that they can do truly all of their editing on an iPad simply because it doesn't currently allow that. Now, that could change in the future. I don't know what the limitation is there, obviously. But I'm sure there's something involved with why they weren't able to make that happen and why the video kind of needs to be imported first and foremost to be rendered and, and used as you're making your clip.
(00:20:42):
There are a whole lot of features that are baked. Final Cut Pro. And one thing that was helpful to me and it will show on my screen in the top right corner, my favorite button, the three dots, the more icon, if I tap on that, it will show Final Cut Pro user guide, video tutorial service and support and send feedback. I'm gonna start by going to Final Cut Pro User Guide. And what that does is it opens up the Final Cut Pro user guide for iPad on Apple's website. Here you will see everything that you want to see about final Cut Pro for iPad. I can look at the table of contents. I could learn about recording video with the iPad. And within Final Cut Pro, it has all of the information I need about recording the video into a new project or into an existing project.
(00:21:35):
Being able to record Apple Pro Re if your iPad has that M two chip, then you can record Apple Pro Re. But what I think is super cool is if I tap those three dots again and I choose video tutorials, ripple Training has a whole set of reviews. I mean, excuse me, of tutorial videos on Final Cut Pro for iPad. You've got Getting started creating project and importing media recording with the FCP for iPad camera. I mean, everything using soundtracks is in there. And you can get this a as a, as a purchase through the Ripple training website. So very cool that there are 19 lessons in the tutorial. 10 of them are free, nine remain locked. And if you want to purchase those those additional lessons it's $19. So they are continuing to add more lessons in the future and those will automatically be included in that $19 purchase.
(00:22:39):
So basically you pay $19, you get access to every single one of the tutorials, and then any they add in the future will also be included with that. So if you're kinda wanting to go all in deep dive into how Final Cut Pro for iPad works, the Ripple training tutorials might be the spot for you to check out everything. But I think what I find the most magnificent about FCP for iPad is how familiar it feels so that if you have training in Final Cut Pro for Mac, you're not gonna be too, you're not going to be doing too much kind of hunting around trying to figure out how everything works because it's so similar. And I think that's a triumph of the, the developers who worked on this project in particular that I as an FCP for Mac user can just hop in and pretty much get started knowing what the different buttons mean, where I need to go to do certain things. And again as Rosemary pointed out earlier, never forget to hold down the command key on your iPad external keyboard because you get so much information in so many apps about special keyboard shortcuts that can make things work even faster for you. Any El anything else you wanna say about final Cut Pro before we move on to Logic Pro?
Rosemary Orchard (00:24:04):
Yeah, I, I mean, I did just wanna mention that folks who are going oh 4 99 a month, 49 99 a year, I'm not in love with subscription apps. That if you were buying final Cut Pro or Logic Pro for the Mac, it would cost you a significant chunk more upfront as a one-time purchase. So it is worth considering that this is certainly a more affordable way to dip your toe in and see if these apps are the right way to go for you. So yeah, just bear, bear that in mind. And yeah, don't forget, of course, you can always buy a app store vouchers on sale at times of the year getting 10% off or sometimes even 20% off them, which gonna definitely add up when it when you are using a subscription like this.
Mikah Sargent (00:24:44):
Yeah, I remember saving up to spend the 300, $400, I know it's 300 now, 2 99 99 to buy Final Cut Pro and making that purchase and going. But you know, now that I have had it for years, I'm glad that I made the purchase when I did. But that's the thing too, right, is even though many of us make a one-time purchase, there are still development teams who are continuing to work on this product and adding more features all the time and trying to make it better. So the idea that you pay once for a thing that continues to be improved forever and ever and ever, it's not sustainable. So the subscription model, as much as many of us dislike it makes sense in sort of the, the trade off that you know, you experienced there. All right let us take a quick break before we come back to talk about Logic Pro on the iPad, what's musical, you get it?
(00:25:46):
This episode of iOS Today is brought to you by Grammarly. Go. As you know today, we are working and communicating more quickly than we ever have before. And, you know, sometimes you might be sitting there, you're writing something and you just feel stuck. How exactly do I say this thing? I'm trying to say? Whether you're struggling to write that thank you notes, you're creating a business plan, you're giving yourself the time that you need to try and figure it out, why not shorten that time and give yourself a helping hand with Grammarly? Go grammarly's new communication assistant powered by generative ai. You can compose intelligently. You type a prompt into Grammarly, go to generate high quality writing so you can spend less time on that wordsmithing. You can personalize your voice. So this gives you the ability to kind of customize your preferred style of communication.
(00:26:39):
You click set voice or the tone indicator at the top of the Grammarly Go window to personalize your tone and determine how you wanna sound. So you know, if you want a more formal tone, you choose casual, neutral, or more formal. You. From there you can kind of decide the formality, ah, I wanna be super casual, or, oh man, I'm trying to go super formal. And then for tone on top of just formality, you can choose personable, confident, empathetic, engaging, witty, direct. So you could go direct and formal and have a very sort of lawyer sounding message. Grammarly go understands the unique context, the preferred voice, the goals that you have to generate high quality writing quickly. And with just a few clicks, you can ideate, compose, rewrite, and reapply thoughtfully. Rewrite for tone, for clarity, for length. Grammarly Go helps you fine tune your writing to reflect your personal style and be effective in any situation.
(00:27:35):
You can select the text that you want to rewrite and activate Grammarly. Go rewrite your paragraph to sound more exciting or maybe make it sound more professional or make it sound more inspirational. I have this habit cuz I have this sort of fear of being misunderstood that the, the words that I'm putting out are going to be taken, and then what I'm trying to say might be misinterpreted, might be misunderstood. And so because of that, I have a habit of writing three paragraphs where one paragraph would do for just making sure every single possible thought of how someone might take this and make it seem like it was about this or this. I try to account for all of those things. And so those paragraphs quickly add up. This is where you could have the, the, the help that you need to say, okay, I know I'm being a little wordy here.
(00:28:30):
Help me be more direct. Help me be more specific. Help me approach this with a casual tone as opposed to what I come across sounding like, which is, I don't know, a lawyer working for a Fortune 500 company who wants to make sure that they don't get sued for writing the wrong sentence. <Laugh>, that's where I'm trying to avoid. I wanna sound more like a human, even though my brain sometimes doesn't want me to be Grammarly. Go can help you out with that. You'll be amazed at what you can do with Grammarly. Go. Just go to grammarly.com/go to download and learn more about Grammarly Go. That's G R A M M A R L y.com/go. Check out Grammarly, go at grammarly.com/go. Thank you for sponsoring this week's episode of iOS Today. Alright, back from the break and now it's time to talk about Logic Pro for iPad.
(00:29:24):
I wanna start off by saying that this has been for me the more interesting of the two apps because everything with Final Cut Pro, for the most part, I saw very positive reviews. I saw a lot of upbeat conversation. People who edit in Final Cut Pro regularly, YouTubers that I follow or I'm friends with and colleagues who, who do video editing all felt pretty good about Final Cut Pro. But in our little corner of the internet, this podcasty corner of the internet, I was surprised and interested in the number of people who were unhappy with Logic Pro for iPad because for them, from the reviews that I read, apple was signaling that this was a tool for music creators, not other audio creators. And when you the app and when you look at the the advertising for it, the ultimate music studio at your fingertips, you do get that impression, right?
(00:30:48):
This is a music creation tool first and foremost, rather than an audio creation tool you know, a more broad audio creation tool. So they talk about the beat mixer, the instruments you can have in Logic. And honestly, you know, to be fair, that's always been Logic's first goal first success is as this music creation tool. But I do know some folks who were, you know, disappointed that they had to continue using the third party tools they had, like Phite, for example, to edit their podcasts. So I'm curious, Rosemary before I kind of show some of the cause I wanna talk about the the the sort of built in tutorials. I, I would love to hear your thoughts on logic and whether you also feel like it is a music creation tool more so than an audio editor.
Rosemary Orchard (00:31:55):
Yeah, and I think this is one of those things where any application can be what you make of it, right? If you have a hammer, everything starts looking like a nail <laugh>. So there, there is certainly a an extent of people who have been using Logic to edit podcasts for a very long time will probably figure out like, yep, okay, I can still use this for this. It's not necessarily designed for that, but I find it's, it's still, you know, it it can, it can be used for that absolutely. But where people have started building alternative workflows using things like faray and so on, and taking advantage of those other tools, then I don't necessarily think that Logic Pro, if they're not using it for music creation and editing is going to necessarily win them back just because it far, for example, is purpose-built for podcast editing and specifically, you know, vocal audio editing unspoken audio.
(00:32:51):
So it, it makes sense that, you know, people would you know, find that they're, they're going back to that. And you know, there, this is a brand new app, so people have not really had a huge amount of time to play with it. We've only had it for a week. But it is definitely possible to oh apparently crash a Logic Pro mm-hmm. <Affirmative>. but they've suffered a few crashes. It's also possible to go in and, and look at the waveforms for for example the different tracks that you have and so on. So I can just hopefully pop it up up here and you can, you know, you can't see, you know, all of all this stuff and so on, just like you can in other apps. So there's definitely possibility of doing podcast editing here. I'm not sure I would go to Logic for podcast editing. It has never been my podcast editor previously. I've always stuck with things like Fare and other apps and also outsourcing things to fabulous people who are much better at this sort of thing than I am <laugh>. But yeah, it's, it's definitely possible to do.
Mikah Sargent (00:33:49):
Yeah, I personally am an Adobe audition podcast editor and have been for years, so I've stuck with that. I, you know, there are folks who do a heck of a job, a really good job editing with logic on Mac. They edit podcasts and they use features like trim silence to help them with that. So I know it's possible there, but I can also understand and respect that, yeah, for them they feel like this tool is not what they wanted it to be especially for folks who were hopeful that they could have that first party app on their iPad that they're used to on the Mac. But let's let's start by looking at this, this screen here. When you first launch Logic, after you've agreed to the trial, you get some different settings here, or you go some options here at the top are new empty project, then you've got learn and explore featured sound packs and live Loop grids in Learn and Explore.
(00:34:43):
I love this stuff because this gives you the chance to try out and understand logic. So I'm going to choose start lesson on the Logic Pro tour. And here you're going to see these, this little text box pop up and it says, welcome to Logic Pro. You can show or hide parts of the app to optimize your workflow depending on what you're doing. This tour is going to introduce key working areas and shows you how to access them. First is the browser and the browser. You browse, you search for patches, tools, loops, presets and other content. So we'll tap that browser button in the bottom left corner, which kind of looks like an inbox to be able to access these features. Then in the tracks area you build an arrangement by recording and adding loops, audio files and other material on tracks.
(00:35:29):
And a timeline recording and recordings and added files appear as regions with different default colors. So this is the area, you've got regions on there and they've got different colors. The transport controls let you choose play, let you control playback. You can go to the start of the project, you can record, you can set up looping and then track headers lets you see, and I'll tap and drag out so we can see the different options. Here. You've got the ability to mute solo a track you can swipe right on a track icon or the track list to show the track controls. So that will I've just soloed that clip. For example, let me swipe this back so that it's small again. Oh, they want me to keep that zoomed out. So there we go. In editors, you can edit regions of the clip.
(00:36:18):
So let me just tap on these function buttons. It says tap a green mid region to open the piano roll editor. Mini notes appear as colored bars that you can move resize and edit another ways. Use the function buttons to trim regions, edit or brush in mid notes and adjust note velocity. So there's the pencil, for example, the brush icon velocity. So I'll tap on the pencil and then it says, tap a blue audio region to open the audio editor. And now I can see that here I have the option to open the audio editor to loop, for example you can also trim split or stretch the audio region. If I tap on a drum clip. Then I also get the same thing here where I've got features and settings for drumming. So I could change the type of drum, the intensity, the complexity then the step sequencer, which of course has different steps that are built in.
(00:37:18):
And you can activate or deactivate, whoop those steps by tapping on them. And then to close the working area, I will choose the control bar here. And let me swipe. There we go. View the control bar and then plugins as well. So it's let me click on the, or tap on this. And now you can see some of the plugins that are available in each of these. So there's a direction, mixer, tape delay, chromo, verb, channel, eq, compressor, I mean all of the features that you're probably used to. And then the details view which lets you see all the different per parameters. Tap a different track in the tracks list of view, all of its plugins. So we'll do that, da da da da. And then the mixer button. Let me close the other view, of course has each of the channel strips where you can make changes to those mutant solo tracks.
(00:38:15):
Set some for recording and then also view the different plugins that you have set up. For anyone who's used an audio editor like this, you're going to be used to seeing these, these features set up this way. It's, it's kind of a sort of standard look and feel. And then let's say double tap an empty part of the view control bar to close open working areas and continue the lesson. So there we go. And then select a software instrument track. Then tap the play surfaces button to view play surfaces. So we could change that from keyboard to drum pads, for example. Let me actually turn up the volume a little bit and I'll choose, let's go with cord strips and then we'll go back to the keyboard.
(00:39:13):
All right. And then it says you can use to play software instruments directly of co of course, on the iPad screen. Tap the play surfaces button to close the play surface and continue the lesson. And then here we go. We're almost to the end here. Live loops, which will actually let you kind of set up cells that have these little special loops in them that will replay. And then you can set them up almost organically as you're kinda going along. So it says play range and report cells freely in the live loop script tap cells to start them playing in control scenes using triggers. You can also edit cells in different ways. So you'll notice that I'm kinda adding in sounds as I go to give more as I'm going through. And then it says, now you're ready to explore creating music with Logic Pro View another lesson using the links below.
(00:40:11):
So I'm gonna choose end lesson here. I'm gonna stop the play of mine. So what I could do in this view here, in this sort of live loops view is I could hit the record button and start creating music using these different live loops. I've got a dreamy piano, I've got atmosphere, I've got trap doors, something called Absolute Zero and the Tompkins, let's see the Tompkins Square 8 0 8 bass. And then I could go through and start making music with these live loops add more if I'd like to and kind of work that way. But that is just sort of the one example of using logic Pro for the sake of, of creating sort of your standard audio. But again, there's so much that you can do within these editors. And if you were working with a more standard setup, if you were trying to just edit an audio clip, for example, let me actually, lemme go back. And what I'll do is I will tap to create a new project and let's just do some simple tracks and we will do audio from the iPad microphone. So here I will go ahead and move out of these audio patches and just set this clip to record, record. Oh, oh let's mute this temporarily.
(00:41:43):
Okay, so what I'm gonna do is record some audio and then I'm gonna show you kind of what you can do to it. So I will go ahead and hit the record button. And now I'm recording some audio on my iPad Pro in Logic Pro for iPad. The audio is being recorded through the microphone that is built into the iPad. If I wanted to, I could set up an external microphone that plugs into the iPad using its U s BBC connector and record audio that way. Alright, stop. And now we can bring back the audio for this, this. Now if I play that back, now
Speaker 6 (00:42:24):
I'm recording some audio on
Mikah Sargent (00:42:26):
My, you can hear this, but what I want to do is show patches for this. So let me <laugh>, let me add Angelic to this clip and see what happens.
Speaker 6 (00:42:38):
Now I'm recording some audio on my iPad Pro
Mikah Sargent (00:42:42):
In honestly, doesn't sound very angelic to me. It, it
Rosemary Orchard (00:42:45):
Sounds more like somebody is trying to take over the world and they've got like the reverb on Max. Yes. Like, you know, now you will do everything I tell you.
Mikah Sargent (00:42:54):
Let's try Bright Vocal instead, and let's hear how that sounds.
Speaker 6 (00:42:56):
Now I'm recording some audio on my iPad Pro in Logic Pro for iPad. Ipad. The audio is,
Mikah Sargent (00:43:04):
It still has a lot of reverb in the background, so I can go in and where did I, now I can't find that. So I can go in. There we go and make some adjustments by, for example, removing the stereo delay, the tape delay to get rid of those and just keep it with the channel eq, the compressor and the dsr. Those I want, I didn't want the rest of it. So now if we play it back,
Speaker 6 (00:43:31):
Now I'm recording some audio on my iPad Pro. And what I love Logic Pro is that
Mikah Sargent (00:43:37):
Right here you can see that this is live view of that channel eq. So watch as I play this back
Speaker 6 (00:43:44):
Now I'm recording, I'm actually seeing on my iPad
Mikah Sargent (00:43:47):
How is making adjustments to the audio wave form iPad as it's playing back the audio. Impressive, recorded through the, this is all happening on iPad.
Speaker 6 (00:43:55):
Ipad if I wanted to,
Mikah Sargent (00:43:56):
I could, as opposed to, you know, needing more processing power that you get from a Mac. So obviously there's, so that's, that's the thing about Logic, I think even more than Final Cut Pro is that <laugh> it is so incredibly like feature packed. There's so many different settings, so many different options that it's worth taking a look at some of the tutorials, some of the, the, especially taking a look at the the owner manual or the, the, the sort of user guide. That's what I was looking for, the name user guide which will then let you kind of de delve deep into this application and everything that it can do. Rosemary, why don't you tell us a little bit about your thoughts on Logic Pro for iPad?
Rosemary Orchard (00:44:48):
Yeah, so I'm, you know, pretty excited by this. I've done, you know, a fair bit of playing with music. I'm not gonna call it like editing or creating because it, it's not really that, but I've done a fair bit of playing with music every the years, you know, creating things with various different mid controllers and so on. And I've been enjoying playing with Logic Pro. And something that if people are looking to, you know, have a play with this that I will note is that Logic Pro is available on many more iPads than Final Cut Pro. Final Cut Pro needs iPads with an M one chip or later logic Pro is a 12 bionic chip iPad models or later it's got a much longer compatibility list. So if you're looking to have a play with one of these apps and see what it's like then logic Pro I think is gonna be a little easier to get into.
(00:45:33):
Simply due to the fact that it's got you know, more compatibility. And also the fact that you can go through those tutorials that Mikah mentioned at the start to, to, to learn how this works. So if you want to learn how to do create a beat with a Step sequencer, you can do that. There's also Beat Breaker and, and so on. And there, there is a whole host, a really long list actually, of tutorials here. Which, you know, is, is really nice. I have to say, you know, if you, if you're looking like, okay, like Live Loops, I wanna learn all about Live Loops. There's three tutorials there right now. There's also working with plugins and, and things like that as well as, you know, recording instruments and finding and adding loops and the bra tour and all of that.
(00:46:18):
And it is just, you know, fun to, to have a play. You can also change your new project settings, which I've currently put my face in front of. So I'll just move my face a moment if you're watching the video. And you can change things like your default tempo and time signature, your key to be a major or minor and what note it starts from. And you do have all the notes you might expect. I should note I did test just in case German speakers will be pleased to know that it goes from A through to H and it doesn't have the, the b I believe it is. I, either way I checked it. And you can also change your default sample rate. So if you want to be able to output everything in 96 kilohertz instead of the standard 48, you can change that.
(00:47:02):
And then, you know, when you go ahead and create your new empty project, it just, you know, brings you straight in so that you can go Cape, I'm gonna connect a MIDI device, which you can connect via u s bbc. And that's it. You, you can go straight from there. You can record audio with your iPad microphone. And when you tap on those magic three dots that Mikah loves so much, you can change the options for each of those. So if you're using your iPad microphone for example, it will be stuck in mono but you can turn on and off input monitoring, et cetera, MIDI options. You can choose to use external midi. And you know, when when you've got things to attached, you get more options. It's, it feels very nice and intuitive to use. And I've certainly been enjoying playing with it so far.
Mikah Sargent (00:47:48):
Beautiful. I did want to point out, I looked for the Guide 959 pages as the Logic Pro User Guide for iPad <laugh>. So there's a lot in there, but if you really want to know how to make use of Logic Pro for iPad it's well worth checking out the guide. Yes, the last page was sort of in the guide. Synth basics starts at 9 15, 915. So
Rosemary Orchard (00:48:18):
There, there's also a web paste version of this guide as well, which you can look at on the Apple website for anybody who is going away, I have to download a nearly a thousand page pdf. They have logic Pro and Final Cut Pro user Guides for the iPad specifically online, which can be downloaded as a pdf d directly from there.
Mikah Sargent (00:48:36):
All right, so folks, honestly these feature packed apps are going to be comparable to what you can use on your Mac already with a few features, like we talked about editing directly from a, from an S S D in Final Cut Pro or in the case of Logic Pro some of the podcast editing features that folks had hoped would be there not being there. But outside of that, I think anyone who's used these tools before will find this familiar. And then, as Rosemary has pointed out, given the 4 99 a month, 49.99 a year price arguably a lot more accessible to a lot more folks. So I wouldn't be surprised if we see, you know, some new entries into the field because of these tools being made available in a way that's a little bit more accessible. And I think that's what's most exciting about this.
(00:49:38):
I think that's what makes this well worth a talking about, but b, celebrating. So yeah, I would love, love, love if you sent us your creations that you make with Logic Pro, with final Cut Pro and also consider that now these tools are included in the long list of applications and features and operating system bits that you can always ask Rosemary and me about by sending us emails iOS today@twit.tv, we will go through those 949 page guides, <laugh> if we don't have that information already and answer those questions for you. So that's what we're here to do. We'd love to help iOS today at Twitter tv. And yes, as I mentioned, share your, share Your creations. We'd love to see that. We'd love to see what people are making. Up next, we've got the news. It's time for the news up next. All right up first in the news is just a brief mention that I talked about there are several guides and reviews out there for Final Cut Pro and Logic Pro for iPad. Rosemary, you linked to one of those reviews in nine to five Mac?
Rosemary Orchard (00:50:54):
Yes, I did. And it's just going through talking about how Final Cut Pro for iPad is a step in the right direction, but it's highlighting a couple of those limits of iPad os. Now I'm personally thinking that anybody who's there going with, yes, iPad OS is limited, you know, it's not makos. Absolutely right. The timing, however, of the Final Cut Pro and logic release last week, a month before WW d c not even a month before ww d c three weeks before ww d c, implies to me that there's gonna be some exciting stuff coming down the, the pipeline at WW d c. So I think maybe we're gonna see some of those restrictions and, and you know, handicaps perhaps being a way to look at it disappear, or at the very least evolve into something less problematic for folks.
(00:51:46):
So yeah, it's certainly interesting. Some people were saying that they weren't super happy with the keyboard shortcuts for iPad oes, cuz you can't customize them in Final Cap Pro or Logic Pro, but you can on the Mac, well, you can customize keyboard trickers in every application on the Mac and you can't customize them at all on the iPad with the exception of using accessibility controls. So yeah, things like that, they really are iPad limitations, not not final current limitations, but let's see what happens. Maybe we will see some more customizations here. And just like when we first got Track Pad support that came as an accessibility feature and then rolled out, I believe it was a 0.3 or a 0.2 release I, I dunno if you remember a iPad O os then for everybody and just became, you know, a thing. So who knows, who knows what we're gonna see. It's very exciting and yeah, I can't wait.
Mikah Sargent (00:52:43):
Then, so in 2022, the app of the year for Apple Watch was gentler Streak. And Gentler Streak was also a finalist for the 2023 Apple Design Award. This is an app that I believe we've talked about on the show before. It is kind of looking at ways to set goals and keep track of things without being too much of a guilt system, like a lot of the mm-hmm. <Affirmative> other apps that are out there. That's why it's called Gentler Streak. And there's now a new feature for Gentler Streak.
Rosemary Orchard (00:53:19):
Yeah, there is. So Gentler Streaks has added menstrual tracking to its wellbeing section. And they've got a little guide in the app store with their, their major update, which is really nice that, you know, that they've, they've got that there. And I, I won't go into the app and, and go through everything cause I uninstalled it by accident earlier today. I'm meant to, meant to reinstall it before the show, but ran out of time. But they've, they've gone through and added that and it's just really nice to see that this app, which, you know, has become very popular and for a very good reason continue to add new features like this. And yeah, so if you're somebody who needs to track your menstrual cycle, then it is now under the wellbeing section in gentler streak.
(00:54:01):
And if you haven't tried checking out gentler streak for fitness tracking and so on with your Apple Health data, then it's well worth looking into as an option. Just, it's, it's a nice app that's got, you know, a lot of gentle as the name implies encouragement for you. And it's certainly not so mean about breaking a streak because that, that does happen to all of us with the best of intentions. I slightly overtake my workouts on Sunday, Mikah. It turns out like three hours of acrobatics in various forms can really do a number on you. And this morning I was just barely able to move. Yesterday I was okay, but today, oh God, that, that really hit this morning. So <laugh>, I'm glad it's eased up a bit. But yeah, whatever your reason for needing to take it easy, gentler streaks might be a nice one to check out to help you with that.
Mikah Sargent (00:54:48):
And then if you've ever as someone who doesn't own a, if you are someone who doesn't own a HomePod or HomePod Mini, if you've ever looked at us, those who do own them and felt saddened by the fact that we were able to send messages as an intercom feature on our HomePod and HomePod minis, that I could annoy my partner by sending a message to a HomePod mini placed precariously next to his face. Then you as a Sonos user out there should rest easy knowing that you will now be able to make use of this feature from the sorro app, which I wouldn't be surprised if Rosemary, you are familiar with the sorro app for the fact mm-hmm. That it adds shortcuts. Tell us about the sorro app and this latest feature.
Rosemary Orchard (00:55:36):
Yeah. So the Soro app is essentially, Hey, I have Sonos devices. I want better shortcut support for them. How can I get that? Well, you can download the Soro app and ta-da, you get shortcut support. Yay. it adds a whole number of features. There is also for anybody who's got Roku devices remu by the same developer and that, that adds shortcut support for that. And so the app essentially itself just shows you how you can use different shortcuts. It's got a whole bunch of examples including things like walkie-talkie, sono spot text to speech and so on. And now they've added support for an intercom like feature, which is very nice. It's with this Speak text action where I've now lost the example that was showing up here earlier.
(00:56:26):
I think I installed the up the update from the app store instead of the beta. But either way, you can go through and control everything basically with it, which is really nice. Wow. And it will even like it'll show you all of the, the home, the Sonos devices you've got on your network. It is 7 99 to download. But it gives you like, I think it's 24 different or 34 shortcuts actions for your Sonos devices. So if you wanna be able to control your Sonos, which do, if you, they've got airplane support, they do have some control through home kit, but soro app is just so much more precise. It's well worth checking out.
Mikah Sargent (00:57:06):
Yes. that is actually pretty incredible. If you do have Sonos devices,
Rosemary Orchard (00:57:11):
And I I should mention as well, if you don't have Sonos, Sonos devices, you've got IKEA sys devices, which are Sonos speakers in an IKEA casing. This works for them too. Oh, good. So you, you, yeah. So if you've not got, you know, like the Sonos beam or something like that, and you've got, you know, the IKEA Symphony or the Ikea Symphonys Glamp, then you can actually take advantage of this regardless.
Mikah Sargent (00:57:34):
All right. Our, oh, wait. No, I can, I think, yeah. Is that the music? It's, it's time for Shortcuts Corner.
(00:57:51):
Welcome to Shortcuts Corner. The part of the show that's totally not planned and catches me by surprise every week. No, this is the part of the show where you write in with your shortcuts requests and Rosemary Orchard, our shortcuts expert, provides a response and oftentimes that response is an actual solution to your problem. The person writing in this week is Steve, and Steve writes, my partner and I care for an elder with moderate dementia and declining mobility. We have been using a baby cam to keep an eye on her during the day to make sure we run downstairs to help her move around. We're looking for a bedtime solution where we can get some sleep, but still be notified if she tries to leave the bed or her room. I have vibration motion and door sensors in and around her room, but I'm having trouble figuring out how to minimize the interruptions to just what we need to know.
(00:58:42):
And most important, when we need to know, I'm trying to find a way to turn on certain notifications from specific sensors during bedtime when we turn on our sleep focus mode, or using some sort of virtual switch to turn on or off notifications for a group of sensors in the time we want. Ideally, we would like to turn on these notifications for ourselves on our own iPhones with a toggle, but we would be fine with both of our phones being set to the same state for these notifications. I know how to create virtual switches, but figuring out the rest with focus modes, shortcuts, and switches is confusing. Any suggestions? Thanks, Steve. Oof. This sounds like a tough one, <laugh>.
Rosemary Orchard (00:59:25):
It is. And so I'm, I'm gonna go through a couple of levels of this for, for one of a better way to put it, because I feel like for most people, what they probably want to do is built into home kit itself. You don't need anything fancy or anything in particular. You just go into Home Kit and you pick one of your devices, or rather specifically one of your sensors or security related devices. So, for example, by security related, I mean things like a lock on a door or camera. And so I can go tap on my bathroom occupancy sensor right here. And then if I scroll down a little bit, then there's a section for status and notifications. And so here I could turn off showing it in my home summaries if I wanted to.
(01:00:13):
That's the, the big overview in the home app. But I can also turn on activity notifications. And if I turn on activity notifications, then I can specify at a particular time. For example, at night, once I've tapped on at night, I get an info icon. And when I tap on that, then I can actually choose what at night means. And unfortunately for us that's related to Sunset and some rice, so that may not be what Steve specifically wants here. But you can also say at specific times. So say Steve and his wife usually go to bed at about the same time every night. It's say, 10:00 PM then you could actually have this for 10:00 PM to 6:00 AM and then restrict it to specific times. And you can also have it for people if you've got more than one person in your home.
(01:00:59):
I only have one person in this home kit home, then you can choose when I'm at home, when anyone is at home, no one is at home, et cetera. I instead I've got when I'm at home or when I'm not at home. And then you can turn this up set this up for each person so that they get notifications when that sensor is tripped. So the fact that there are, however multiple sensors involved makes me think that Steve has gone down a bit of a rabbit hole with various things and is trying a bunch of stuff out. My, my big you know, bringing out the heavy solutions for this suggestion would be home assistant. Mm-Hmm. <affirmative>, because you can then say, okay, if my phone is in sleep mode, then I'll use the shortcuts actions from my phone to tell home assistant I'm in sleep mode.
(01:01:49):
And then it will turn on sending notifications about this, that, and the other and can send them as critical alerts and so on as well. But there is another option, which I'm going to mention, and if you tap on the Plus in the home app, then you can add an automation and then you can scroll down once you've selected your event. So I'm gonna say a sensor detects something in this particular case, and if I can find my bathroom, then I will use that same sensor just for test purposes. There we go. And then you can choose, you know, sensor turns on, sensor turns off, switch turns on, switch turns off. Those are options as well. You've got those same limitations of time and people if you want. And then you can actually scroll all the way down to the bottom in the next section and convert to a shortcut.
(01:02:35):
And then here, what you can do is you can actually go a little bit more in depth. For example, you can use the status of a home kit act home kit device. So for example, if you've turned on a I am asleep virtual switch, then you can get the state of that. And so I'll just use my light panels as a proxy. And actually I will not, I will use the, I will use something slightly less complicated, something that has an on off button. Ideally do I have something with just a simple on off button here? Da, there should be something that's a switch bathroom light. My bathroom light just turns on and off. So it's got the power state. So if I were to run this, it will just say, at the moment it says no.
(01:03:22):
If my bathroom light were on, it would say yes. And then you can say if the and I'll just slide that one if that power state. So that's, that's, if it's on, then you can go into something a little more fun with, say, get contents of u r url. And if you were to use a get contents of URL action, you could use this in combination with an app like pushup. Now, full disclosure, I'm part of the team behind the development of Pushup, which is a app an app for extending shortcuts and doing things like fancy custom notifications. And then you can send a custom notification. I'll actually just pick my door, still open one here, and I'll just copy that u r url. And then you can actually, instead of getting the contents of the para state, you could paste in that u r URL here.
(01:04:09):
I won't paste it cuz it's got my secret in there. And I don't wanna reveal my secret to everyone, even though obviously I can reset it, but it can then send that notification and it would only send that notification if that other thing were on. So you can do this with converting things to shortcuts and using something like push cut or there, there are other apps as well that, that support something similar to this like pushover and push bullet and things like that. And you know, you can even then have it update things and remove those. You can try doing this with just home kid, or you can go for the big guns and get out home assistant and you can create some virtual switches and so on in home kid. Or you can just do the work in home assistant and share back the results to home kit as you need, whatever works for you. The trick is figuring out which one you wanna start with. <Laugh>, I'd suggest try starting with just Home kit and just setting up those simple notifications when something happens so that you just, you know, when, when that sensor detects something, you get a notification and see how that goes. Because I think, Steve, that will probably do most of the work for you.
Mikah Sargent (01:05:18):
All right. And then coming out of that into feedback and questions Peter has written in, hi, Rosemary and Mikah. I received an email from Apple this morning advising that they were shutting down my photo stream on the 26th of July. The email said they were letting me know as at least one of my devices was using it, and they would be deleting any photos attached to it. I have used Apple Products for about eight years and have never heard of my photo stream. I back up to iCloud, but this seems to be something different. I've looked across my devices and can't see any sign of it where they said it would be, I'm afraid the links provided by Apple do not clearly articulate the changes from my point of view. If you think this is worth mentioning, could you discuss on your show what this is and what needs to be done before it goes away?
(01:06:02):
Kind regards, Peter. So Leo and I actually talked about this over the weekend on Ask the Tech Guys. He mentioned that I, or he mentioned it and I was, I kind of said, oh, I'm not really that concerned about it because for most folks they're not using it. They, because it was the way that things kind of once were, and then Apple introduced iCloud photo library, and that was the kind of enabled by default set of features. So when that happened, my photo stream became less and less important. My photo stream had several limitations. For one, it would only stream the photos for a period of time after which they would disappear from your photo stream. For two, they were lower resolution versions of the photos. And for three, it was replaced, of course, with the more powerful iCloud photo library.
(01:06:56):
So I actually did not receive a notification about this because I don't have this turned on on any of my devices. But if, if you do, then of course this is a problem. Now, one place that I could see a lot of people having this turned on that they might not know is an Apple tv. Apple TV was kind of one of the best places for this because you could see a stream of photos right there as they were coming through and be able to display them, you know, kind of wallpaper style almost, or screensaver style almost. But outside of that, I think a lot of people are going to have them off. Unfortunately, there are still some folks who do have it turned on, who may be worried that when the feature gets turned off, it's going to cause a problem for them. So, yeah. Rosemary, what, what is some advice we can give to our listeners regarding the iCloud photo stream?
Rosemary Orchard (01:07:56):
Well, first of all, I would recommend just go to Apple id.apple.com or go to the settings app on one of your devices. Go to your Apple ID and then look at all the devices signed into that Apple ID account. Make sure it's the same one as the email that you got sent. Because you may have a second iCloud account that you've forgotten about that has an old device registered to it that you don't have anymore. Whatever, something along those lines. But check what devices you've got and any devices that you do not own that you sold off to other people or recycled or whatever, make sure you remove those from your Apple id. And then that will probably for, I would suggest the vast majority of our, of you folks listening and watching resolve your problem. That'll be it.
(01:08:41):
Bye-Bye. and then you, you just don't need to worry. Now if you do have some old devices floating around in there that you you know, you, you can't update, for example cuz of course the other thing to do is make sure that you install all of your updates. Then you can go into them, for example, on the Apple TV in the settings, you can look at turning off photo stream and things like that. And just see if anything goes horribly, horribly wrong. And Apple does have the option of being able to download things from the photo stream if they are there. You believe you can do that@icloud.com. But you should already have a copy of these images on your device because it is just a lower resolution copy that was there to be kind of like shared as like a preview across your devices so that you would have kind of an idea of, you know, what things you've been up to recently, which, if you or me meant that you got a screensaver on Apple TV of lots of screenshots of like shortcuts and workflow back in the day <laugh>.
(01:09:44):
So I didn't really use that feature. But yeah, if you need backups of your images and so on, and you were using photo stream as a backup system first of all, I seriously hope you didn't lose any photos cuz it wasn't actually a backup. And secondly, I'd recommend getting some iCloud storage for that so that you can sync the images pr between devices properly at full resolution without losing anything. And if that's not an option, don't forget, if you've got something like an Office 365 account, then you get OneDrive storage space. If you install the OneDrive app on your device, you can back up photos automatically. Similarly, if you have a subscription to Google Photos for your family you can install the Google Photos app and back everything up and you can back things up with Dropbox. There are lots of solutions for backing up photos on your iPhone and iPad. But if you use your camera and you wanna keep those pictures, definitely check out one of them so that you don't have anything going missing. So there we go. That's basically what we need to work know about.
Mikah Sargent (01:10:45):
Awesome. Yeah, it, it's, I think that this ends up being something that scares people, <laugh>, right? That it's not as, as frightening as it sounds, given the fact that this was already kind of a photo stream that lo that drops things off after a while anyway. Mm-Hmm. It's not as if you're, you're truly losing anything. And then one of the things I've failed to mention is that if you had going to the photo stream after iCloud photo library was added, you had to say, I want to save these to my iCloud photo library <laugh>. So it was, it was a mess and I'm glad that it's going away. It ended up confusing a lot of folks. And so there's some, some tips for you, but also I think a little bit of comfort knowing that, hey, this is not super, super important.
(01:11:34):
Alright, let us move right along to take a quick break before we come back with our app caps, because I do want to tell those of you out there who are perhaps thinking about you know, the, the, the ad reads that we do on the show, the, the sponsors we have on the show. And maybe you're considering that you would like to join the team that you would like to help support the network and also get your product, your service, your software out in front of all of the listeners and viewers that we have here at twit. Cuz here at twit, we are dedicated to building a highly engaged community of tech enthusiasts by offering them the knowledge they need to understand and use technology. In today's world. That's what Rosemary and I do on iOS today, every single week. In order to do that, we create partnerships with trusted brands and make incomparable introductions between our audience and our partners.
(01:12:35):
With twit, you can keep your brand in front of your target audience and continue to grow because at twit we deliver powerful host red ads by tech experts. You've heard them on this show, you've heard them on all of our shows. And according to Nielsen, 56% of podcast listeners pay more attention When a host reads an ad on their show, we pride ourselves on delivering information relevant to our audience. 72% of our listeners have a job function that's directly related to technology, and 87% of our audience are involved with tech and IT decisions. We have top earners listening to our shows overall, 66% of our audience earns more than $100,000 annually, and 23% earns more than $200,000. Partnering with TWIT means you're going to get the gold standard in advertising because we go above and beyond. We've got valuable services like a full service continuity team that's supporting everything from copywriting to graphic design.
(01:13:38):
So if you know you're going, oh, I don't know about how we're gonna write this copy, our team can handle that part. Oh, I don't know what the graphics our team can handle that part. We do embedded ads that are unique every time and guarantee over delivery on impressions. So you're getting more than what you pay for onboarding services, detailed reporting that are offered free of cost to our direct clients courtesy commercials that are shareable across social media and landing pages. So, you know, you hear, well, let's just say me read an ad for you and you think, oh, that's a, that's great. I want to introduce my product to new audiences using this. That's what we make. We make these courtesy commercials for you to share on social media and landing pages and of course, other free gifts like mentions in our newsletter that sent to thousands of fans, recession bonuses, social media promotions and value add on shows you didn't even have to purchase.
(01:14:31):
So occasionally your ads might show up on a show that you didn't even have to pay for it to be there. That is what we provide. That's the gold standard. Our listeners often become our partners, the founder of thanks to Canary Harun. Miir says, we expected twit to work well for us because we were longtime listeners who over the years bought many of the products and services we learned about on various shows, and we were not disappointed. The combination of the very personal ad reads and the careful selection of products that twit largely believe in gives the ads an authentic, trusted voice that works really well for products like ours. 10 out of 10 will use again. Ah, no, that sound great. Our listeners are a highly intelligent, highly engaged, tech savvy audience. So are you ready to elevate your brand? If you are, join us. Launch your campaign today, break out of the advertising norm, and grow your brand by giving an authentic introduction of your products and services to a qualified audience by experts you trust. Check out what we have to offer at twit.tv/advertise. That's twit.tv/advertise. Please consider joining twit with your product, your service, your company. We'd love to have you. All right, let us move right along to the app cap segment of the show.
(01:16:01):
This, of course, is the part of the show where we place caps, a top hour heads to honor our app or gadget picks of the week. These are the apps and gadgets we are using now or have used for quite some time that we want to share with all of you because we think they're great and we want you to know about them. And then of course, to cap off the show we put things on our heads like this delightful cap. I'm wearing a top of my head. Perhaps it will be familiar to you if I if I'm doing this voice and also wearing this cap. Anyway, rose, the Mary Orchard. Tell us about the cap at top your head and then tell us about your app or gadget pick of the week.
Rosemary Orchard (01:16:42):
Well, the cap top of my head, it's silver. It's glittery. Butch means that my house is now covered in glitter and if I wanna get rid of it, I have to burn my house down and move. And it's a cowboy hat because of course why wouldn't I wear a silver glittery cowboy hat for Iowa today? There's no particular reason for it other than the fact it came in my box of party hats. And, you know, I'm talking about some fun things today, including games on the Nintendo Switch. So I have previously had as my app Cap switch Buddy which is handy dandy little app to help you connect your Nintendo switch to your iPhone and, and, you know, do various things with it. But this app called Game Widgets by the same developer is to help you keep track of upcoming game releases, not just on Nintendo Switch, also available on Steam, PlayStation Xbox Quest, all of the games consoles.
(01:17:30):
So there are a number of different widgets available. There's teeny tiny little widgets there's large widgets. And there is a calendar, large calendar widget as well. And then there are some medium sized widgets. And so what you can do if I just open the app is you can go ahead and just sort of scroll through upcoming releases of games that might be there. And if you see something and go, Ooh, I'll snap on that and see if that's something that I'm interested in. So if I was looking at Crash Team Rumble, then I'd see that that was gonna be released on the 20th of June. And I could add that to my favorite so I can get a bunch of information about it and see it even supports multiplayer. And what you can also do is see all of your favorites and then see upcoming releases.
(01:18:20):
Now there's also a search button in the top right. So if I tap on that then I can type in apparently Elda instead of Zelda <laugh>. And then I can see the legend of El legend of Zelda, tears of the Kingdom. And this one is in my favorites. And so if I, if I look at my favorites then I'll see that one there. And if you download the app for free, then you only have three favorites available to you. So I'd have to unfavor something before I can favorite something else. And when I go to favorite an item, then I can choose which platform I would be interested in getting this on. So if I wanted to get this on PlayStation five versus Xbox One, they may have slightly different release days in this particular games case, they're the same.
(01:19:01):
But then in my widgets I can see what's coming up. So don't forget widgets on iPhone and iPad don't update immediately. So the fact that Zelda is still there is not game Widget's fault. That's iOS being good about my battery life. But in widgets I have a small widget of a release countdown, which is gonna countdown the days until my next release. I have a medium release countdown widget, which again counts down the days. And then there is a medium up next widget, which shows the next release that is gonna be incoming in my list complete with the date, small artwork and so on. There is an update list widget, which shows me in a large view the, a nice sort of colorful with artwork version of the next release. And then underneath that there's a space in the listing for more as a tech space.
(01:19:51):
And then there's a calendar one. And I have to say, you know what, what works out quite nicely here is you can also for some of these, specify a particular one and then when you tap on it, it will take you to that. So this widget here, when I edit it, I can it's, it's the release countdown. I can choose which game to follow in the release countdown. So I can set this back to Zelda and it will show me that it's been released. And then if I were to edit it again instead of tapping on it, then I can change it back to, in this case, Calico, the Quilts and Cats of Calico, which as a board game that I have very much enjoyed. And I'm looking forward to the digital release of on Nintendo Switch and Steam. So if you or somebody in your life likes to keep track of upcoming releases of games then this is a cute and pretty way to do it. It's free to track three games and 3 99 a year to unlock unlimited ones and support the developer of this and a few other great apps. So why not give it a try and a play and add some widgets to your iPhone home screen.
Mikah Sargent (01:20:51):
Nice. the cap at top of my head is the wonderful cap from now I'm forgetting what it's called. Beca Alison
Rosemary Orchard (01:21:02):
Wonder.
Mikah Sargent (01:21:02):
It's the Matt thank you. It's the Matt Hatters cap from Alison Wonderland. And I think it's a delightful hat, but the app that I'm talking about this week is going to sound familiar to some of you who tuned in. Just last week as we talked about Apple Arcade updates, I have been playing this game so much that I had to make it my app cat pick because it's wasted so much of the time in my life. It is a game called Cityscapes and it is available in Apple Arcade as part of your Apple Arcade subscription. And it is a city building sim that doesn't have any of those ridiculous, free to play mechanics. So since when you start out you have one little city, it's called River Valley and you start out at level one, you're trying to build up your city.
(01:21:51):
You'll notice that I have now opened up not two, not three, but four cities. I'm currently still playing through my second city though I haven't moved on to three or four yet because I'm trying to get all of the areas unlocked in the second city. So let me tap on my second city here, and this is Glacier Glen. You'll notice that in my Apple Arcade friends, I currently rank number one because nobody else is playing this game. But good luck to anyone who does join because I have quite a few points. So when I tap on play, it'll take us into the city and you can see my city here that has been building up over time. You start out by building roads. Roads are required for building certain buildings next to them, but then from there you have to add resources to your city that are needed.
(01:22:45):
So you need to add water to locations, you need to add power to locations. Also certain buildings will sort of pollute your city. So you need to add groves of trees to kind of balance that out. There are these little goals that are given to you on the left side of the screen here, like increasing the education provided. Now I've got a few options for increasing the education provided I can either go in and find the education buildings that I already have in the city and pay to upgrade them or I could add new buildings. What I'm going to do is look around to see what I do have. So I'm gonna tap on my building options here and I will choose education. And then what that does is it shows me on the map the different buildings that are education buildings.
(01:23:32):
So I've got an elementary school here. I'll go ahead and upgrade that. Then I'll go back in and choose education again. That's the one thing I don't like about this is that I have to keep ret tapping. You'll notice that this is level five and there's no option to upgrade. That means it's reached its max level. So unfortunately I can't do anything with that education building. But let's look around. We've got a high school over here I can upgrade for 11 K. We also have a, where was it? I think there was an elementary school nearby. Okay, that one's already reached level five. This elementary school has also reached level five. So we'll keep looking around cause I know I've installed some libraries and colleges as well and I'm spending the money that I have. The better your city is, there's a university the more money you get in taxes.
(01:24:22):
So right now, every time this little meter at the top reaches max, I get 21.1 KK in taxes that I can then use to help improve my city. So as I've upgraded those buildings, we should start to see that number on the left rise. The problem is depending on how you upgrade versus add, if it's in a location where there aren't a lot of residences, then you're not actually providing any new education. So I would have to find a place where I could add some education buildings that would actually increase, increase it. These little exclamation points next to certain characters are little kind of choices you get to make. So it says, mayor, quick, this windmill running at full, this windmill is running at full capacity. Do you want to upgrade its generator permanently? So I can either pay two K to increase the power production of this windmill, or I say, no way.
(01:25:20):
My approval rating drops, which drops the amount I earn in taxes, and then I have to try to regain that. I'm gonna spend the two K to upgrade that power generator, make it better. And then I saw another exclamation point over here. It says, mayor pollution is very high around this park. We could plant some trees to reduce the pollution, but it's gonna cost us. So for one k I can drop pollution by 40 and I can also add two to my approval rating, which is already at a hundred. Cuz I'm a great mayor. So in this case, I will not be adding anything to my approval rating, but I am reducing pollution. Now, most of this city, you'll notice I have filled at this point, I've got a few more places where I can start adding things. So let me look down here in my construction menu.
(01:26:05):
And here in the top left I've got my needs. So I need 1.1 K workers and 6.3 K shoppers. So that means I need to add more to my population. If I tap in the middle down here at the bottom, cuz this is for residences, the middle is for shops. So here you can see that I'm good to go as far as what my residents need. They don't need any more shopping at the moment and jobs, they're doing okay with jobs. But here's the thing, as soon as I start adding residences, then the needs for more jobs and more shopping is gonna increase as well. So I'm gonna add a few of these very expensive high-rise buildings to the map. And you'll notice that these have to go along the city streets that I have here. I cannot place them just anywhere on the map, unlike many of the other properties.
(01:26:59):
So I can place fire what is it, fire stations and some, some of the, the power generators and pollution reduction options like parks, those can go in special places that do not need to be necessarily attached to a road. So let me go ahead and I'm gonna add a new education building just to see how that does for us. So this is a $14,000 building that will add 800 to education, and I wanna put it next to residences like these. So we'll drop that there. And then I also want to go ahead and add a few smaller options. So this is 300. Well, let's see, let's move it to where I've got these new residences. So I'm gonna move over to the side of the map. Ooh, where I've got these residences here and I will drop that.
(01:28:03):
Okay. And then now you'll see I've increased education by 243 at first. But as these new buildings get built that number should go up as well. Now one last thing that I'll show here. You'll see I've got, I'm gonna, I'm gonna pause it because I don't want this to run out. So here it is showing that this building is saying, look, we need seven more police officers in the area. And this meter is filling up here on the left. So this meter is red and as it fills up, if it reaches max, it will actually drop your building a whole level and you'll have to build it back up again. You want your buildings to reach max level because then you can start merging them together, which actually make them more powerful. That means you can add more people to them.
(01:28:48):
They take up less resources, et cetera, et cetera. It's a really cool kind of mechanic that's built in. So this is, this has provided me hours of distraction and enjoyment. And it's, I think, very easy to kind of pick up on how it works as you go on the, in the campaign, the cities have different mechanics that make them harder. So for example, the second city that I'm in right now there's not as much water. So there are only certain places where you can drop your water towers and pumps and things that will actually bring water to your buildings. And then also due to the nature of the terrain, the roads cost double. So you have to, especially in the beginning, do a lot of resource management to try and make sure that you can build roads, which lets you build more buildings, which lets you add more people to your city, which lets you make more in taxes and it kind of builds on that.
(01:29:45):
So the third city's going to have its own set of unique circumstances that will make it more difficult to create a thriving city. And then you go on from there, one warning, your phone will get hot, your battery will run out. So just be mindful of that as you were playing this because it is doing this simulation there on the phone and does take a lot of processing. But that is cityscapes available via Apple Arcade on your iPhone. And this is iOS today. Thank you so much for tuning in to this episode of iOS today. If you have questions, feedback concerns shortcuts, corner requests, et cetera, please send those to iOS today, twitch.tv. We'd love to hear from you. You can tune in to watch this show live if you'd like by going to twit tv slash live there, starting around 9:00 AM Pacific.
(01:30:38):
1600 utc, 12:00 PM Eastern. Tune in every Tuesday to watch us as we record the show. The best way to get the show though is by subscribing because when you subscribe to the show or follow the show, depending on which service you're using you will get this show all knitted together, buttoned up and put together in its best format possible. And that is available by going to twit tv slash iOS. There you will find links to subscribe to audio or subscribe to video. You choose your application and then click subscribe. That will let you get it on Apple Podcast, Google Podcast, YouTube, Spotify. We're also just a plain o RSS feed. So whatever RSS application you're using to get your shows and your stuff, you can get iOS today. There. I also wanna mention Club twit at twit.tv/club twit.
(01:31:30):
Joining the club starting at $7 a month, $84 a year. You out there can be a member of Club Twit when you join. You get every single Twitch show with no ads, just the content. You also get access to the twit plus bonus fee that has extra content you won't find anywhere else behind the scenes before the show, after the show club Twit events all get published there and access to the members only Discord server. A fun place to go to chat with your fellow club TWIT members and also those of us here at twit. It's like an app. And the app has lots of different chat rooms that you can join and talk to us and talk to your fellow club TWIT members. Rosemary Orchard is an incredibly active member of the Club Twit Discord, all starting at $7 a month, $84 a year.
(01:32:14):
You can choose to pay more if you'd like. We heard from some people who said, Hey, you keep adding stuff to the club, I'd like to give you more than just $7. So we made that possible, but starts at seven. And along with all of that I mentioned making the club more valuable. You also get access to some great shows. There's the Untitled Linux Show, which is a show all about Linux. You also get access to the Hands On Windows program, a show made by Paul Throt that covers Windows tips and tricks. There's hands on Mac by yours truly where I cover Apple tips and tricks, not just the Mac, although it's been a big focus on the Mac as of late. And the Incredible Home Theater Geeks brought to you by Scott Wilkinson. That is a show that covers all sorts of home theater devices, suggestions, products, it's all sorts of stuff there. So consider checking out home theater geeks as well. All part of your club tweet subscription. It's with that tv slash club Twitch, Rosemary Orchard. If folks wanna follow you online and check out all the great work you're doing, where should they go to do so?
Rosemary Orchard (01:33:20):
The best place to go is rosemary orchard.com, which has got links to the various places that I'm found on the internet, though I have also just signed up for Blue Sky, where you can find me at with username Rosemary Orchard. And you can also find apps, podcasts and books that I'm involved in on that side as well. And other than that, as Mikah mentioned in that Club Twit Discord where folks have been asking some good questions, I'm waiting to hear back from somebody who had a question about focus modes and the filtering of calendars on their Apple Watch. I've got a few follow up questions before I can answer that for them, but it's always great fun hanging out there. What about you, Mikah?
Mikah Sargent (01:33:53):
You can find me at Mikah Sargent on many a social media network or you gonna to chihuahua.coffee, c h i h u a h a.coffee, where I've got links to many of the places I'm most active online as well as my podcasts. Yet you'll notice that my chihuahua.coffee page has recently changed. I'm using a really cool service called Bento and it made it very easy for me to list my different social media sites, my podcasts. So this is not a sponsor <laugh>. I just really like Bento for what it's been able to provide. So I decided to take that chihuahua.coffee URL and forward it to this. So yeah, check that out. Chihuahua.Coffee folks, thank you so much for tuning into this episode of iOS today. Looking forward to next week, but until then, it is time to say goodbye. Go out, go forth and create with Final Cut Pro and Logic Pro on your iPads. Goodbye.
Rosemary Orchard (01:34:53):
Goodbye folks.
Ant Pruitt (01:34:55):
Hey folks, I'm Ant Pruitt and do you get your favorite tech geek that has everything, A Club twit gift subscription? Of course, TWIT podcasts, keep them informed and entertained with the most relevant tech news podcasts available with the Club twit subscription. They get access to all of our podcasts ad free. They also get access to our members-only Discord, access to exclusive outtakes behind the scenes and special content such as AMAs, which I just love hosting. Plus exclusive shows such as Hands on Mac, end Zone Windows, and The Untitled Linux Show Purchase Your Geeks gift at twit DO TV slash club twit and they will thank you every day.