Home Theater Geeks 452 Transcript
Please be advised this transcript is AI-generated and may not be word for word. Time codes refer to the approximate times in the ad-supported version of the show.
00:00 - Scott Wilkinson (Host)
In this episode of Home Theater Geeks, I share another great home theater from AVS Forum's Home Theater of the Month series. So stay tuned Podcasts you love From people you trust. This is TWIT. Hey there, scott Wilkinson. Here, the Home Theater Geek.
00:34
In this episode, I want to share with you another great home theater from my series on AVS Forum called Home Theater of the Month. Called Home Theater of the Month. Now, avs publishes 13 Home Theaters of the Month every year sort of a baker's dozen, if you will and this one is the 13th, or bonus, home Theater from 2022. We'll have a link to it in the show notes if you want to go check out the article itself, which has more detail than I'm going to give you here, but I'm going to show you quite a few of the photos that appear in that article, because this one's really cool.
01:12
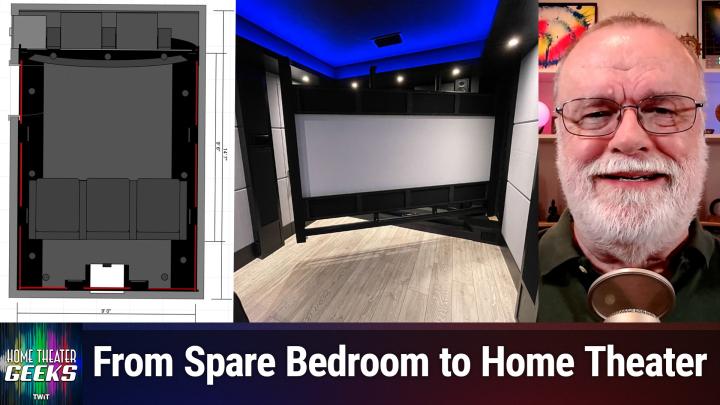
Uh, it's not that it's big and elaborate and, uh, gigantic and super expensive. It's what the owner, who go, whose name is Steve, decided he could do, and he did it in a spare bedroom. So it's pretty small, but a lot of people don't have any more than a spare bedroom. So what can you do in a spare bedroom to make a really cool home theater. Well, Steve found a way to do it. He started, as I said, in a spare bedroom and we have a picture of that bedroom. His house is in Boca Raton, florida, and, as you can see, this is just a normal bedroom in a house. Now he wanted two rows of seats, but the size of the bedroom prevented that, couldn't do it. So his final plan, which you see here, has only three seats, which is fine, because his family is he and his wife and one child, so perfect. He planned to build a false wall at one end of the theater where he could put the speakers behind the screen and a little bit of a stage, which is the outward curving part just in front of that screen, and then you can see the three seats back there, and the white little square on the right is where the projector sits. So, as you can see, the room is only nine feet wide, a total of 14 and a half feet long, but from the screen to the back of the seats, only nine and a half feet. So you know it's not big, but that's okay because it's going to turn out to be pretty amazing. Now, the plan took about six or eight months of drawing diagrams like the one you just saw, while they renovated the rest of the house.
03:19
Now, what Steve did was he built a frame in front of the actual walls of the room and installed what's called rockwool safe and sound insulation between these new studs, which isolated the sound within the room, didn't allow much less of it to get out and allowed much less of any sound outside the room to get in. You can also see this sort of window next to the door. That's not actually a window. He was going to put a LCD TV there in portrait mode which would become an electronic movie poster. You'll see that in some of the later shots here as we go along, which a lot of people do, they put in these electronic movie posters and you can show any movie poster you want on this TV screen and it's actually pretty cool. In another shot of the build you can see the framing of the soffits which are sort of the middle, which is called a projector box, and it holds the projector and actually can reduce the amount of noise coming from the projector, from primarily its fan. Virtually all projectors have a fan that prevents them from overheating, but that sound can get kind of annoying, so you put it in a hush box such as this, and you do, ideally, need to vent some air out of that hush box. I'm not quite sure if Steve did that. I can't imagine he didn't. He must have, anyway. So that's a look at the soffits around the top of the room or near the ceiling where the wiring and air conditioning conduits and so on.
05:36
He also built columns in the room to hold and to hide the side and rear surround speakers, which is graphic five. Here you go. So this is looking again back in the back of the room and these columns there in their raw form are going to hold the speakers, the back speakers and the side surround speakers. Now he wanted to match the drivers in his front width and surround speakers with those of his Infinity RS5 front speakers, which he was going to use in the front for the front, left, center and right. However, the width and surround speakers needed to fit in those columns that you see here. So what he had to do is he had to remove the woofers and the tweeters from six Infinity CC3 speakers and install them in custom enclosures so that they would fit in those columns. And here we see those custom enclosures which he built and he installed the tweeters from existing speakers into these enclosures, which I find to be a very brave thing to do. I really don't like disassembling something made by a company like Infinity or any other good company, but you know he needed those speakers to fit in those columns, so he went ahead and did it.
07:15
Another really cool thing is the duct work which is in the stage in the front of the room, under this, under the screen, and this duct work is for air exchange from outside the room. Air is pulled in at the bottom of the equipment rack which sits in the wall between the hallway and the room, and it the air comes in, it's pulled through the stage and out the front vents in the stage. The return ductwork is in the soffit that we saw earlier, so the air is pulled out next to the projector and exhausted back into the hallway. So that's how he keeps the projection box cool, by running air through it, but with a much quieter system than a projector fan would be. Now, one other interesting thing, many interesting things about this room, is the DIY acoustic panels that he basically put up in the entire room, and in this picture you can see in the corner there are. You can see the framework in the on the left, the framework of the acoustic panels, and on the right you can see the acoustic panels in place. Those, those frames, have velcro on them so he can easily take those acoustic panels, velcro on them, so he can easily take those acoustic panels down and put them back up. It's an ingenious solution to acoustic panels and it also makes for a really nice look in the room. The walls are covered in fabric and they have acoustic treatment in them. In fact, they're filled with one inchinch duct liner and one-inch polyester padding and the fabric itself is called Acoustimac DMD. So very, very interesting and well-thought-out way to acoustically treat the room. To acoustically treat the room.
09:29
Now, one really cool thing about this theater is his screen masking system. Okay, so content from TV to movies to games, whatever you're watching has different aspect ratios, right? The relationship between the width of the image and the height of the image, and a lot of people with home theaters, dedicated home theaters, install what's called a masking system. So the part of the image, the part of the screen that is not being used by the image, will have a black velvet or something, panel moved over it, which increases the apparent contrast of the image, the active image that's there.
10:14
Well, steve really did something cool. He built an aluminum frame for the screen, now a wood frame. First of all keeps the spandex screen tensioned and also supports this aluminum framework that you see here which is in front of the screen. The framework has horizontal masking panels, which you can see not at the very top and bottom of this frame, but the ones just inside the top and bottom. They're covered with black Acoustimac DMD, that same fabric material at the top and bottom, and they move vertically to mask the 16 by 9 screen, which is its native aspect ratio, down to 2.4 to one. Uh.
11:12
Now we have a uh, a uh closeup of this uh masking panel in the next graphic and it shows you the pulley system and this, this aluminum frame, which will eventually be covered by black fabric. And this pulley system can move this, which is the lower mask, and the upper mask at the same time, moving them in and out so that it masks the image to the right aspect ratio. It masks the image to the right aspect ratio. The pulley system is tied to a linear actuator and it has different. It's controlled by a programmable controller and he can program in different presets for different aspect ratios, which he selects at the touch of a button, and he can adjust it as well manually. The masking is controlled from iRule, running on an iPad, which also lets him control the rest of the theater.
12:22
Now this system is what's known as constant image width or CIW, which means that if it's a widescreen movie 2.4 to 1, the top and bottom mask comes down. If it's 16 by 9 TV, the masks go up, but the image is always the same width. Now many home theater owners use the other approach, called constant image height, where if it's a 2.4 to 1 movie, the masks move outward and when it's a 16 by 9 TV show, the masks move inward. This is primarily a matter of preference. You know you can do it either way. Matter of preference, you know you can do it either way. The constant image height aficionados claim that they prefer the taller image in a movie, in a 2.41 movie. But constant width also works. That's what you would see on a flat panel TV. If you're watching a movie on a flat panel TV, the top and bottom. You have black bars on the top and bottom. So you know it depends on what you like.
13:39
So the equipment rack is at the front of the equipment racks in the hallway, which is pretty cool, and in this, this image, you can see on the left the equipment rack, and on the right you have a better picture of the electronic movie poster. Now, these pictures were taken with a really wide angle lens, obviously, so they look pretty distorted, but if you take that into account, you can walk outside. You can can see the front of the rack and and do any adjustments you need there. So you know that's pretty cool. But how do you get to the back of the rack? Well, I'm gonna show you. This is really cool. In the next photo we can see the finished theater and the screen wall. The screen is closed and masked to 2.4 to 1. Now here's the cool part If you want to get to the speakers behind that screen and to the back of the equipment rack, all you have to do is swing that screen open. So here it is halfway open and here it is, and, and it's on hinges on the right, and then you swing it farther open and when it's fully open, in the next image you have the entire speaker front speaker array, including the front, left, right and center, the two subwoofers gigantic subwoofers and two what are called height speakers up near the top, and that box on the left is the equipment rack. And so, if you have, you have to remove the right sorry, the left front speaker to get to most of that equipment rack, the back of it. But you can do it pretty easily and that lets you do any rewiring. You need um and uh and and do any other stuff you need there. Uh, ooh.
15:46
Jammer b in the chat room asked a great question can it do four by three? Uh, not with constant width, uh, unless you have a 4x3 screen there? So the answer is no. You'd have to just have black bars on the sides of a 16x9 screen to have a 4x3 content. So very good point, jammer B, which is another reason why constant image height might be preferred.
16:17
On the other hand, how much 4x3 material are you going to watch Really? I mean, that's pre-HDTV, so it's a good question. And certainly there is 4x3 material out there older stuff If you're into classic movies, there might be a lot of it. That's that it's a good question. And certainly there is four by three material out there, older stuff that if you're into classic movies, there might be a lot of it. That's that way, and so you would take that into account when deciding whether or not to be constant image width or constant image height. Clearly, steve decided constant image width was the way to go Probably didn't have a lot of four by three material that he wanted to see was the way to go. Probably didn't have a lot of 4x3 material that he wanted to see.
17:06
So in the last graphic I can show you the seating in the theater. There's only three seats, as the plan called for, but again it's Steve, his wife and his child. So you know that's plenty for them and it's pretty darn good for a spare bedroom, if you ask me. I mean, this is a beautiful theater in my opinion, and that swing-out screen is really cool in my opinion. I just I thought what a brilliant idea. Now he did all this himself too.
17:35
I really like featuring DIY theaters. There are, you know you can hire somebody and build a home idea. Now he did all this himself too. I really like featuring DIY theaters. There are, you know. You can hire somebody and build a home theater, no question, but it's going to cost you a lot of money.
17:44
Now Steve said that he didn't keep careful track of his costs, which I have learned through some home renovations recently to do and I do that very carefully, but he didn't. But he guesses that it was probably around 30 or 40 thousand dollars and that it takes into account that he kept a bunch of equipment that he used to have that he had before this home theater, but he bought some new components as well as building material and he built the entire thing himself. So very impressive. I think that's just great and it shows what you can do if you have a spare bedroom. So bravo to steve, great job and happy to have featured that as a home theater of the month at AVS Forum.
18:38
Now, if you want to learn more about it and check out the equipment that he has in there which is pretty darn cool as well just head over to AVS Forum and to the link that we will put in the show notes and you'll be able to see more detail about that. So congratulations, steve. Detail about that. So congratulations, steve. Now, if you have a question for me, please send it along to htg at twittv. I love answering those questions right here on the show and I will do so as often as I can and, as always, we thank you for your support of the Twit Network with your membership in Club Twit, which gives you access to all the twit shows in their video form. So if you're listening to this on audio, you didn't get a chance to see all those great pictures, and if you join club twit you'll be able to do that, and I hope you will consider it until next time. Geek Out.