Hands-on Photography Episode 141 Transcript
Hands-on Photography Episode 141 Transcript
Please be advised this transcript is AI-generated and may not be word for word. Time codes refer to the approximate times in the ad-supported version of the show.
Ant Pruitt (00:00):
Today on Hands-on Photography. I'm going through some of your feedback because y'all are just so Damn awesome. And you send me so many different kind messages, feedback and questions and comments. I have some images that you've shared, and we're gonna talk about 'em on the show. Hey, stay tuned this to it. Episode of Hands-on Photography is brought to you by blue land. Blue land is on a mission to eliminate single use plastics by reinventing home essentials that are good for you and the planet. Right now, you can get 15% off your first order when you go to blue land.com/hop,
Ant Pruitt (00:47):
Hey, what's happening everybody. I am Ant Pruitt. This is Hands-on Photography here on TWIT TV. I hope you're doing well. I'm unbelievable as always. This is a podcast where I like to get together and, and just sit down and have different tips and tricks to share with you that are gonna make you a better photographer and a better post processor, as well as from time to time, sit down with a couple of different professional photographers out here. That's doing some great things in the photography space and share some of their nuggets and tips and tricks. But this week, it's all about you, the Hands-on Photography listener, as I'm gonna go through some of your feedback and emails that you have sent to the show before we get into that, I wanna say welcome to all of our brand new listeners of the show, because I know someone referred you to this awesome podcast.
Ant Pruitt (01:36):
So welcome to you. Thank you for popping on in now, please do me a favor, just as someone referred you. How about you refer someone else to the show, just share the show out. We're available on apple podcast. We're available on Spotify and Google and YouTube. Yeah. We have a YouTube channel as well. Or just head over to the website, tell people to check out the website, twit.tv/hop, twi.tv/o P for Hands-on Photography. And you'll see all of the subscription options right there, as well as our previous episodes and all of the show notes, because those show notes have a lot of little interesting nuggets in there for you to click on and try out and just sort of help get you get you squared away for being a better photographer in a better post processor. All right. So that side of the way let's get started with this week's show and the feedback that came in from you, the Hands-on Photography listener.
Ant Pruitt (02:28):
First one comes from Mr. Gary Sampson. This email reads, this was shot with an iPhone 11 and you can use it on air, please review. Thanks Gary. <Laugh> Hey, I totally dig that pretty straightforward and simple. So let's just go ahead and dive right in and take a look at this image because I gotta tell you it's quite nice. All right. So here we have this image in, yes, this is quite, quite beautiful and shot with an iPhone. I do have some thoughts on it because as you're looking at it on the screen, this thing is in full, full screen. This is the full layout of the image. And I'm gonna go over here to my developed module here inside of Lightroom. And you can see that it came from Gary Sampson. All right. This is roughly 20 megapixels or so, so pretty, pretty good size, pretty good resolution.
Ant Pruitt (03:22):
I can zoom in and still see fairly decent detail. There's a little bit of noise there, but that's after pixel peeping. So it doesn't matter. It's totally fine. I would highly recommend this as a metal print if you have access to do so. I've mentioned, you know, the print service that I use online, but you can check out your local print shop and see if they have an option for metal prints. But I think this is perfectly ideal for metal prints because there's so much contrast in here. All right. So speaking of contrast, this is, there's a bit of a contrast because you have these sunset going on here and then you, you have this just a lot of black in the image. I mean, it's just black, everywhere, even over here to the right of the frame, lots of black. And I gotta tell you, I'm not sure what's going on there.
Ant Pruitt (04:16):
<Laugh> this just doesn't it seems like it should have just stopped right here on the right of the frame. There's this isn't necessary over here. So what I would recommend before you send it to the printer, just go ahead and crop this out on the right hand side. Like, so cuz all of that dead negative space there is, it just didn't really add to the image. So I've, I've cropped it there and that's looking good too. Now, if you wanted it to have a bit more of a wide panoramic perspective, I get that. But I think you're better served by just cutting out all of that dead space unless you're trying to use it for marketing and use that that right side for some text or another graphic or something like that. But this right here, I think this is good to go.
Ant Pruitt (05:06):
Some people are gonna argue about the dynamic range and the dynamic range as I've discussed previously on the show, when we talked about HDR that's the, the, the measurement of going from dark areas in the image to brighter areas in the image and how far you can push that particular file to be able to still see detail, whether you're pushing the slider up or down for the exposure. So if I were to just push the exposure up on this one, to make it brighter, what happens here in the bottom is what got me curious because this, again, it's a lot of shadow here. Really, really crush, crush shadows. If I push this up, you start to see, there was apparently a little bit of color coming from a light source over here on the right hand side or the frame. And it's probably why.
Ant Pruitt (05:58):
And Mr Gary said, you know what, let me push that exposure back down because I don't want this green cast showing up on the, on the image. So I'm gonna take it back and we'll get rid of it. And it totally makes sense to me. I think this does look better having the shadows in there. And if you look at the histogram up here in the upper right of my screen, you can see that all of the data is on the left side of this histogram here in the blacks and in the shadows areas of the histogram. Again, that is just a good tool to use. A lot of people will say, you want to have that histogram go all the way across the screen there. And that's not always the case, maybe from a composition standpoint, having it look the way this image looks. That's how that is. That histogram is supposed to look for him. So, Hey, I think this is totally fine. Again. I would just consider the crop. I'm gonna crop it one more time, just consider the crop and look at how you can, you know, really maximize the subject in here. And the subject in this image is clearly that beautiful sunset back there in the distance, on the horizon line. And speaking of the horizon line, you notice folks, I didn't have to straighten out this horizon line.
Ant Pruitt (07:15):
I gotta give you an applause for that. Appreciate you getting that horizon line. Nice and straight. Beautiful, beautiful work. Yeah. That's a great image, Gary. I, I, again, I highly recommend you sending this to a printer and getting it printed for yourself and put it up on your, on your wall somewhere in your home. Very, very nice image. This episode ofHands-on Photography is brought to you by blue land. Did you know that an estimated 5 billion plastic hand soap and cleaning bottles are thrown away each year? And if that's not enough, most cleaning formulas are 90% water, which is heavy to ship lead into excessive carbon emissions. Plus those products are often filled with nasty gunk like chlorine and ammonia. Ugh, that's a lose, lose situation for you and for the planet. Do you ever feel overwhelmed by the number of plastic bottles and containers you throw away nor have you ever thought about purchasing a more eco-friendly product, but you didn't really know where to start.
Ant Pruitt (08:15):
All right, well look, I got you covered. I'm sure you've tried a few green products, but found them to be pricey or ineffective. And you know what the answer to those questions is blue land. Yes. Blue land blue land is on a mission to eliminate single use plastics by reinventing the home essentials that are good for you and for the planet blue land's innovative tablet, refill solution takes up 10 times less space than a traditional bottle and their powerful formulas. Keep your home clean and smelling amazing. The idea is flat out simple. You just grab one of their beautiful forever bottles, fill it up with warm water, drop in a tablet. And then you get the cleaning refills start at just $2 and you don't have to buy a new plastic bottle. Every time you run out, just reuse the bottle, hence saving the planet.
Ant Pruitt (09:08):
You can even set up a subscription. So you never run out of the products you use the most and save even more. When you buy in bulk from cleaning sprays to hand soap to toilet, cleaner to laundry tablets, all blue land products are made with ingredients. You can feel good about recently, I went head over heels over the toilet cleaner because it's really that simple. You just drop a tablet in and it bubbles up and fizzes and all of that and it smells super good. And it really does clean up your toilet. Hard head was trying to clean up his bathroom and use the all-purpose spray that they offer. And he said, you know what? This was quite effective on my shower. So it's hard head approved as well. <Laugh> Blueland PR is come and refreshing signature scent such as Iris agave, fresh lemon and eucalyptus mint. And for a limited time, their hand, so is getting a summer upgrade with three refreshing SCS. You get strawberry rhubarb, you get citrus Petly and you get coconut Palm. All of that sounds so clean and refreshing. So right now you can get 15% off your first order when you go to blueland.com/hop, that's 15% off your first order of any of the Blueland products at blueland.com/hop again, that's blueland.com/hop. And I think Blueland for supportingHands-on Photography.
Ant Pruitt (10:40):
So now we're gonna transition into another image. So let me flip back my screen here. And let's see, I got two images that came in from our next person. This email comes from Michael Rivera and it says I'm a beginner when it comes to photography, but I've been listening to and watching hop for a year, which got me inspired. So I was editing some old photos on my phone with Snape for the first time. Outstanding, outstanding. Any suggestions would help me and you definitely have my permission to use on hop. I enclosed my edited version in the original version I took using my S 20 ultra. That's a Samsung smartphone. Sweet. So Mr. Rivera, this is thank you again for, for being around on, on the show for over a year, man. Thank you. Thank you. Thank you for that support and thank you for spreading the word and thank you for sending these images over you sent over to.
Ant Pruitt (11:40):
So we're gonna take a look at both versions, your original version and your edited version that you use snap Snape to process with. For those who don't know, Snapseed is a free photo editor that you can use on mobile devices for iOS or Android. And it is super duper powerful. There's a lot of tools inside of Snape and it works really well. Yes, I'm an authorized Adobe affiliate. So I use Lightroom 98% of the time for the stuff that I do on mobile devices. But Snapseed is one that is, that's also installed on my phone and I use it from time to time as well, because it's just, it's pretty nifty and has a lot of tools in there. Even stuff like text tools, if you wanna make graphics and thumbnails, very, very nice options. So check it out. It's totally free. Both iOS in Android.
Ant Pruitt (12:32):
Now enough of that, let's take a look at this image here. So let's switch my screen. Okay. So we have these two images here and I believe he told me that this is the edited version here. So let's go back and look at the original one here. So this is the original one, and this is the edited version. I think I got that, right. At least if I look at the resolution here, let's see one's from December 24th, 2021. And that's about eight megapixels or so, and this one is about three to four megapixels or so, so yeah, this is probably the edited version here. All right. So the original shot, all right, I'm looking at this one. And the first thing that pops in my head is something's going on with the white balance here. Everything seems to have a bit of a blue cast to it.
Ant Pruitt (13:23):
It's a little, little cool to be something shot with a smartphone. Cause most of the time the smartphone algorithm just gets it right, right out the camera, unless we're talking Samsung. I don't know if you guys remember, but there was an episode of this week in Google. I don't know. It's several months ago. If I could find it all listed in the show notes. But on this week in Google, chief twit, Mr. Leo Laport was talking about one of his latest and greatest Samsung smartphones. And he took a, a, a photograph of, of his wife did CEO, miss Lisa Laport. And it was a nice photo. But the first thing I noticed was that white balance was off. It was, I mean, she, she's a, she's a beautiful woman, but she looked blue, <laugh> in the image and nobody wanted to bring that out.
Ant Pruitt (14:12):
So I had to bring that up and say, Hey, look, this is a great shot, but dude, that white balance ain't right. Something needs to be done about that before you post it on Instagram, you know, and I meant it in all fun, but it's still something that my eye noticed in white balance does make a big difference in these images and looking at this one, I'm seeing the exact same thing. Samsung phone tends to roll on the cooler side of things with the white balance. I guess I don't have a Samsung phone. So I can't necessarily say that's a fact for example, I shoot cannon. I've mentioned, you know, I'm a cannon fanboy through and through. And when I shoot with my cannon cannon can intends to shoot, tends to process things on the warmer side of things. Okay. So if I want to set my white balance to standard daylight balance at like 5,600 Kelvin, that's supposed to look like natural daylight coming through similar to the how to how these lights here in my studio are, but Canon tends to warm it up and everything will start to have more of a golden orange color cast to it hue to it.
Ant Pruitt (15:20):
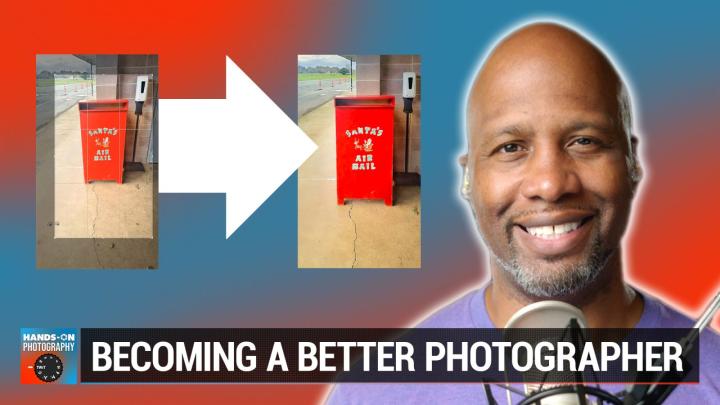
And I always have to cool it off in post. So what I ended up doing was just setting a custom white balance inside of my camera to like 4,600 Kelvin, 40, 4800 Kelvin, something really, really on the cooler side of things. And when I snap it and pull up the raw image, the white balance is damn near perfect. Every single time to my eye, you know, it's, it's never over warm and it's never over. Cool. So that's something that you can consider with your, with your Samsung device here on future shots. But anyway, got that outta way. So color is one thing subject matter and perspective is the next thing I'm looking at this. Okay. So you're a beginner. And I always like to say, okay, if you're snapping a photo, well, what is the subject of your photo? I like to assume the subject of your photograph is this little mailbox here for Sanus air mail.
Ant Pruitt (16:14):
Okay. Well what can you do to bring that subject out? So let's pop over into your process version of this image. What I can see is you did some some sun, some saturation adjustment and boosted the reds in here. And even if you look over here in the upper right corner of the histogram, there's a big red spike popping up here in the highlights cause that that's a dead giveaway that you did some selective adjustments with boosting that red. I am totally fine with selective adjustments to help bring out the subject perfectly, perfectly fine strategy to do that. So that's one thing, but in my opinion, you're still not quite focusing on the subject. And as I've mentioned before, the easiest thing that you can do in post-processing regardless of whatever photo editor you're doing, the easiest flat out simplest tip that you can do for post-processing is the crop tool. So that's what I'm gonna do here is I'm gonna crop this to make it where the subject is more of the focus. So let's just crop this down.
Ant Pruitt (17:28):
Okay. So we'll just start with that. And this is, this is a basic crop. I basically just centered it up. So now there's, there's no denying what I'm supposed to look at when looking at this image. If I revert back to the original like this here, I had all of these, these little distractions here. I have these little, I don't know if those are cat feet, dolphin, feet, or whatever that is had these little prints on the ground. There's this other little piece of potential garbage going on, then there's the hand sanitizer there. Then there's the background with the cones and all of that. I mean, my eyes just sort of wondered all around the screen where you're trying to get me to take a look at the air box. So let's just fix that in post by just cropping it down. So let's just crop it out to where this is a little bit more center it up and then focus
Ant Pruitt (18:27):
Something like this, I think is, is a little more ideal. Okay. My next step on this, and this is something that you're probably not gonna be able to do inside a Snape. Maybe you can, but I don't even know if it's gonna totally work. I'm gonna try it here in Lightroom, but this is something that you have to consider while you're on the shoot. Okay. And that is changing your perspective again, you know what your subject is, you know, what, what, what caught your attention and compelled you to pull your camera out and snap the photograph? Why not change your perspective? If we're looking at the original shot, you are standing up and you're standing away from it and you're shooting at a downward angle towards the shot. So why not squat down? I've spoken about that previously on episode. It, you know, we talked about it with landscape photography. This goes for anything, change your perspective, just squat down, just a little to help raise the, the subject up to be more of a focal part there. Now inside a light room, there's some transform tools down here. So let's see here we go. And maybe I can change your perspective a little bit. It may or may not work.
Ant Pruitt (19:44):
Let's see. And that's good in there. Can you see what's happening is it's warping the file here. I'm just playing with these tools here, playing with the vertical's perspective and the aspect, and it's not perfect, but it does just sort of line things up a little bit better. And by doing that, of course, I introduce these empty pixels in the upper right hand corner. So I need to just get rid of that. Let's crop those out.
Speaker 2 (20:31):
Okay.
Ant Pruitt (20:34):
There we go. All right. And now I noticed that it's not necessarily straight, so let's rotate it and straighten it out. Cause now we have a proper horizon line
Ant Pruitt (20:51):
And this image looks better. Now, granted, this is from a beginner's perspective. There's a lot of things that can continue to be worked on in this image that, that are a little bit more advanced. And I'm not gonna assume you, you have Photoshop or anything like that, but there's, you know, you could get rid of this sanitizer here. It's not adding to the image. You can get rid of these cones back here. It's not adding to the image and you can even continue to play around with the color tone of this image. So let me see, I'm going to take a look at de Hayes here, cuz this de Hayes, this gonna add some more contrast not too much there. Pull these highlights back a little push the vibrance up, like, so excuse me there. And maybe even add a little bit of noise reduction to smooth it out. Just a little. There we go. And then if you want, you can do a, another selective adjustment and I know this is something that's available inside a Snape. You can do, what's called a radio mask. So I'm gonna add a radio mask right here
Ant Pruitt (22:10):
And just strap it on the top like this. Okay. And then it has feather control. So I'm gonna hit this feather to make it a smooth transition like that, and then I'm going to invert it.
Ant Pruitt (22:33):
So now since it's inverted, you see that what's being affected is the areas in red. So let me take that red away just for a second. And I'm basically going to blur it out in the background. Just, just give it a little subtle blur. I taking it a texture and decreasing it, taking the clarity and decreasing it and taking the sharpness and decreasing it. See, I went too far. Okay. So that looks really, really fake. So I went too far. So you need to just play around with it, make it gradual because depth of field is gradual. Okay. Not bad. Like, so, and then even if you want take the exposure down, cuz it'll create a bit of a vignette like that.
Ant Pruitt (23:29):
Okay. So now the background is sort of in shadow if you will. So I'm gonna turn this, get out of the mass tool and go back to the global adjustments and then bring the exposure up now back to normal there. All right. So let's see if we can do a quick before and after here. So there's before on the left hand side of the screen with, you know, with some of my adjustments there <laugh> and then here's the after on the right. All. So let's see. Might sound like that at before and after, before and after. Yeah. That's better before you can see the perspective has changed. It's brighter. And then after like, so all right, well folks, I hope that has been helpful. Thank you to Mr. Michael Rivera for sending that image in and, and just walking me through his process. And I, again, I hope this has been helpful for you and I appreciate you checking out the show for the last year plus.
Ant Pruitt (24:39):
And since the more images in, I'm curious to see how your progression is gone, and if you've picked up some other tips and tricks from the show, that's really helped out your images. So Hey, to the rest of your folks, checking out the show, send me your, send me your email, send me your images, your image, critiques feedback, questions, comments, shoot an email to hop twi.tv again as hop@twi.tv, or you can feel free to just, you know, tag me on one of the social media platforms. You can find me over on Instagram. I am T underscore Pruit on Instagram. Granted, I don't know if it matters cuz people that follow me over there, don't tend to see my stuff for some reason, stupid algorithm, or you can follow me over on Twitter. I am T underscore Pruit on Twitter as well. Thank you again for all of the tremendous support.
Ant Pruitt (25:29):
Thank you to my man, Mr. Victor for making me look and sound good each and every week on the show. And Hey folks, keep sharing the show out. Keep sending the little reviews and ratings and in the different podcast apps that you're using to help get more people catching the show and tell 'em to go and check out the previous episodes cuz there's a lot of nuggets there and I'm just, I just tried to make this a bit of a masterclass. If you will, to help people learn photography and get better at photography as well as video and post processing. All right, until next time y'all safely seriously safely, cuz this virus ain't going nowhere create a dominate and I'll catch you next time.
Speaker 3 (26:10):
Listeners of this program get an ad free version. If they're members of club TWI $7 a month gives you ad free versions of all of our shows plus membership in the Club, TWIT discord, a great clubhouse for TWIT listeners and finally the TWIT plus feed with shows like Stacy's book club, the Untitled Linux show, the gizz fizz and more go to twit.tv/club TWIT. And thanks for your support.