Hands-On Photography Episode 133 Transcript
Please be advised this transcript is AI-generated and may not be word for word. Time codes refer to the approximate times in the ad-supported version of the show.
Ant Pruitt (00:00):
Today, your Hands-On Photography, we're getting into animation. Yes. Animation inside of your video. And it's not quite the animation that you're probably thinking of, but it's still gonna be a lot of fun. So fire up your N or video editor of choice and let's get right to it. Y'all stay tuned.
Speaker 2 (00:18):
This is twit.
Ant Pruitt (00:21):
This episode of Hands-On Photography is brought to you by nomad. Good to nomad goods.com/twit and use promo code twit for 10% off your first purchase of any nomad accessory, da have apple watch straps, wireless chargers, ultra durable cables, and more limited time offer.
Ant Pruitt (00:46):
Hey, what's happening everybody. I'm aunt Pruitt, and this is Hands-On Photography here on twit TV. Hey, I hope y'all are doing well. I'm unbelievable as always sitting down on yet another fine Thursday, where I get to share different tips and tricks to help make you a better photographer and a better post processor. And today we're not talking about any of that <laugh> today. We're going to get back into the video editing module that I started however many episodes ago. So we're gonna have a lot of fun with doing some animations for your videos and it's not quite what one would think. I will explain that momentarily before we get started. Allow me to say welcome to everybody that is brand new and catching the show for the very first time. Welcome to you. Go ahead and subscribe right now in whatever podcast app that you're using to catch this right now.
Ant Pruitt (01:38):
So if you're on apple podcast, go ahead and hit subscribe. If you're on Spotify, go ahead and subscribe. If you are using our YouTube channel subscribe and like, and comment and all of that good stuff there too, it really does help out. I appreciate all of that support. If you're just looking for general subscription options, you can check out the website, twit.tv/hop that's twitt TV slash H O P for Hands-On Photography. And you'll see everything that we offer for us, the subscriptions, as well as our previous episodes and previous show notes. And by the way, if you're a apple podcast user, please leave me a rating in a, in a comment there, cuz it does help push us up in the ratings and rankings over there. So give me five stars if you don't mind. And also just say something nice or just say something <laugh> it doesn't even have to be nice.
Ant Pruitt (02:30):
<Laugh> anyway, thanks for all the support. Let's go ahead and get started with this week's episode. Okay. So today I want to talk about animation inside a video. Now I'm going to break this down because based on my personal experience and you probably are way smarter than I am, but I'm gonna just present this anyway, because this is how I had to learn and sort of teach myself with this stuff. So animation and video, when I first heard about animations, the first thing that came to my mind was cartoons. You know, things like old fashioned loony tunes and things like that. Well, that has nothing to do with the animation that we're gonna talk about today. When you're talking animation inside of a video like this one here, you're talking about how things are interacting within the video that you created from a, from a composite standpoint, you know, we talked about handful episodes ago, just adding titles and, and lower thirds to your video.
Ant Pruitt (03:31):
Like what Mr. Victor pops up on the screen each and every day, every week for me you can put in there an animation that will allow that lower third to appear a certain way and disappear another way. So for example, Mr. Victor, let's go ahead and put the lower third up on the screen right now with no animation, just boom. It's up there on the screen. Okay. That's pretty easy to do inside of your video editor. We just literally drag and drop that asset onto our timeline. And when the play head gets to that, to that particular piece and the timeline, it just pops up. And when it goes beyond that particular piece and the timeline, it goes away. Okay. That's I guess you can call that in animation, but eh, not really, <laugh> it just sort of pops up and pops away.
Ant Pruitt (04:18):
There's really no possess to that. You know, so today we want to talk about how to make those things just really, really add a little bit more polished to it and get into some of the nuance of, of diving into how things can move on screen. Okay. Oh, but then there's also one more thing you can even animate your actual video footage itself. Like right now I'm staring at you into my camera with a nice 16 to nine aspect ratio and beautiful HD quality, yada yada, yada. But what if I wanted to just have like a banner or something come across the bottom of the screen, like credits or whatever. I could take my footage right now and have it shrink down to a smaller size in the frame so we can put something else in the bottom. You know, that's, that's an animation and didn't want the stuff at the bottom is finished, reset my screen to be back to the normal view.
Ant Pruitt (05:15):
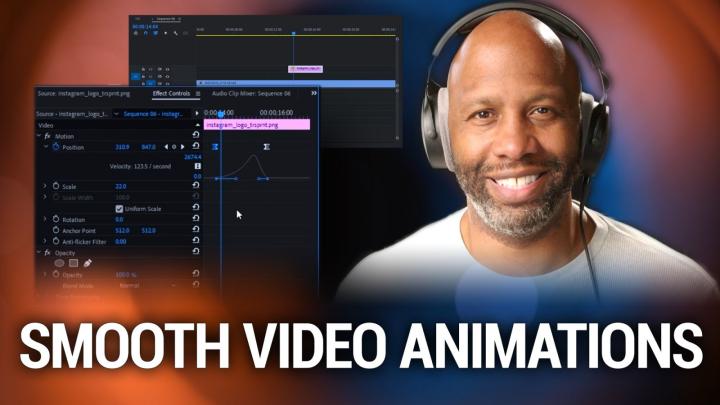
That's an animation and there's, justas, there's easy ways to do that. And then there's really nice polished ways to do that. So we're gonna look at it from the standpoint of premier pro you know, cuz again, I'm a Adobe subscriber and we're also gonna look at it from the standpoint of DaVinci resolve because I also bought that, but then DaVinci resolve is also free and these functionalities are gonna be fairly similar. But yeah, just, just fairly similar. There's a couple things that are different. So first let's go ahead and hop into premier pro and take a look at animation. So I'm gonna switch my screen now. Okay. So here on my timeline, I have just this regular video clip of this dude named biscuit. It's nothing to it. He's just sort of sitting there, but what I want to do is have a graphic pop up on the screen and I just picked a random graphic from all of the assets on my computer here.
Ant Pruitt (06:11):
And it's just this Instagram logo. So if I double click on it, you should see it over here on the left hand side as part of the preview menu preview window. So let's drag that over to the timeline. Okay. There, I'm just gonna drag it there. Now you notice you don't see it in the program video here because the playhead is beyond the actual asset here. Okay. So find zoom in a little bit. There we go. Zoom then on the timeline there. So you don't see it because the playhead is over here and the actual asset is back here several seconds prior. So now have I put my playhead over it? It pops up on the screen. Okay. No big deal. So let's do a couple things first. Let's shrink this down to have ourselves a good starting point. So I'll just scale it down pretty easily here inside of the effects controls, and then I'm gonna move it over here to the left, like so, okay.
Ant Pruitt (07:18):
So now if I go back and just hit play and the logo will pop up on the screen and then it goes away. All right. That's what we were talking about earlier with the lower third example with Mr. Victor, let's give this a little bit more, you know, style to it. So we'll go back to the very first part, the very first frame the logo shows up and we're gonna expand this out. So this lasts for, you know, a couple seconds, you know, anywhere between three and five seconds is a good rule of thumb. And what I want to do is take this logo and have it pop up on the screen and go from the left and go out of the screen onto the right out of, you know, outta frame on the right. So we're gonna use what's called key frames to do these animations.
Ant Pruitt (08:11):
So right now I have the logo highlighted here on my timeline. And if I look at the effects controls over here, this lets me know I'm working with all of the different parameters of that Instagram logo. And if you look closer, you have these little toggle animation icons, which look like little stopwatches. That's what we're gonna do. We're gonna play with these to build the animation. So I'm going to play with the actual position of this asset. So we're gonna start with the key frame. I mean with the, with the file, right at the edge of the screen, we're gonna wait a couple frames. So we'll just move our timeline, move our play, head over just a couple frames like, so, and then we're gonna say start our animation with disposition right here. So we'll just click that and it turns blue and you notice it creates this little diamond right here.
Ant Pruitt (09:06):
If you can zoom in on that, Mr. Victor, it creates this little diamond right here and that is the key frame. And it also gives you another load of indication right here on the left of that, that shows, Hey, a key frame has been applied to this particular point of the timeline with these sets of parameters saying that it's in this particular position. Okay, next I'm going to move my play, head on the timeline, just move it down, you know, a handful of seconds or a handful of frames and stop right there. And I'm going to change the position using these, the position parameters again. So let's have this go all the way off the screen. Okay. So I'm just gonna take this from 3 0 1 value and just push it all the way to the right to where it's off the screen. Okay. So it's off the screen now and that changed the value.
Ant Pruitt (09:58):
Now notice we have another diamond that showed up right here inside of the, the effects controls. Okay. So what does that mean what's happening is if you, if you look at the two positions of these, you have two different positions of these particular key frames. And in between these key frames is time passing on your timeline. So basically whatever is here in key frame one, you have to get to the same VA to the different value that's set in key frame number two. So what happens is, as you scrub across on this timeline, you can notice that the position value is changing to meet whatever the position value is set to on the next key frame, which creates here on the screen and animation. So as it plays by you notice the logo starts to go off of the screen. Okay. So now let's go ahead and play that back in real ish time just to see what it looks like.
Ant Pruitt (10:57):
So I'm gonna back it up, hit play, and it goes off the screen. Hey, there, we're done. We did our first animation <laugh> now again. And that could be a lot better. I'll go back. There's a couple things that you can do with this here. All right. So let's go back to this first frame here. All right. We went from left to right. And that's fine and dandy, but what if we want to speed this up? Okay. So what you have to do is have the key frame values change at a faster rate meaning. Okay. So if I go to key frame number one and I want it to get to this point faster, the second key frame, all I'll have to do is just move it closer like that. Okay. So now we'll go from this thing playing onto the screen in popping off fairly slow to something a little bit quicker like that.
Ant Pruitt (11:58):
Maybe that's still too slow. So you just highlight your layer again, highlight the asset, click on the key frame, move it even closer if you want. Okay. So now let's do this. Boom it's gone. And that was a lot quicker. It still isn't the prettiest. But we'll work on that here in a second. All right. So let's go ahead and pretty find this just a touch. I'm gonna drag that out a little bit more. I didn't want it that fast, but I wanted it faster. The next thing I want to do is look at how this, this, this, this logo is animated across the screen. Look at the motion. The motion is very linear and honestly, folks things in life don't really move in a linear fashion. It has a bit of a, a curve to it things as you make the move, they're at a certain speed and it tends to decrease in speed and sort of slows down and sort of glides a little bit. These animations can have that same type of physics, if you will, and it'll look so much better. And inside of a premier, that's basically using, what's called a buzzier type of movement here. So I'll click on this again and I'll get my key frames activated. So I can just hit this little arrow to Cisco, to, to the key frames.
Ant Pruitt (13:18):
And then I can right click on that key frame and change its in Pearl, inter interpolation. And you notice it as this linear and it has this BA and a couple different options. The ones that I use the most are Baier, but more than that, I'll use ease in and ease out. Okay. So what I would like to do on this one is a bit of an ease out because I'm going from point a to point B and I sort of wanted to just sort of gradually go out of point a and then on point B or second key frame on the right click change that two ease in. Okay. Just sort of the, the opposite. So what should happen is this movement is not gonna be quite as linear, so it'll have just a little bit more life to it. So let's play it back, take a look.
Ant Pruitt (14:14):
And eh, it was okay. <Laugh> and maybe if I slow it down, you can see it a little bit better. So I'll slow it down by decreasing the distance of the key frame. Okay. Let's play it back and that's okay. It, it's not great, but it's okay. So how can we fix it? How can we make it look way better than what it is? All right. Inside of these effect controls, you can naturally get into the actual, the speed graph of the animation. So I'm gonna twitrl down this parameter here, like so, and you see this speed graph. So it sort of has a bit of an arc to it that shows that it's not a linear movement, just sort of, it's not straight across. It's got it's gonna ramp up in speed and decrease in speed. Well, let's give that a little bit more ooph and, and you know, a little glitch to it. So we're just gonna click on that first key frame. And now we get these little handles that pops up. So I'm gonna take that and handle this on the right. And I'm just gonna drag it over to the, to the right a little bit and that totally changes the curve. So what's happening and it's gonna ramp up to speed really fast, cuz it's going up higher on the speed scale and then it's gonna drop off slowly into the next point. So let's just play this back, see how it looks
Ant Pruitt (15:39):
Much better. Okay. And if I want to continue to play with that, that curve, I can, I can just really exaggerated like that if I want to. Okay. So we'll play it back, see how it looks
Ant Pruitt (15:59):
Good. That's much better. Next thing I'd like to do is let's get rid of this whole pop up on the screen. And we've talked about this before. You basically can just add a bit of a dissolve where it just sort of dissolves and fades in to the screen instead of just popping up. And I already have that effect set over here in my custom bin because these are effects that I use all the Daum time. So I'm just gonna add that to the front of the, the frame here. And so now when I play it back, it should fade in and then go across the screen in a nice lifelike transition or motion pops in fades goes away. Very good. Now I still see something I don't really care for cuz it's fading in, but as it's fading in, it's starting to move. I wanted to sit there a little bit longer. So instead of it jumping into the motion, right at that particular point in time, let's have that motion delayed, just a touch. So I'm gonna grab both of the key frames this time and I'm just gonna drag them down in time. Just a little bit like so, so that's saying, Hey, pop up onto the screen. You know, we'll fade into the screen, show yourself and then transition off of the screen. So now let's take a look,
Ant Pruitt (17:24):
Fades in waits goes, we can do it a little bit more. Let's give it a little more delay a little more. Let's try that.
Ant Pruitt (17:34):
Okay. And let's play it back. Fades in waits and off you go much better. I love that. That's a very, very simple animation and, and you can basically apply these principles to anything that you need to animate inside of your video. So next up, we're gonna take a look at doing this inside of Davin resolve. But before we do that, I wanna take a few minutes to think this week's sponsor define folks at nomad. This episode of Hands-On Photography is brought to you by no mad, Hey y'all no MAD's founders met in Santa Barbara, California. Back in about 2012 with the goal of building an ultra rugged and minimalist tool for the 21st century that would seamlessly integrate your everyday carry, you know, things like your smartphone in your wallet and your watch, things like that. Everything, you know, that everything carries stuff in the past nine years, nomad has expanded to offer a wide range of mobile accessories to fit any need from iPhone cases, apple watch straps, wireless chargers to premium wallets and passport holders and crafted with horror leather like Ooh, really, really pretty pretty leather nomad uses leather from the horn tannery in Chicago, founded in 1905 and offers an unparallel blend of quality and consistency.
Ant Pruitt (18:59):
The leather accessories they'll they'll develop this rich patina over time and it just gives it a whole new unique look, you know, a look that says, this is mine, it's just, this is all me. And it's just, it just looks great and it smells great cuz we all know leather smells great. Nomad offers convenient wireless charging solutions for your home office and your bedroom and suite of charges for whatever apple device you may have as well as apple watches and AirPods. Nomad is now offering AC adapters too. You know, for people like me that don't really use apple, but still have devices that needs to be charged up. So you wanna make sure you check out their 30 wide and 65 wat G adapters the crew at Noman who was tired of dealing with flimsy charging cables that seemed to fall apart every few months or so.
Ant Pruitt (19:47):
So they decided to set out an engineer, some of the more rugged and pretty much the most rugged cables that you can find when it comes to charging devices to reinforce what double braided Kevlar, outer sheath and strong metal allure connector houses, nomad cables have been engineered for extreme durability and heavy everyday use. They are also a climate neutral certified brand. Good on you. Nomad good own you nomad is and always will be a company that prioritizes design and quality over everything else. One of the most important aspects of nomad when designing new products is they use the highest quality and longest lasting materials that are available. They design all of their concepts from the ground up rather than white labeling things that you know already exist. We know who those companies are. Again, I highly recommend if anything, get yourself a, a charger, get yourself in an AC adapter because they're, they're so handy and they're not gonna give you that slow trickle charge, man, when you really need something to get to, to get charged up fairly quickly.
Ant Pruitt (20:53):
Thank you. Thank you. Thank you for that. No man. So head on over to no man goods.com/twit and use promo code twit for 10% off your first purchase of any no man accessory that's nomad goods.com/twit with promo code twitt. This is a limited time offer. Okay. And we thank nomad for their support of Hands-On Photography. Okay. So now we're gonna take a look at thevinci resolve again. It's still the same types of principles and some of it may be just a touch easier or you may find it a little more difficult. I'm sort of eh, about half and half on, on either one of 'em. So let me go ahead and switch my screen over to the wonderful DaVinci resolve. Here we go. And again, I'm working with the same piece of footage and the same assets. All right. So we have our timeline here at the bottom and I have my assets over here in the upper left.
Ant Pruitt (21:52):
So I'm gonna drag the good old Instagram logo down and holy moly. Again, it is really, really big for the screen. As a matter of fact, I'm going to get rid of this dual display here. So let's just click that. So we have a single display. Okay. We don't really need to preview anymore. All right. So this thing is really, really big. So inside of resolve, if you wanna change the aspect not the aspect, if you wanna change some of the parameters of your assets, you wanna go to the inspector panel in the upper left. So I'm gonna click on that's the upper right. An, the upper, right. So I'm gonna click on the inspector and you're gonna get a lot of different parameters to choose from. Particularly the video tab is what you wanna work with. So I want to change the scale or zoom of this.
Ant Pruitt (22:41):
So let's go ahead and pull that back, like so to where it's big enough. Okay. And now I also want to change the positioning of this, so let's do mm. Let's do no. Yeah. I wanna do like a, a top down kind of thing. So I will put it here to the left, to the left and I'm gonna raise it up a little bit like that. Don't wanna do a lower third, so let's do it like that. Okay. So we got it up there in the upper left corner and if we play it back, it just sort of, again, pops onto the screen. Nice and boring. Who wants to do that? Of course, we don't have to add a fade effect on there. We can fix that with these handles here on the timeline, but I don't wanna get into that just yet.
Ant Pruitt (23:37):
Let's first make sure our animation is good to go. So I'm gonna trim it, just a touch and we want to move this on the screen. So it's gonna pop up onto the screen there in the upper left. Let's have it move from top to bottom. So we'll start right here on this particular point and we'll go over here to the right inside of the inspector tab. And again, you have these little diamond icons, which are key frames. So we're gonna hit this first diamond for the position that is currently set to. We're gonna move ahead in time and then we're gonna drag it down to here this time. We're not gonna drag it off the screen. We're gonna drag it down to there like that. Okay. So now if I go and do a playback, very linear, very boring. Okay. Let's fix that first off.
Ant Pruitt (24:36):
We'll give it a little bit of a fade, like so fades in, moves down, pops off. Okay. So let's fade out a little bit more, so I'm gonna extend it and fade it out. Just a touch, like, so play back there. All right. So let's fix this linear motion cuz it just, that just looks horrible. Instead of going over here to look for your graph in the inspector, you actually access your graph here on the timeline inside of da dementia resolve. You'll see, there's a bit of a little speed graph. If you just click on that, <laugh> it gives you these extra options down here on the screen. So let's go over to our first key frame right here and we'll pull this down so we can see a little bit more like that. And you can see you have this little dot there.
Ant Pruitt (25:34):
We just click on these little buttons here after we've accessed the speed graph and just change that to a different curve, you know, or you can do like this. So we'll just click on the natural icon there. First change the curve of it. And now you get an additional handle that shows up down here, hold it hard to see it because it's in blue on this black grayish background. And then we'll move ahead in time to the next key frame like so, and we can continue to do another little Baz curve there. So we just click on it on the point like that. And we get a brand new Baz curve there. So just like before in premier, we can really warp this to make it have a different type of transition, you know, or movement going across the screen. So I'm gonna put it, something like that, cuz I believe what'll happen now is it'll go down below just a little bit more and sort of bounce up. So let's play it back. Yeah. Like that so I can pull it down even more and it'll give it a little bit of a little bounce, you know? So let's try this again.
Ant Pruitt (26:50):
Scroll up. Let's have it fade in. Let's fade in like that. Sit a second. Fade out on edge. Okay. Here we go. Fades in, drops down, bounces up so much more natural, so much more lifelike and nothing real linear, you know, so much cleaner. One more time. It's all about fading it in moving it. And if I want to change again, the, the way this thing moves, you just hit the different BA curves down here to change it up. So one more time
Ant Pruitt (27:32):
Fades in, goes up and down and bounces at the bottom. It's pretty neat stuff. And again, you can do this in final cut. You can do this in Vegas pro whatever video editor that you're using in lead that is that they'll tend to have some way of getting into doing key frames and changing the way those key frames transition on and off the screen giving you much smoother, much pretier animations. All right. So that's it for this week's episode. I hope this has been quite helpful. Again with these animations. It's not just using an Instagram logo. You can do this with whatever asset that you have on the timeline. If you wanna do it with another photo, you can do it with the photo. If you wanna do it with another video, you can do it with the video. You can wipe in a smaller video on top of your current video.
Ant Pruitt (28:27):
As in, as in like picture and picture, we talked about that before, when you use in different layers in your video editor and have those things just animate in a certain way and animate out a certain way. And it'll just continue to give you so much more Polish to your video creations. If you have any questions, feel free to shoot an email hop@twit.tv. I'll be glad to answer the questions that I can answer. And if I don't know the answer, I will let you know. I don't know the answer and we'll see if I can recruit someone that can answer it for you, but yeah, reach out. Send me your emails to hop twit.tv. If you have image critique request, if you have any other feedback that you'd like to share about the show yeah, just shoot a message on over.
Ant Pruitt (29:13):
If you, if you send me images and you're fine with them being shown on the show, please be sure to mention that in your email. I'd appreciate that. Cuz some of the things that you all send are absolutely beautiful and I do enjoy sharing them with the rest of our Hands-On Photography community. So send them on over. All right next, make sure you're following me over on social media. Follow me on Instagram. I am int underscore Pruit on Instagram. Let's get that Instagram number up. I'm continuing to shoot and share photos as well as shoot and share videos over there on that platform. And I'm having a lot of fun with that. Gonna have a fairly busy summer. So maybe you'll see some more things on there that are behind the scenes. I don't know, depends on how much I can actually share publicly.
Ant Pruitt (29:58):
Hmm. I don't know. We'll see, but just give me a follow an underscore Pruit over on Instagram. Wanna give a shout out to my man, Mr. Victor for making me look and sound good each and every week. And one more shout out to you as the loyal hands on photographer and listener. Thank you so much for the continued support. Thank you for rating me on apple iTunes. Thank you for all of the ratings on whatever podcast app you enjoy on and thank you for sharing the show with other folks. All right, folks, that's gonna do it for this week's episode. You all safely create, they dominate and we'll catch you next time.
Leo Laporte (30:33):
Listeners of this program get an ad free version. If they're members of club twit $7 a month gives you a free versions of all of our shows plus membership in the club, twit discord, a great clubhouse for twit listeners and finally the twitt plus feed with shows like Stacy's book club, the untitled Lenox show, the gizz fizz and more go to twit.tv/club twit. And thanks for your support.