Hands-On Photography Episode 123 Transcript
Please be advised this transcript is AI-generated and may not be word for word. Time codes refer to the approximate times in the ad-supported version of the show.
Ant Pruitt (00:00):
Today on Hands-On Photography. I am not looking at another Adobe app. Nope. I'm looking at another app that's going to help you with your photography post-processing and it comes at a great value and I'm talking dollars folks. Yes. A great value. So check it out. It's gonna be a lot of fun. Y'all stay tuned.
... (00:20):
This is TWiT.
Leo Laporte (00:22):
Listeners of this program get an ad-free version if they're members of club TWiT $7 a month gives you ad free versions of all of our shows plus membership in the club, TWiT discord, a great clubhouse for TWiT listeners. And finally, the TWiT plus feed with shows like Stacey's book of the untitled Lennox show the GIZ Fiz and more go to TWiT.tv/club TWiT. And thanks for your support.
Ant Pruitt (00:56):
Hey, what's going on everybody. I am Ant Pruitt and this is Hands-On Photography here on TWiT TV. I hope y'all are doing well. I am unbelievable as always as usual. I like to sit down here at my desk each and every Thursday to give y'all the different tips and tricks. That's going to help make you a better photographer as well as a better post processor. And every now and then I do get the opportunity to sit down with they and talk about photography, tips and tricks as well with those folks. But that's not this week, this week, we're gonna take a look at an app that that we can use here in the photo editing space. And it's not in the Adobe world. No it's not Adobe Lightroom or Photoshop or anything like that. This is going to be a discussion about defined folks ater and their app is called affinity photo.
Ant Pruitt (01:51):
But before we dive into affinity photo, let me do a proper welcome to the brand new listeners that are out there. So again, welcome to you folks that are checking out show for the very first time. Do me a favor, go ahead and subscribe in whatever podcast app you use or podcast catcher. I don't even know if that's the correct term, but whatever podcast app you're using to catch the show, go ahead and subscribe right now. And if that app allows you to do some sort of rating and comments, go ahead and do that too. Leave me a little five star rating, especially your apple podcast folks, and leave me a rating in and comment. So it'll help push us up in the ranking. So other folks can find the show, or if you just can't quite figure out where to subscribe, go on over to the website, TWiT.tv/hop that's TWiT.tv/h O P for Hands-On Photography, where you'll see all of the subscription options, including our YouTube channel, all of our previous episodes and all of the show notes and all that good stuff there.
Ant Pruitt (02:50):
So thank you for the continuous support, but now let's go ahead and get started with this week's episode. Okay. As I was saying, we're gonna talk, talk about a different app today. We're not gonna talk Lightroom. We're not gonna talk Photoshop, somewhat Photoshop, but we're gonna dive into the world of affinity photo. So what is affinity photo? All right. Affinity photo comes from the folks at serif that's S E R I F ER, they make a couple different types of creative software out there. You have a photo version, you have a, a designer version. And then there's one more thing, but I I'm drawing a blank on it, but that's neither here nor there either way. They have a photo photo app out there. That's really good. It's cross platform on that or windows and is also available on iPad OS and quite frankly, folks, this thing is really, really, really nice.
Ant Pruitt (03:51):
Especially when you consider the pricing of it. This is not a free app. You can get it online for your computer windows or, or Mac OS for, I think it's 55 bucks on their website. We'll put a link in there, show in the show notes that takes you to all of that. Or you can get it for the iPad. And I believe it's like $22 or $25. I'm drawing a total blank on the price. I can't remember what I paid for these, but I've had 'em for a while. And, and I do enjoy both of these pieces of software. I use it here on the computer and I also use it on my iPad. My iPad doesn't get a lot of use, but when I do use my iPad, it's either opening up Adobe Lightroom or it's opening up affinity photo on it, cuz it's really good on the iPad.
Ant Pruitt (04:38):
Quite frankly, I think it might. Hmm. I think it might be better than Photoshop on the iPad. It's it's it's really, really good. There's no drop off going from your desktop experience to the mobile experience on the tablet. It is quite impressive. Adobe. I might want to take notes folks. Okay. Anyway, so what I wanted to do is just at least introduce you to the folks introduce you to this app because some of you have asked, Hey, what are, what other options do I have out there? You know, it it's, I don't want to pay the umpteen dollars a month to be a Adobe creative cloud user, or I don't wanna pay this subscription. I just want something that's gonna be useful. It's not gonna cost me a ton of money, but still give me a lot of functionality that evokes in the subscription world or live in.
Ant Pruitt (05:31):
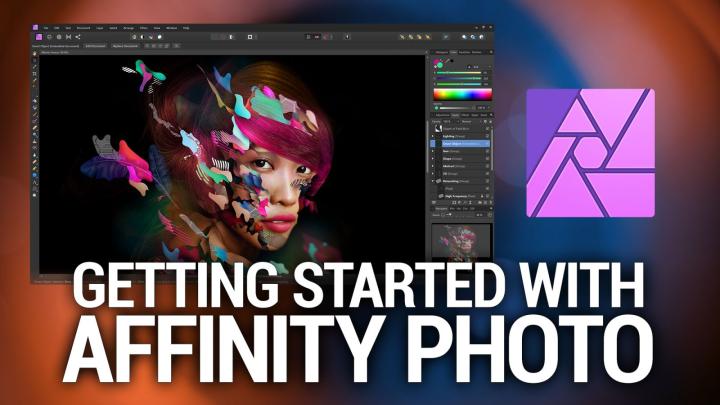
And fortunately to Sheriff's credit you do you get a lot of functionality, so let's go ahead and hop on over into my screen here. So we're gonna pause for, and I'm going to pull uper affinity photo. Okay. So we are iner affinity photo. And if you look at this thing, man, it, it really does look like a clone of Photoshop. Just, just to be Frank. The same could be said for the likes of GI, the, the free Photoshop clone, if you will, G I M P this thing it's, it is so powerful. Now it's a lot of similarities when it comes to Photoshop far as some of the layout and some of the shortcuts and things like like that. But there are a couple different differences, couple differences that I wanted to point out today. So first let's just dive in and take a look at this first image.
Ant Pruitt (06:25):
Now I have, if you look here at the top you got these little tabs, this is this the particular image here, but I have another tab right to the left of it. That is another image, very similar to the functionality of Photoshop. You can open up multiple image inside of the application and work on a tandem and so on and so forth. But you also have over here on the right hand side, similar to Photoshop, a layer panel and you notice the image when you pull it in, it comes in as a background here, and it even has to lock where all of that stuff sounds just like Photoshop, right? So for the most part, if you're a Photoshop user looking to save yourself some money, this is a pretty viable option here. Cuz you're not gonna lose a lot of that functionality or those keyboard shortcuts or not all of them that, that you're used to inside a Photoshop, but then you have the extra panels here.
Ant Pruitt (07:22):
You have the adjustment panel and effects and styles and so forth. If we look at this adjustment panel it's, this reminds me of using something like Lightroom, you know, I can click on levels and it'll give me all of these little presets here. So let's say I just click dark and preset and one click. It's going to change the image quality of course, but I get these extra sliders that I can manipulate and do whatever I want with. And then when you're done, you know, you just, just close it out. I'm gonna undo all of that. Of course, cuz I don't want that for now, but you can do the same for these other options here. White balance and HSL, which is huge saturation, a lot of different tools built right into it. You even have your curves tool here that you can play around with.
Ant Pruitt (08:09):
But this is sort of the quick and easy side of things when it comes to doing just touchups all right inside of affinities photo affinities photo, and then you have the layer option here and you have the effects where you can add different things different blurs and drop shadows and things like that. Again, a lot of that stuff on the Photoshop outside of things, you have to go to a menu and add it in that way. It's a little bit easier having it there. Or you can just go over here to this filter menu in the upper left and you can see a lot of different filters and, and effects built in right there. All right. So again, this is a JPEG image and again, you can do whatever you want with it from a editing standpoint, but what about manipulation?
Ant Pruitt (08:59):
That tends to be the big thing when it comes to say Lightroom versus Photoshop inside of Lightroom, you can't do a lot of manipulation of the, of the particular photo. You know, if I want to, to sure if I want to change the color of someone's shirt or hair or eyes or things like that. Yeah. I can do that inside of light room, but if I want to, you know, like cut out the background, something like that, that's so much easier to do inside of Photoshop. Actually you really can't do it inside of light room and get like a trans background, but there's just some things inside a Photoshop that's, that's what it's made for. It's made to totally manipulate an image. And then let's see, I'll just go ahead and add another layer here. Just like I would at Photoshop. So let's see control J or command J on Mac and it duplicates the first layer to sitting there.
Ant Pruitt (09:55):
And this allows non-destructive post-processing on this image. So if I'm working on this top layer, if I wanna rename it, I'll just call it top or something, whatever, just keeping it organized just as she wouldn't Photoshop. I'm gonna try not to say that too often, but I, if I wanna work on this top layer and do some manipulation, let's say like this, this little Spriggs of hair on my boy's face that he calls a beard. Let's say I want to try to clean it up. I can pop over here to the different tools over here on the left hand side, just like I would in Photoshop, there should be like a patch tool or an eraser or something like that. So let's see here. I just saw it normally it's J on the keyboard. There it is. Yep. There we go. Healing brush patch, tool, blemish removal, all of those typ typical retouch types of things here on the left hand side.
Ant Pruitt (10:51):
So let's say patch tool. So I'm gonna click on that. And the patch tool allows me to take a patch of skin in this instance and make it look the way I want it to look. So if I want to get rid of this hair on this face and just make it like he's shaving a little bit, I can just take the patch and grab what I want and then just sort of drag, whoops, did it wrong and then just sort of drag it out, like so to clean it up and that looks pretty good. Right? And that was just quick and easy. Now what about say using layer mask and things like that inside a Photoshop, we've talked about layer masks before where you have two different layers and the top layer has one version of the image and the layer below has another version of the image, but you want them to blend together.
Ant Pruitt (11:47):
So what you do is you take a mask and just mask out the stuff on the top layer. So the bottom layer is revealed. So if I wanted to do a mask for let's say his beard or whatever, this is a bad example, but I can create a layer mask on this top layer by clicking the little icon like, so, and then just brush in what I want to be Veed on the top layer. So if I wanted to bring his beard back, I really can just brush it in by painting in with black, just like that. So now it's back. So again, you're still getting more and more functionality that you're used to seeing inside of Photoshop. Okay. So that's just working with the JPEG. Well, what about handling raw images? You know, something from, from Sony, like the a R w files or, or NECON, I think there's any Fs and then cannons are CR files.
Ant Pruitt (12:48):
I have, I have a raw file also over here. So let's pop into that when you first open up the app and if you're opening, if you're bringing in a raw image, it opens up a separate module, just like Photoshop would Photoshop usually opens up raw files with camera raw. This will open up its develop persona. Yes. Develop persona is what it's called. What the heck of personas. All right. So inside of affinity you have these little buttons up here in the upper left and they're called personas. Now what we've been working in on this episode for so far is the photography persona, which has pretty much all of the bells and whistles that you need as discussed over here on the right hand side, the, you know, the different effects, the layer options, so on and so forth. But if you want to did I just freeze it?
Ant Pruitt (13:49):
This is what happens when you record live. Okay. Anyway, we can move on. But if you want to check out the other personas, you just go over here to the upper left and you'll notice there's a lot of, couple different options involved here. So first you have the photo persona didn't you have next, the liquified persona. And if I click on that, it's gonna bring up a whole separate menu. And the liquified is just a, a special effect. Use a lot inside of like portrait retouching if someone's face or cheeks or something, they're trying to retouch 'em to, to bring out their cheek bones or to slim down their face a little bit. You know, you use the liquified tool to sort of just shape things the way you want them to be shaped the as a photographer or as the client suggests.
Ant Pruitt (14:39):
Now this is I'm just gonna go overboard and I'm just going toy this person. And you see it just warps the perspective like that. And that's just the liquefy too, that serves no purpose in this particular image, but I just wanted to show it to you being used just as you would inside a Photoshop. So after you work inside of a persona, you get these different options here to apply it and move on. I'm just gonna cancel that. And it's gonna take us back to the photo persona. Then you have these other two personas here. This is a tone mapping. One. I skipped over one in particular, but trust me, you know, I'm coming back to it, but the tone mapping persona, very good, very easy. A lot of presets built right into it. It's going to look at your image and analyze it.
Ant Pruitt (15:25):
And then it's going to pop up some filters over here on the left hand side to help you with getting your color squared away. Whether you want to go with something that's natural like this one, or if you want to go to more of a cool color temperature, just click on that one and it'll think, and it'll apply it. Or if you just want to go to something that's like a gray scale, they call this black and white, but that looks way more like gray scale to me and it's, and it'll apply it. And it'll allows you to go in and work on these other options and settings, just like you would any other photo editor. Very nice. I'm going to cancel this persona and we're gonna move on then of course you have your export options right here. How you wanna save it, you know, as a JPEG P and what have you.
Ant Pruitt (16:13):
Okay. So I skipped over one persona and that's this persona here. This is the developed persona. Okay. So again, as I mentioned previously, if you open up a raw file inside of affinity, it's going to initially open affinity photo with the developed persona because it's a raw file cuz it's thinking, all right, you are wanting to do some quick processing. We're not processing some quick adjustments before bringing it into affinity photo to really dive into the nitty gritty of toing, tone coloring and things like that. So this is what it looks like. It's nothing to be afraid of. The best way to look at it is like looking at Lightroom or camera raw because it gives you a lot of the same sliders and things like that over here on the right hand side. Okay. If I click on this basic tab on the right hand side, I get all of these regular sliders, just like I would in other ones to bring up the exposure, brightness, contrast, clarity, everything is just, it's all pretty straightforward.
Ant Pruitt (17:22):
Okay. and you got different options for your lens calibration because again with the raw file, you're that raw file is carrying the data of your camera. So I know that I shot this particular image using a Canon 85 mill lens. And so if I shot it in say like the, I don't know, maybe like a 24 to 70 or no, let's go with the wide angle. Something like this here, like an 11 to 22 that has a whole different effect because that lens has a Boeing effect. It has a bit of distortion to it when you shoot with it, when you bring it into this software and you tell it, you tell affinity, Hey, I shot it with that wide angle lens. What it will do is try to flatten it out and minimize that distort. Of course it has a reverse effect on this shot because it didn't shoot it with the lens like that, but you get the drift.
Ant Pruitt (18:15):
So it just allows you to, you know, make sure you got everything squared away. That is definitely going to make your image look even better because it's using all of the ideal settings. So now I can't find I can't in my lens in here anymore. All right. Anyway, doesn't matter, you, you get the drift, but that's the developed module. And again, it's got a lot of different tools in here that you can play around with to help get you started with using this really robust photo editing app. And of course, after you're done with doing your initial set up inside of the developed module, just come over here to the menu and the upper left and you just click develop and it will write the file and allow you to carry on and, and do what you need to do with this image. So if you wanted to just drop some random color on here, just hit B for your paint brush and, and I don't know, just paint on it.
Ant Pruitt (19:15):
You can do all of that. I don't know why you would do that, but have at it. If you wanna make a new layer, you can just add a brand new layer over here. Let's see like that and just paint it in on that layer. And if you're thinking, nah, I don't know if this looks good, you can turn that layer off and double check. This is really, really cool. And it's nowhere near the same pricing as what's offered by those subscription companies. But yeah, that is affinity photo. I gotta give them their credit or credits due. They bring in a great product with really, really good pricing. And they're also offering a lot of different resources on their website. They have the they have a couple different tutorials. Their YouTube channel has a lot of different tutorials and it's really good.
Ant Pruitt (20:06):
It's not just a here's a new feature, check it out. No, they really walk you through using the product and can be quite helpful for you. So I highly recommend them if you're not interested in being in the subscription world, you got some options. All right. Again, it is just over 50 bucks for the computer and it is right at 25 bucks or $22 or something like that for iPad OS not available on an Android tablet. Okay. All right. That is gonna do it for this week's episode. I hope this has been helpful for you and I hope it gives you some options to consider regarding your photo editing and post process and endeavors. If you got any questions, feel free to shoot me an email, that's hop TWiT.tv. I'll be more than happy to ask your questions as best I can.
Ant Pruitt (21:00):
If you have comments feedback, you have just send them all over to there. And one more thing. We're going to, we out an email. We're gonna go ahead and have our moon discussion next week, cuz we've already had our moon photography challenge up and out there. And I've given you some time to get your, your images in and boy have y'all sent them in. Thank you really do appreciate that. So stay tuned for our moon photography to challenge and, and see some of the instead have been submitted by other Hands-On Photography, viewers and listeners. Boy, I can't wait. It's gonna be great. All right. Thanks again for all the continued support. Thank you for sharing the show with other folks. That's how we grow this thing. And also go ahead and give me a follow on the social medias. Follow me over on Instagram.
Ant Pruitt (21:46):
Yeah, follow me on I, I am an underscore Pruitt on Instagram and tag me in some things that you, that you've shared on Instagram. If you want to and let me see what you're sharing and I, I, I like to interact with folks over there, so yeah. Gimme a follow on Instagram. That's T underscore Pruitt. I want to give a shout out to my man, Mr. Victor, who you, the man search. Thank you so much for all that you do for this here show. Thank you for making me look and sound good each and every week. All right, folks, until next time, Hey, safely, create and dominate and I shall catch you next week. Y'all take care.
Rod Pyle (22:24):
Hey, I'm Rod Pyle editor of Ad Astra magazine and each week I'm joined by Tariq Malik, the editor in chief over at Space.com in our new This Week in Space podcast. Every Friday, Tariq and I take a deep dive into the stories that define the new space age what's NASA up to when will Americans, once again set foot on the moon. And how about those samples from the perseverance Rover? When are those coming home? What the heck is Elon must done now, in addition to all the latest, greatest and space exploration will take an occasional look at bits of space flight history that you probably never heard of and all with an eye towards having a good time along the way. Check us out on your favorite podcast. Catcher.