Hands-On Mac 180 transcript
Please be advised this transcript is AI-generated and may not be word for word. Time codes refer to the approximate times in the ad-supported version of the show
0:00:00 - Mikah Sargent
Coming up on Hands-On Mac, it's time to take a look at iPhone mirroring. Once again, stay tuned.
0:00:09 - Leo
Podcasts you love From people you trust. This is Twit.
0:00:24 - Mikah Sargent
Welcome back to Hands-On Mac. I am Micah Sargent and now that this feature is fully baked this feature being iPhone mirroring I thought it'd be a great opportunity to take a look at the system that allows you to pull up your iPhone on your Mac and control it. Very cool, let's take a look. All right, here we are on Mac OS and you can see that I have the iPhone mirroring app open. I have selected it from the dock, but if you don't have it open on the dock, you can always hold down command, hit the space bar and start to type in iPhone, at which point Spotlight will show you iPhone mirroring and you can hit enter. Now, when you first launch iPhone mirroring, it gives you some information about what you can do Quick access to iPhone apps, view and act on notifications, and the ability very cool to drag and drop photos, documents and other files between your iPhone and your Mac. So let's go ahead and click continue, and the first thing that happens is on my iPhone, I see a prompt that says enable iPhone mirroring by typing in your iPhone passcode. When you type in your iPhone passcode, you're saying I trust this Mac and I want it to be able to access my iPhone wirelessly. Of note, your iPhone needs to be locked. I will type in my passcode on my iPhone and that tells the system yes, I'm okay with it. And now it prompts me for notifications. I am going to click allow, because when I click allow, what happens is the Mac is going to mirror my iPhone notifications, so notifications in apps on my iPhone will appear on my Mac. I'll click get started, and now I need to enter the passcode for the Mac itself, and so I'll type that in now, and then it's going to connect to the iPhone. When you see, when you do this for the first time, you'll see a prompt that pops up to say require Mac login to access iPhone. Essentially, what happens here is you're saying I need you to log into the Mac, either via Touch ID or by typing in the passcode every single time, or go ahead and let the authentication happen automatically. I'm going to choose authenticate automatically and then I will once again type in the password for my Mac, which says yes, absolutely, that's what I want you to do.
Now, before we take a look at what you can do, I want to talk about what is required for actually using this feature. First and foremost, both devices have to have Wi-Fi and Bluetooth turned on. If you have your Bluetooth turned off very common, I know people think that it saves battery. It doesn't really save that much battery. But if you do have your Bluetooth turned off, both of the devices need to have it turned on. You need to be signed into the same Apple account on both devices, so the Mac and the iPhone both need to be signed in. Your devices need to be within 30 feet of each other. If they're further than that, your devices need to be within 30 feet of each other. If they're further than that, the Bluetooth signal is not high enough and it tells the system no. There's no reason why you should a Mac with the Apple T2 security chip. If you have one of those Macs, an Apple Silicon Mac or an Apple T2 security chip Mac, which is an Intel Mac that can run macOS, sequoia or later, you're good to go. The iPhone needs to be able to run iOS 18 or later. At that point, once you're running macOS 15, sequoia or later and your iPhone has iOS 18 or later, at that point, once you're running Mac OS 15, sequoia or later and your iPhone has iOS 18 or later, you're good to go. You need to, of course, remember all of the other requirements being signed into wifi and Bluetooth on both devices, having the same account signed in. But once that's done, you're ready to rock.
Now with iPhone mirroring, I can do everything on the iPhone that I would want to do. I can launch the Photos app and see what photos are here. This is equivalent to tapping, so while I'm moving my finger around on the trackpad, I can simply click to do what is equivalent to a tap to open the app switcher. I simply move my pointer to the top of the iPhone mirroring screen and when the menu bar appears at the top, like so, I click on the rectangle with a couple of rectangles behind it in the top right corner, and that brings up the app switcher. If I want to get to the home screen from somewhere so let's go into the Notes app, for example I can go up to the top again and hit the row of app icons in order to pop back to the home screen, and I can also do things like rearranging and editing the home screen. So right clicking on certain apps will allow me to change the app itself by clicking to edit the home screen. So I can remove an app. But you'll notice, if you right click on an app, you can also turn it into a widget, for example. So the Reminders app becomes a Reminders widget. I can make it a small one or a large one. I can edit that widget from here. I can change it back into an app, like so For the Wallet app, I can take a look at my last transaction. So if it has shortcuts that would be accessible via tapping and holding on your iPhone, a simple right click will give you the ability to edit that instead.
Which apps are actually going to show up on our screen for the notifications on the Mac? So, for example, I can scroll down and choose, oh, let's go with the messages app, and you'll notice that it says show on Mac. That means that notifications that comes to messages and I'm going to actually send one from myself to the Micah Twit account so that you can see what that looks like. I will say hello there and then send that, and you'll notice that it popped up in the top right corner. Now, this is an app that, of course, has notifications on the Mac itself, but it will show up specifically from the iPhone if that app has notifications to be shown. So when you interact with those. It will let you interact with them from the actual iPhone itself.
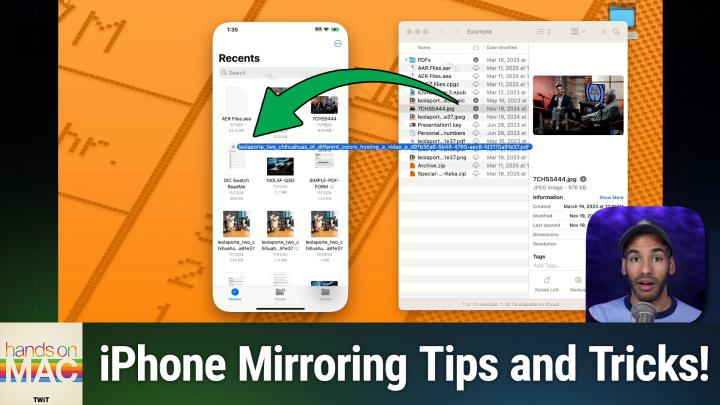
On this, you are also able to drag and drop files. So I can go to my example folder, this folder that we've been using for quite a while at this point, and I can click on something to change it, or to drag it over, rather to change it, or to, uh, to drag it over, rather. So if I click on Hmm, let's go with this JPEG file here and drag and drop it on, uh, the iPhone, I need to choose, uh, an experience that will allow for it. So let's actually open up the notes app and create a new note. Then we can take this JPEG, drag and drop it and you'll notice that it pulls up on the iPhone just like that. No problem at all.
Going back to the home screen, if there's another app that I have, I'm trying to think of a good app for this as well. Perhaps let's see, if we go to Safari, if we can get an app from here to show us. So no, in this case it's not going to pull that up, but let's try a PDF, for example, and we drag and drop that into files. There we go, let's do that. So we'll take this PDF and we'll drag and drop it to be able to. Well, in this case, of course, the PDF already exists in that folder, but dragging and dropping files over between the two documents is something that you are able to do, and I've just thought about an option here. If you're working in a Pages document, for example, you'd be able to drag and drop those types of files in between.
Now, at any time, you are able to disable iPhone mirroring. First and foremost, you can do so simply by going in and turning off the accessibility settings for iPhone mirroring. But if we go to General and we choose Airplane Continuity, we have these different options, including iPhone mirroring, at which point you can edit and remove it. So you tap edit and then you remove that Mac. Now one other note.
When it comes to this, you are able to connect multiple iPhones to one Mac.
You just simply cannot use more than one at a time. So if you want to have three different iPhones connected to one Mac, if you've got a family Mac or whatever that might be, you are able to do that. This is a continuity feature. It is very powerful and, the great thing is, your iPhone remains locked the whole time. So it's not as if on my iPhone I'm seeing everything happening that I'm doing on my Mac to the phone. It can stay how it is and be left alone and no one's going to know that you're using. You know your iPhone in the other room and look at what you have on screen. But that also means that if you have a fantastic little desk stand like this from 12 South, then it can show your standby mode. While we're actively playing around with the iPhone, nothing is happening on the screen of the iPhone itself. So you could have it docked and nearby, keep the battery charging and still be able to access the entirety of your iPhone right there on your Mac.
It was one of my favorite features. When it was announced, I was very excited to try it out. So happy it's here, so happy that it's truly and fully locked in at this point. Locked in at this point, full featured and fully accessible, and now that we can sort of do everything that we would want to do between the iPhone and the Mac, that feature of dragging and dropping files was one that took a little while to get there. I thought it was the perfect time to head back in and take a look. So thank you for tuning into this week's episode of Hands-On Mac. Always appreciate the time and support that you provide, and I will be back next week with another episode. Until then, goodbye.
0:11:45 - Leo
Hey buddy, are you a geek? Are you a tech enthusiast? Then I would love to invite you to join a tech community like no other. You can gain exclusive access to our incomparable quality tech content with Club Twit. As a member, you'll enjoy all Twit TV shows ad-free plus access, private video feeds for insider shows like iOS Today, Home Theater, Geeks and so much more. Dive into the members-only Twit Plus bonus feed for behind scenes content, club discussions and special events. But here's the best perk Join our incredible Discord community to watch live show productions, chat with hosts and participate in exclusive members only activities. It's your backstage pass to the world of Twit. Whether you're a tech enthusiast or a lifelong learner, Club Twit elevates your knowledge while entertaining your interests. Get two weeks free when you sign up now and unlock unparalleled access at twittv slash club twit. That's twittv slash club twit and, from the bottom of my heart, thank you and welcome to the club.