Hands-On Mac 136 transcript
Please be advised this transcript is AI-generated and may not be word for word. Time codes refer to the approximate times in the ad-supported version of the show
0:00:00 - Mikah Sargent
Coming up on Hands-On Mac. Let's take a look at an accessibility feature for iOS, mac OS and iPad OS that creates a virtual version of your voice. Stay tuned Podcasts you love From people you trust. This is Twit, is Tweet. Welcome back to Hands on Mac. My name is Micah Sargent, and today we are taking a look at personal voice for the iPhone, the iPad and the Mac. It is a feature that lets you create a synthesized version of your voice that you can use to communicate with other people. It is a feature that is intended as an accessibility feature for someone who might be losing their voice soon, but it's something that's kind of fun for anybody to try out and I felt it was worth talking about Now.
Before we get into how to set up the feature. I did want to mention the kind of requirements. First and foremost, you need to have at least iOS 17, ipados 17, or macOS Sonoma running on your device and, of course, future versions of those operating systems as well, and then you need to have one of these devices an iPhone 12 or later, an iPad Air of fifth generation, an iPad Pro in the 11-inch size of third generation or later, an iPad Pro in the 12.9-inch size of the fifth generation or later, or a Mac with Apple Silicon. Those devices are the ones that are able to actually do this synthesizing, because it does happen locally on your device. You also need to have Face ID, touch ID or a device passcode or password, because this is protected information and will be encrypted. It is only available for the English language as it stands. So if you do not have or if you're hoping to create one in a different language, unfortunately that's not available right now. You are able to create multiple voices on your device, and so you can create one. Decide if it works, you create one for someone else. This process is kind of a long process and requires a little bit of patience, because the processing happens overnight while your device is charging and connected to Wi-Fi. Even though it does happen locally on device, it still does require that you do have your settings turned on and your device running overnight.
So let's take a look at how we do this Now. You can do it on your Mac. You can do it on your iPhone, your iPad. I'm going to show you today on the iPhone, simply because that's how I created the first personal voice that I made. So let's head over to the iPhone.
Ok, so first thing that we need to do is launch the settings app and then we will choose accessibility OK, and we will scroll down to the speech section, where you will see an option called personal voice. Now, when I tap on this, you can see that on June 8th of 2023, I created a personal voice and I want to go through kind of some of the stuff here. So, first and foremost, if you have created a voice before, you can tap on it to see when it was created. You'll notice that it did a face ID scan to make sure that I truly did want to allow access to that personal voice. I can export the voice recordings that were used to create the personal voice, so these are specific voice recordings. We'll talk about that in a moment. I can delete it I don't want to have this personal voice on my device anymore and, of course, I can change the name of the personal voice.
Now the next sections are create a personal voice. That, of course, allows you to create a personal voice. Share across devices says that any devices that are logged in with my iCloud account can make use of this personal voice, and so if I were to open the settings app on my iPad now I would tap into personal settings and I would be able to find that Micah voice and then allow apps to request to use. This allows certain apps that have the feature to gain access to the personal voice. These are called AAC apps augmentative and alternative communication apps. It lets them say hey, we want to use this personal voice. Give us the permission to, so they have to request it. This says they can request it.
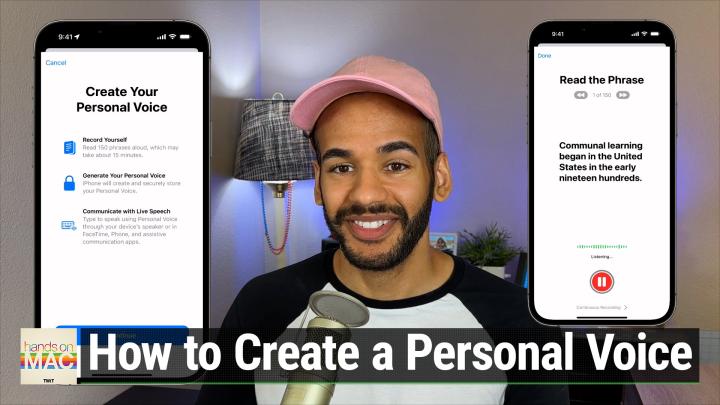
Now, when you create a personal voice, it will automatically generate a series of randomly chosen text prompts and you simply just have to read them. It takes about 15 minutes of recording, so we aren't going to go through the whole process, but I want to show you what the process looks like, just so you're able to see that. So we will choose, create a personal voice, and then it immediately scans my face again to make sure I'm me, and then it has some information Read 150 phrases aloud, which may take about 15 minutes. Iphone will create and securely store your personal voice and then we'll talk about this in a minute. You can communicate with live speech, so we'll tap continue and from here I'm going to have to kind of just choose to read some of this text. So I'll tap continue. And then it says you got to find a quiet place. You want to speak, naturally keeping the device about six to 12 inches away from your face, and take your time. You can save and close your session at any time, so you don't need to do it all at once if you don't want to. It's simple to do and you can do it as you need. You want to be in a place that has minimal echo and background noise, so don't do it in a room where there are other people. We'll tap continue again and we'll see what happens. So we give it a name. We'll tap continue again and we'll see what happens. So we give it a name. So I'm going to call this. We'll just call this Hom, because this is hands on Mac, and then we will tap continue. I'm creating a personal voice with my iPhone. Ah, I forgot, I need to hit the record button. I'm creating a personal voice with my iPhone and it says looks like there's a very low background noise. That's great. So make sure that you, when you do this recording going forward, that you choose a similar environment. We'll tap continue and then we will start to read some of these phrases, just so you can again get an idea. And then we will start to read some of these phrases, just so you can again get an idea.
Communal learning began in the United States in the early 1900s. He supported the League of Nations and other movements for global awareness. He supported the League of Nations and other movements for global awareness. She was the daughter of a well-known merchant. At the age of 14, he was taken to England to study music. It is a group of islands in the southwest Pacific Ocean. During the next 20 years they explored much of the region.
And now I'm going to pause because I want to show you that there are 150 phrases in total that will be recorded. You can choose to do continuous recording, which, instead of showing these kind of step by step, it will show you a list and you can just keep going, and then you also have the option to go back and rerecord phrases if you want to. Now I'm going to tap done in the top left corner and what that's doing is it's saving it. So now it says there are 144 phrases left to record. When I tap on it, I can choose to continue that recording where I left off.
Now I'm going to go with the voice that I already created, and I want to show you how this can be used. First and foremost, you want to go back into your settings app. You want to go into accessibility and now in the speech section above personal voice, there's an option that says live speech. We want to turn that on. From that point on, triple clicking the side button will give us access to live speech. Now, underneath the phrases section favorite phrases section you can tap on that and you can add phrases, so you will type in a phrase. So maybe you regularly Please hand me the remote, and do you know what happened to the remote? Now those phrases are accessible regularly. They're not ones that I'm going to have to type in.
I'll show you in a moment what the live speech actually looks like and under voices, we choose the voice that we want to be part of live speech. So you can choose one of the built-in voices from Apple, including Siri voices. I, of course, chose personal voice, which appears at the top, and then Micah, which is the full personal voice that I've created in the past. So, now that I have live speech turned on, I've selected some favorite phrases and I've made sure that the voice is set to me. I'm going to go back to the main screen and I'm going to triple click the side button. One, two, three. Up is going to pop an option. I have a lot of accessibility shortcuts here, but at the very bottom is live speech. I will tap on that and now I can type in a phrase, or I can choose phrases and I can tap please hand me the remote. Please hand me the remote and it will play that back. Please hand me the remote. Do you know what happened to the remote that is using my voice, generated to be able to put out those phrases? So, once again, triple tap the side button. You could also type something in uh, hey, I found the remote. Hey, I found the remote. And once again, it sends.
Now the point of personal voice is if you're ever in a situation where you can't speak but you want to still sound like yourself in your communication. That's what personal voice was created for. So maybe there's a time when you need to take vocal rest. Maybe there's a time when you have lost your voice from laryngitis who knows what reason it might be but in any of those cases, personal voice can come in and can help you. You can use it in FaceTime. You can use it just on your phone in person. You can use it in those assistive communication apps and phone calls, once you have generated your personal voice.
Folks, that is going to bring us to the end of this episode of Hands on Mac. It was all about personal voice today. I'm curious to hear if you have taken the time to set up a personal voice for yourself, if you've used live speech and anything else that you have to say, you can always email me, micah, at twittv. Thank you for tuning in this week and I look forward to being back next week for another episode of Hands on Mac. Bye-bye.