Hands-On Apple 191 transcript
Please be advised this transcript is AI-generated and may not be word for word. Time codes refer to the approximate times in the ad-supported version of the show
0:00:00 - Mikah Sargent
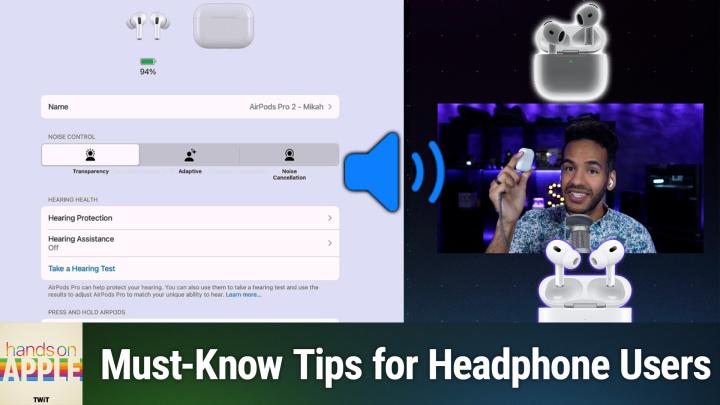
On this week's episode of Hands-On Apple, we're going to take a look at the settings you have for Apple audio devices AirPods, airpods Pro, even the Beats set of headphones. So stay tuned Podcasts you love From people you trust. This is Twit that you have when it comes to what you can do with your AirPods and similar devices. These are the devices made by Apple itself and, because that is the case, you have more available to you when it comes to the settings for these listening devices. So let's head over to iPadOS in this case, although these settings are available across the suite of Apple's platforms. But let's take a look at it there. All right, here we are on the settings page. Well, in the settings app, the main page for our iPad, and I am going to take these AirPods and I'm going to put them in my ears when I do that, because I last connected to this device. Then they pop up here at the top with an immediate connection. Now I'm going to hold down on the side of these to change the mode to transparency, because it helps me hear myself better, which is important for this, because I need to know what I sound like. So let's look over here in the menu and again, this works the same on an iPhone. You would see, above everything else, your set of AirPods pop up. Now I have AirPods Pro 2, which are some of the most recent versions of Apple's audio hardware. What that means is I have access to all of the controls, and that means that I can show you everything. So the point that I'm trying to make here is that you may not see all of these controls for your specific set of AirPods or Beats or what have you, but if you ever were to upgrade to kind of the latest and greatest from the company, these are all the possible controls that you would have. Now, up at the top, you can see the current percentage of the battery for the AirPods themselves. That is because they are in my ears Now. If I were to put them in the case and we still had access here, we would see a percentage pop up next to the case. If I were to put this case and plug it in to charge, we should see an update to the animation here showing that we are charging. Now, sometimes it doesn't update and sometimes you need to, in fact, take the case and hold it next to the device and open up the lid. Different things may trigger different types of animations, and I have found that it can be a little bit random when it comes to what it's showing, and it all has to do with whether the Bluetooth is properly connecting.
Now, underneath this main section, we see the name of the device. You can change that to whatever you'd like here, because I want to make sure that I am using the right set of AirPods. I've notated that it's AirPods Pro 2 and that they belong to me. You may have any other set of AirPods that you'd want to put there, but the name could be anything. So whatever you decide to put, you can put it there.
Next is noise control. Now, many of you are already familiar with these controls and in fact, when I was tapping and holding or clicking, I should say, and holding on my AirPods, that is what was letting me change between transparency and noise cancellation. Now let's talk about this, because you can see I have three controls here Transparency, adaptive and noise cancellation. Transparency is not simply turning off noise cancellation. That would be a fourth setting called off, which you'll see I currently don't have access to. We'll talk about that in a moment.
Transparency is actually using the microphones in the AirPods or other audio device that has these controls to give you an enhanced understanding of your surrounding, while also still making it so that you can hear the audio that is playing through your AirPods. So if you need to be more aware of what's going on around you, say, you're walking the dog or you're on your bike you would want to probably use transparency mode, because it will let you hear certain frequencies better while also still making it so that you can listen to what you want to listen to, and that's much different from off, where sounds from the outside will sound muffled and it may be having an impact on the clarity of the audio that is playing into your ears. Transparency is actually very clever. Noise cancellation is, of course, a set of audio bits of magic that are working to make it so that you are not hearing sounds around you that are kind of typical and are consistent. So, using what we understand about sound waves and how sending an alternate wave out to the wave that's coming in, will help to cancel out that sound. That's what noise cancellation does, and Apple is always improving upon its algorithm to make noise cancellation even better. So with that, the environment around you gets blocked out, in particular, those sounds that are consistent and the environment that is, you know, inside, is going to be much clearer.
Adaptive aims to switch between noise cancellation and transparency based on your environment. With Adaptive turned on, it particularly listens for conversations taking place around you. That listens for conversations taking place around you that, in particular, you are participating in, and will adjust the noise control how much noise is being canceled based on what's happening. Now, as this continues to improve and has continued to improve, something very cool has happened where Apple has made it even more possible. For example, if you're listening to an audiobook, you know, with music you have a conversation and the music is playing in the background, and so it just kind of makes that person's voice more present to you while the music continues to play. But if you're listening to an audiobook, you obviously want to focus on what is happening in the book, and so when this is on, what it will do is it will pause that audiobook and let you have that conversation and drop the noise cancellation down, making things more transparent, and play it back for you. Very cool, all right.
Moving along to hearing health, we have some different options here, and it starts with hearing protection. Now, what hearing protection does is. It is going to make it so that sounds around you in your environment don't have as much of an impact on your ears. So what it aims to do is try to use transparency and adaptive modes to still block out those loud sounds that could be troublesome to your hearing. And there are quite a few things involved with this because, for one, by having AirPods in your ears, you are blocking some of those sound waves externally already. So if those AirPods are also able to listen to the sounds around you and lower the level of volume of those loud sounds, that's a great addition.
Now in this you're going to see a few more things, and this has to do with what features are required, or rather, what settings are required and what is required to be able to use the hearing protection of that loud sound reduction. Importantly, remember when I said we've got noise control features that include transparency, noise cancellation and adaptive, and I said that there was no off function there. If the off function was available, then this would not be a feature that's available the loud sound reduction. Now the first thing that happens is, with this, there's an ear tip fit test, and what this does is it plays some sounds, to determine if the ear tips that you're using, the size of the ear tips that you're using are best for you and your ear canals, because Apple provides small, medium and large options in the box and you may have chosen the wrong size, thinking it's the right size, but this will help to determine if it is indeed the right size.
And then there's also something called headphone safety on iPad or iPhone or wherever it happens to be, and what this does is if audio coming in is over a certain volume level, then it will let you know and it will reduce that sound to a set decibel level. 85 decibels is the default and you can go up from there or down from there. Now 90 is where things start to become an issue, according to many a research study on the effects of loud sounds on your hearing. So 85 decibels is a great choice there. Now you'll notice that was in the sounds section of the accessibility menu, so what we need to do is go back to AirPods and go back into the hearing protection level. Now we've got headphone safety turned on. This about hearing protection level is just a page that tells you everything that you need to know about using hearing protection and what it can and can't do. I think it's really, more importantly, used as a means to go understand that this is not going to fully protect you in the environment, but can be helpful.
Now there's the hearing assistance option. What hearing assistance does is it will make adjustments to your AirPods to improve upon how music or audio or audio of any kind, or calls or whatever sound, based on what your ears are capable of doing. So you use this to do an actual hearing test and the test is going to tell AirPods okay, here is what this person is dealing with, here's how their ears are able to, here's what they are able to hear, here's what they're not able to hear and make adjustments based on that. So hearing assistance is for that primarily, and if you have the latest version of AirPods Pro, then you also have access to using your AirPods as a hearing aid. So what it does is it boosts voices and sounds around you in a way that is similar to a hearing aid. So what it does is it boosts voices and sounds around you in a way that is similar to a hearing aid, providing the right frequency and the right volume for you, based on that environment.
Our next, or I should mention. There's also the take a hearing test option, which coincides with that hearing assistance. So doing this is going to help you understand what your hearing is like and if you have any deficits in your hearing. Next, press and hold AirPods. This is a way to understand what you are aiming to do when you press and hold on a pair of AirPods. So for me it was for noise control. That lets me switch between transparency and noise cancellation, but I can also turn it on so it switches between the three modes. You get to choose what each of them do, and on right we've got all three of them turned on, but if you would like, you could set it so that the left one instead triggers your virtual assistant, so you would remember whichever side you want to. In my case, I'm just choosing left because I'm left-hand dominant, so I know that the voice assistant is over here by pressing and holding, and noise control changing is over here with my non-dominant hand.
Next is call controls. This lets you answer a call by pressing while a call is ringing, pressing on AirPods to the stem to get it to answer the call Once the call is underway. Pressing once would mute or unmute the call, so you could easily mute while you do something that you don't want the person on the phone to hear and then ending the call. Beep, beep is pressing twice. You can also change that to press once, which would switch, mute and unmute. To press twice, because otherwise you would have them both doing the same thing.
Next is audio, and these are important as well because they are a little bit like the adaptive audio section and indeed do influence the adaptive audio section. The first thing is personalized volume, and personally I'm not a fan of this. But what it does is it adjusts the volume of what you're listening to based on what the microphones hear in your environment. So if you're in a quiet environment, it'll bring the audio down, if you're in a louder environment, it will bring the audio up, and so turning the volume down and turning the volume up becomes relative and not consistent, because it's based on the environment. As a person who likes to be in control and have consistency, not a fan of this feature, so I do not have this turned on, but some people may like it because they don't need to have it louder when they're in a quieter environment.
Conversation awareness is what I was talking about before, but it's a little bit more understanding that you indeed are having a back and forth. So with this, not only does it lower the media volume and, in the case of an audiobook, pauses the media volume, but it also reduces background noise. So while you're having a conversation with another person, where, by default, they may see you with your AirPods in and go okay, this person's not listening carefully to me. Instead, it turns out you're actually listening more carefully to them because it is reducing the noise of the background around you and really narrowing in on that person's voice, letting you hear them and hear yourself. So that's what conversation awareness does. Under this section, we have adaptive audio, which, again, if you have adaptive audio turned on under the noise control option, what you do here is you say I want to have it allow in less noise or more noise from the environment with this feature turned on, so it will do more or do less. With adaptive, I have it set to default, but you may find that that's letting in too much background noise, so you would switch it to less instead of more.
Automatic ear detection this feature is the way for the AirPods to know when they're placed in your ears so that it will automatically connect the device that you are using. Automatically connect the device that you are using. So earlier, when I put these in and we saw AirPods Pro 2 Micah appear in the left-hand sidebar here in the menu, that was because I have automatic ear detection turned on. If I were to turn that off, I would have to go to the Bluetooth settings and choose AirPods after I put them in my ears to have them connect. Now this next setting is one that ends up annoying a lot of people and it's one that I always tell people about when they get a pair of AirPods, and it's called connect to this blank, because it could be iPad, it could be iPhone, it could be whichever. Your Mac Connect to this blank has an option between automatically and when last connected to this iPad.
I always change mine away from automatically, because what automatically does is it tries to be smart about the last device that you were well, rather, not the last device that you were using, but the device that it thinks that you are actively using and when you put in AirPods, it attempts to connect to that device as the device that you probably are wanting to use with your AirPods. So sometimes it may be an issue where you're using your Mac actively, but you want your iPhone playing through your AirPods, or you're using your iPad actively and you want it playing through your AirPods, or you're using your iPad actively and you want it playing through your phone, or whatever it happens to be, and with that, because you have automatically turned on on all of the devices, it's going to make that decision for you and it may make the wrong decision, so changing it from automatically to when last connected to this blank Mac iPhone iPad. It says if the last thing these AirPods were connected to was this iPad, then when Micah puts in his AirPods, connect to this iPad, don't connect to the phone, don't connect to the Mac, don't connect anywhere else, connect to that iPad. That means that you will have to go into the settings, go into the Bluetooth and change it to the device that you're trying to actively connect to if it is different from the iPad. So, for example, this will be an issue for me after this, where the next device I will want to use these AirPods with is my phone. I'll need to go into the settings Bluetooth and connect to the AirPods, which will disconnect it from the iPad and properly connect it to my phone. I'll need to go into the settings Bluetooth and connect to the AirPods, which will disconnect it from the iPad and properly connect it to the phone.
Under spatial audio, this is the set of features personalized spatial audio that is going to give you spatialized audio, which is a way of kind of warping the sound that is coming through the AirPods to give it a three-dimensional space. It's, of course, created and rendered. It's not actually three-dimensional, but give you that impression that audio is coming to you from multiple areas left, right, you know, behind you, in front of you and personalized spatial audio is going to use your specific hearing pattern and your ear shape to make it so that it is personalized to you. And if you tap on the see and hear how it works option, it will give you an understanding of how spatial audio plays out. Most of the time I'm not a fan of spatial audio and have that feature turned off, but in this case that may be something that you find is really enjoyable and you find kind of cool. So that is how you go about using it.
Under microphone, you can see that we have this set to automatic. What this does is it decides which of your AirPods is serving as your microphone and if you decide that you don't like the AirPods kind of switching between the two to be the microphone you can choose for one to automatically be the AirPod of your choice. So always left or always right. Next, head gestures. This is the option to do certain, to do certain actions on your device based on what you do with your head. If you nod or you shake, that will make the difference to what action is taken. So this is really handy. If you're getting a call, it'll ask you do you want to answer the call? And you can shake your head left and right. You've got to be a little bit forceful with it, but in doing so that call is going to go away. If you want to accept the call or reply up and down will give you that option. So if you're in a place where you don't want to or can't use your voice, a little shake back and forth or a nod will give you the ability to dismiss these notifications, which is very handy.
Enable charging case sounds very simple. When you put your AirPods into your charger and you thwack it onto a charger, if your AirPods case has a speaker, it will play sounds to let you know that it's properly connected and properly charging. Optimized battery charging, as you might imagine, is a feature that is going to attempt to understand how you charge your device and what's typical for your charging of your device. So, if you regularly charge every night, or you are always putting your AirPods on the charger and how you use them and when you put them back in the case before they run out, do you wait for them to run out, all of that stuff informs how to charge the battery in such a way that the battery will last longer, so it optimizes the charging of the battery to improve upon battery health. Next option is Find my Network, and what this does is each of your individual AirPods plus the case are all part of the Find my Network. If you have this turned on and will let you look at the last place that it found them, use Bluetooth to connect to them or, in the case of the AirPods, in the case of the AirPods case, for the AirPods Pro 2, do a very focused find to find your AirPods Plus. It also has a little speaker on the case remember for charging sounds that can also play audio to let you find it. And Apple improved upon these speakers, built into the AirPods themselves so that they too can make a louder, more easy to hear sound to find each individual AirPod Very handy.
Accessibility has all sorts of controls for the types of interactions that you have. So press speed basically means how quickly do I need to press the stems for those different actions that require two or three times? Is it okay if there's a long pause in between my presses or do I need to do it quicker? Mine is set to default or you can make it slower. The press and hold duration is the same. How long you need to press and hold for it to trigger this function. In this case it's not. It's either default or you can press and hold for shorter periods of time.
Noise cancellation with one AirPod. This gives you the because right now, if I were to take out I currently have it on transparency mode, but if I were to put noise cancellation mode on, take out one AirPod, the remaining AirPod in my ear is going to automatically switch to transparency mode and not have noise cancellation turned on. A big reason for that is it can be a little equilibrium affecting to have one AirPod doing noise cancellation when your other ear can hear out in the environment, perfectly fine. However, if you only have hearing in one ear, or say you're using one AirPod and the other ear is up against a pillow. That is a place where noise cancellation with one AirPod can be helpful, so you may want to turn that on. Turn on loud sound reduction we talked about that earlier. This is the place where you do that. Audio accessibility settings is not focused on AirPods themselves, so I'm not going to cover that in this episode.
Spatial audio head tracking for follow iPad. What that does is it says, when this feature is turned on, figure out where the iPad is and use that to spatialize the audio instead of attempting to follow your head movement. So kind of keep it in the standard place of where the iPad is, as opposed to instead using your head movement to determine how it spatializes things. A lot of people turn this feature off so that it, or rather, turn this feature on so that it follows the screen, because that's what we're used to the screen and the environment kind of has the sound, as opposed to how your head moves. The head move feature is a little bit more gimmicky in my opinion, but can be kind of cool for some people, so that may be for you.
Then adjusting the tone, volume of sound effects played by AirPods. So that's the different sounds that it'll play in your ear, based on you know, notifications or letting you know what's going on, by default set to 100, you may have it set you know a little bit less, a little bit more as well. Volume control so whether or not swiping up or down on the touch control section, the stem of the AirPod, will actually turn up and down the volume. For some people, turning this off is important because what they're trying to do is just adjust their AirPod or they're actually trying to click and instead it's turning up and down the volume. That can be kind of annoying. So maybe you don't want to control the volume this way. Maybe you want to use your voice to tell SI-I-R-I to turn it down and then, of course, changing the amount of time that it takes for you to make those volume adjustments by default, or do you want to actually make a change to the audio volume? So that's accessibility. Eartip fit test we talked about that earlier. This is another place to be able to check it.
And last but not least, here, off listening mode. When this is on, you have that fourth option or third option, depending on if you have adaptive as part of it to turn off entirely the noise control features so you can have transparency, which brings in more of the environment. You can have noise cancellation, which closes out the environment. Adaptive, which makes choices and changes based on your environment, and then off, which completely turns it off. At the very bottom you'll see we've got disconnect and forget this device.
Disconnect will temporarily disconnect these AirPods from this iPad and your other audio device. Forget this device will remove it, will disconnect from this iPad. But it's also if you're logged in with your iCloud account. It's going to forget this device across all of your other signed in, logged in iCloud account devices. So your phone will forget this device, your Mac will forget this device, whatever you have, and you'll have to kind of reconnect.
This is kind of a troubleshooting feature where, if you're having issues with it connecting properly, that's what you'd want to do. Wow, quite a few features there and available to you in the AirPods and Apple audio section and Apple audio section of your settings. So I thought it was definitely a good time to take a look at that and understand what all you can do with your settings for your AirPods and your Beats and your AirPods Pro and all of them across the suite. Thank you so much for tuning into this episode of Hands-On Apple. As I always say, it's my pleasure to bring you this show. I'll be back next week with another episode, but until then, I'll see you next time and don't forget Micah at twittv if you have questions. Bye-bye.
0:28:11 - Leo
Hey buddy, are you a geek, are you a tech enthusiast? Then I would love to invite you to join a tech community like no other. You can gain exclusive access to our incomparable quality tech content with Club Twit. As a member, you'll enjoy all Twit TV shows ad-free plus access, private video feeds for insider shows like iOS Today, home Theater, geeks and so much more. Dive into the members-only TwitPlus bonus feed for behind-the-scenes content, club discussions and special events. But here's the best perk Join our incredible Discord community to watch live show productions, chat with hosts and participate in exclusive members-only activities. It's your backstage pass to the world of Twit. Whether you're a tech enthusiast or a lifelong learner, club Twit elevates your knowledge while entertaining your interests. Get two weeks free when you sign up now and unlock unparalleled access at twittv slash club twit. That's twittv, slash club twit and, from the bottom of my heart, thank you and welcome to the club.