Coding 101 57 (Transcript)
Father Robert Ballecer: On this
episode of Coding 101 we’re going to finish our Arduino clock.
Netcasts you love, from people you trust. This is TWIT.
Bandwidth for Coding 101 Is provided by CacheFly. At
cachefly.com. This episode of Coding 101 is brought to you by Lynda.com.
Invest in yourself for 2015. Lynda.com has thousands of courses to help you
learn new tech, business and creative skills. For a free 10 day trail visit
Lynda.com/c101. That’s Lynda.com/c101.
Fr. Robert: Welcome to Coding 101. It’s the TWIT
show where we let you into the wonderful world of the code monkey. I’m Father
Robert Ballecer, the digital Jesuit and joining me today is our regular special
guest co-host, Lou Maresca. He’s a senior software development lead from
Microsoft. Lou, thank you very much for coming on to Coding
101.
Lou Maresca: Thanks for
having me back and welcome coders.
Fr. Robert: Yeah, exactly. We wouldn’t have the
show without the coders. Now at some point our super special T is going to put
Lou on this back screen, but until then, Lou, there has been some interesting
developments in the Java world hasn’t there?
Lou: Indeed. So a lot of people looking to
start web development or application development on the web are looking to
start now and they want to build now and they want to build large applications
and they want to be able to build it on different platforms and devices. And
that’s kind of the key is when you build on the web you can build it for the
phone or the tablet or notebooks and it can snow up and render and be able to
look the way you want it to look. And a lot of places now days teach object
oriented programming. And we talked about object oriented programming in the
past. Where objects are just ways to model real world things. Say I wanted to model a person object, you would have
a bunch of attributes like height, weight and be able to perform functions like
run or talk. And they teach languages like Swift, objective C, C++, Java, C Sharp. And these are all object oriented languages that
allow developers to build really large scale applications. But if you use Java
Script applications today, you’re aware that it’s really tough to build large
scale applications. It’s a really tough thing to do.
Fr. Robert: Hold on here Lou, because when I think
of programming languages for large scale applications, Java Script is not one
of those languages that come to mind. In fact, Java Script is only lumped in
with words like disease and virus and horrible and why is this still here? Is
it just a bad rap? I know that from experience, one of the things about Java
Script is that it very easily allows for really bad programming. But are you
saying that we actually can safely and securely develop large scale
applications?
Lou: Right, so that’s kind of where the
evolution of Java Script is coming in. so there’s a new standard coming out.
What they call ECMA Script 6. It’s just an acronym for European Computer
Manufacture’s Association. But basically they have standards they’re building
out, and they’re actually starting to evolve Java Script finally to be more
like an object oriented programming language. What that allows you to do is
organize your code, create objects, perform functions, group your code into
categories, name spaces and modules, create classes,
build objects off those classes. So it gives you the ability to really start to
isolate the code and be able to create more complex applications without having
to get lost in the code.
Fr. Robert: What specifically would I be looking
for if I was looking for the advantages of using this ECMA script?
Lou: So ECMA script 6 has a ton of new
features. New options and abilities. One of the
biggest ones for me is the ability to just use the class ability. So to be able to use classes and – from class. And so I have
a really fast example. So this a current example of
side by side actually- this is the original Java Script over here, and this is
the new version of it. And what I have here is I have a class that I call logo.
And the class has a function that actually renders itself to the screen and
also has a title. And this is a Java Script. This is not the original way of
doing it. So if you look down here, I actually have another class called TWIT
logo and it actually extends logo, which means it’s inheriting from logo, and
then I render a different logo to the screen. And so the key here is, I have
the ability to break apart these things, these classes and create objects from
them. Which, they have different functionality and they have different
properties, but they can inherit from each other because some of the things are
the same. And so I can actually new it up, create a new instance of it, and
then I can render to the screen. So when I actually do that, click the button
render here, boom, I get a new logo. And so this is the key. So let’s do a
really quick compare, side by side. This is the code over here that’s the
original Java Script. And this is creating a module and it’s trying to create a
function that’s called logo and its- all the conventions very verbose. And it
creates confusion sometimes. So that’s where classes come in. and there’s a
bunch of extra features that we probably should go into because there’s a lot
of detail but there’s things like the new keyword called let. Which allows you to just scope your variables differently. There’s
also what they call arrow functions where this function right here will
actually turn into this really complex function over here were you have to
build a function out and return this x times x and all this stuff. So this
makes it a lot easier to write the code and make it very clean and make it
easier for other developers to understand how it works.
Fr. Robert: Okay Lou, but this is still an
interpreted language right? it’s still going to run in a browser so how does
this alleviate any of the security concerns for people who have been writing in
Java Script and having being concerned about it being used for Malware?
Lou: It’s not necessarily going to alleviate
any of that. I mean, a lot of times, the browsers, they
build their Java Script engines to be what they call “sandboxed”. Meaning when
you run your Java Script code it runs in a specific sandbox. A lot of browsers
today, like some of the newer ones, especially the new
browser called Windows 10, their Java Script, their application sandbox is
very, very isolated. I mean, there’s not really any way to access operating
system functionality. Like you know, calling into a Windows function, do
something specific on your machine or installing an app. so these browsers
really are kind of responsible for implementing their sandbox so that they
don’t allow things to leak out. Especially through the Java
Script language. So this is not really a way to secure it more. It’s
more of a way to add new standards, abilities, new ways of doing things, new structures to it so it makes it easier for the coder
and easier for the developer.
Fr. Robert: Alright. If people did want to start
poking around with this language, what are the resources that we’ve got for
them?
Lou: So I think one of the first ones, there’s
a great website out there, we put it in the show notes, and it’s basically
called, it’s on a GitHub, and it allows you to see which browsers have the
different functionality of ECMA script. It’s what we call the compatibility
table. But there’s also a lot of different ways- the application I was using
was called web storm by jet brains. Really cool company that’s out there that’s
creating IDEs to develop things. And they have a shareware version of it that
you can check it out. Jetbrains.com. Of course they had to pay me to say that. It’s
a great IDE. You can actually start using their examples for ECMA script 6 and
basically an application framework compiler called tracer you. That allows you
to basically build out ECMA script 6 type Java Script.
And so the example that I have, I’ll give it to you. You can check it out. And
you can start playing with it. I think that’s the key is just get your hands
dirty and start playing with it.
Fr. Robert: Absolutely. Start playing with it,
we’re going to make sure we include all that information in our show notes so
you don’t have to re watch the episode a couple of times. Just jump into our
show notes, find the links, and see if maybe that’s your next scripting language.
Now Lou, we are going to have to take a break here in just a moment, but before
we did that, I want to tease something. The last couple of weeks we have been
speaking with Mark Smith. The guy from DefCon, the guy whose always in the
hardware hacking village, and he’s been showing us some of the hardware and
programming that goes into making an Arduino powered analog thing clock.
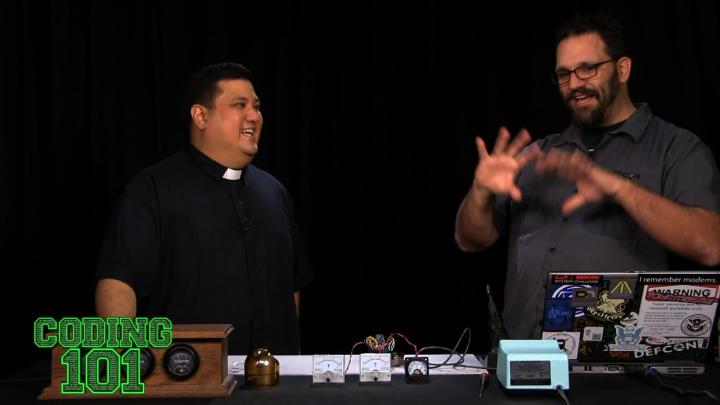
Essentially what he did was he made a steampunk clock. Now we’ve got a great
example of steampunk. This here is a laptop that Leo ordered. It took a while
to get it but this is indicative of what you get when you start making
steampunk. This is a completely custom, handmade laptop case. He took the innards
out of a decent laptop and he put it into this beautifully appointed wood and
metal and glasswork device. Now what Mark had done was he worked on the
electronics, on the guts of a device, but then he left off the steampunk part
to you. Now if you do want to start making stuff like this, that is beautiful
yet functional, you’ve got to stick around because we’re going to give you the
very last episode of our Arduino clock. But before we do that, let’s go ahead
and take a break and thank the sponsor of this episode of Coding 101. When you
think about programming, when you think about gaining knowledge in the world,
you need somewhere you can go to ask questions. You need somewhere you can go
to have all your maker, your DIY questions answered.
And for us here at TWIT, that’s Lynda.com. Lynda.com is a one stop shop. A repository for knowledge. Both of new
knowledge and knowledge that you just need a refresher course on. Lynda.com is an easy and affordable way to help you learn. You can instantly
stream thousands of courses created by experts on software, web development,
graphic design, and more. Lynda.com works directly with industry experts and
software companies to provide timely training, often the same day you get the
new releases on the new versions on the street. You’ll find new courses on
Lynda. So you’re always up to speed. All courses are produced at the highest
quality. Which means it’s not going to be like a YouTube video with shaky video
or bad lighting or bad audio. They take all that away because they don’t want
you to focus on the production, they want you to focus
on the knowledge. They include tools like searchable transcripts, playlists and
certificates of course completion, which you can publish to your LinkedIn
profile. Which is great if you’re a professional in the field
and you want your future employers to know what you’re doing. Whether
you’re a beginner or advanced, Lynda has courses for all experience levels,
which means they’re going to be able to give you that reference that place to
go back to when you get stumped by one of our assignments. You can learn while
you’re on the go with the Lynda.com apps for iOS and Android and they’ve got
classes for all experience levels. One low monthly price of $25 gives you
unlimited access to over 100,000 video tutorials, plus premium plan members can
download project files and practice along with the instructor. If you’ve got an
annual plan, you can download the courses to watch offline. Making
it the ultimate source of information. Whether you’re completely new to
coding or you want to learn a new programming language, or just sharpen your
development skills, Lynda.com is the perfect place to go. They’ve got you
covered. They’ve got new programming courses right now including the
Programming the Internet of Things with iOS, Building a Note taking app for iOS
8, and Building Android and iOS apps with Dreamweaver CC and Phone Gap. For any
software you rely on, Lynda.com can help you stay current with all software
updates and learn the ins and outs to be more efficient and productive. Right
now we’ve got a special offer for all of you to access the courses free for 10
days. Visit Lynda.com/c101 to try Lynda.com free for 10 days. That’s
Lynda.com/c101. Lynda.com/c101. And we thank Lynda for
their support of Coding 101. Lou, are you ready for a little bit of steampunk
inspired Arduino clock action?
Lou: Definitely. Looking
forward to it.
Fr. Robert: Jason, if you would be so kind, press
the magic button. Our code warrior, Mark Smith from DefCon. In the last couple of episodes we’ve shown people what Arduino is. We’ve shown
what the IDE looks like. We’ve shown them how to get input in and how to get
input out. But now we need to give them that final step. How they turn all of
that into something like this. This has been our dream box the entire time. Can
you show us some of the final steps?
Mark Smith: Sure, let’s do it. So on Know How we
showed you how to convert one of- like a 15 volt panel meter into a one milliamp
current meter. So go back and watch that episode if you haven’t seen it,
because it’s kind of important. Because otherwise, if you try to hook these 15
volt meters up to the Arduino, it’ll only deflect.
Fr. Robert: It’ll do nothing. And the reason for
that is because by default they’re set up to measure voltage but they do that
by basically cheating.
Mark: It’s not so much cheating, it’s using
Ohms law. Ohms law is a fact of nature. It’s important, we use it a lot. In
fact, we’re using it here as well.
Fr. Robert: Right. And they just drop a resistor
into a meter that would normally measure current, so that it will actually
measure voltage. You just took that thing back.
Mark: Took it back out. Well, sort of. We
took it out of the meter. And then we replaced it with the potentiometers on
our circuit boards. And that allows us to adjust the voltage at which we’ll go
to full scale.
Fr. Robert: Okay. Now show us, you’ve obviously
hooked up two more meters, the same way that we did in the last episode, and
you’ve adjusted the potentiometers the same way we did in the last episode. So that the minimum and the max would match on both ends. So we’ve got the hardware set up, but I’ve got a feeling that we’re
not done.
Mark: We’re not done, we’ve got to do the software yet. Let’s go take a look at the software. So here
is the software. It looks very similar to the software we’ve been looking at in
the last several episodes. We still have the voltage pins for the RTC. We ended
up not using those #defines so I just commented them out. We have to define
buttons for the minute and the hour and the calibrate.
So those are the pins. The pin numbers that those buttons are hooked up to. Similarly
we are #defining the pins that the PWM outputs are using. So those are the pins
that the analog voltage will come out of the Arduino to get to. And we also
have to define what the maximum scale on our PWM is for calibrating some other
things. We’ll get into that in a little more detail. And then PIN_LED 13,
that’s something else I added in there for fun a little bit later. In our
globally defined variable section we are keeping track of the last time that we
went through the loop. Just like we did last time. We’re
keeping track of the state of the minute button and the hour buttons. So the
way pulse width modulation works is that there is a counter that counts really
fast. And it just goes between 0 and 256 and it counts all the way up and goes
back down to the beginning repeatedly. And then what you do is you say when
that counter gets to a value, say 128, I want you to turn a pin on. So its
counting up and the pin is off, off, off, it gets to 128, it turns it back on,
it goes all the way to the top, 256, and then wraps around and turns the pin
back off again. And that way, you have set it up so that the pin is on for half
the time and off for half the time. And if you do this fast enough, it looks like a voltage that is half way between the maximum voltage and the
minimum voltage. So this is called pulse width modulation. If I instead tell it
to count up to 64, then it will be off until it hits 64, and then be on for the
rest of the time up to 256. And so that will look like a three quarter voltage.
Actually I think I’ve got the ons and offs backwards.
Because smaller numbers are lower voltage, bigger numbers are higher voltage.
So what we do when we say analog right, what we’re really doing is we’re
telling it at what count point should it switch the output. So when it’s at
zero, when we give it an analog write of zero it just never turns on. When we
give it an analog write of 255, it stays on the entire time. I think there
might be an edge condition in here that I’m missing. But
basically, in those numbers in the middle. So we have 256 ticks of our
clock that we can use. 256 doesn’t divide by 60 very
well so we’re actually only using 240 of our ticks. Which
makes use of most of our analog voltage. And gives us
four ticks per second or per minute. Or per whatever.
Fr. Robert: Which is why you had
to use the onboard crystal in the last episode because you need something
that’s actually going to count down to that. The RTC can’t do that.
Mark: Exactly. The RTC only gives me one
second resolution and I want quarter second resolution. And so, let’s go back
to the code. That’s what the millisAtTopOfSecond is there. So the Arduino has a
function called Millis which says how many milliseconds have I been powered on?
And it’s a counter that just goes up from zero as it’s on. It just counts up
the number of milliseconds since it’s been on. So if I take what that value is
when we transition from one second to the next, then I can count up 250 milliseconds,
that’s a quarter of a second. Another 250 milliseconds, that’s another, and so
on. And then I only do that three times and then I look for the second. For the RTC to update to the next second so we’re not actually
drifting out of order.
Fr. Robert: Now a quick note here is we’re using
PWM to be able to drive a particular amount of current into the meters. Sort of.
Mark: SO we’re actually outputting an average
voltage and then that voltage goes through a resistor to the current meter just
like it was doing before except that we’re putting our own value of resistor in
there, the potentiometer so that we can fine tunely adjust at what voltage the
output of the Arduino makes full scale on the meter. That’s why it’s an
adjustable resister. Because these are one milliamp resistors but I think this
one is like 2.5 or maybe it’s a half of one. But it’s off a little bit. But
every meter is different. So I don’t want to just put a fixed value there
because it will changed based on how much current that
particular meter needs.
Fr. Robert: Because I’m sure there are people out
there who are like wait a minute, you removed a resistor and you added a
resistor? I don’t understand why you just did that.
Mark: Because I wanted to change the value of
that resistor.
Fr. Robert: Yeah. Another note about PWM is we’re
using it for this application, so we’re pushing it into the meters, but PWM can
actually be used as a communications bus. There are applications that will read
the on and off states on the other side so you can have one device talking to
another device via PWM. That happens all the time in quad captors.
Mark: For servos. Specifically. So servos use that a lot. Most other things use serial buses. You can get a lot
more control. but if the servo, what you’re trying to do is get to about this
value, and so it’s still kind of an analog value that you’re trying to send.
And so PWM is a way of taking what is otherwise a digital output, its either on
or off, and then kind of faking an analog value by turning it on and off really
fast and taking the average of those two voltages. Back to
the code. Alright, so that’s what the “millisAtTopOfSecond” is. So we’re
trying to count milliseconds so that I can have these 4 ticks per second. And
then “lastTicks” is another state variable that we use. Set up is very much the
same. We are setting up our ins and outs just like we did before. We saw all of
this last week so I’m going to fly right past it. Initializing
our globally scoped variables. You never want to use a variable on
initialize. Bad things happen. So let’s go into our loop. Just like before
we’re doing an RTC.get. We’re getting the time, we’re
breaking it up into time elements, just like we did before. We’re checking to
make sure we didn’t get any read errors from our RTC. Then we have a section
here for calibrate. We talked about this last time. Without
going into too much detail on what exactly we were calibrating or why.
Fr. Robert: Essentially if you hit the button it’s
going to give it a low state, it will go into this
state which will allow you to set the max on the meters so that you can adjust
with the potentiometer.
Mark: Adjust the potentiometer to read full
scale. Exactly. So and then out of that now we’re down
to the time setting, which is what we looked at last time as well. These have
not changed at all. And then “see if the time has changed and print it if it
has.” So this time is different from last time. The only thing we’ve changed
here is we’ve added this “millisAtTopOfSecond”. So I want to see what the value
of the Millis value from the Arduino when the second changes. When it changes from one second to the next. Because I want to reset my count of 250 milliseconds, 500
milliseconds, 750 milliseconds and so on. So I’m taking what the Millis
is at the top of the second. And then here is our RT bug output just like
before. And then set the analog outputs. This is the fun part. So the PWMs are
8 bit. So this is the part that I just described. The PWMs are 8bit. 0-255. But
time is 60 second increments. So we’re going to use 4 ticks per second or minute,
and that will get us between 0 and 239. And it uses most of the PWMs bandwidth
and still allows us to have a relatively smooth movement. If you didn’t care
about any of this and you wanted your meters to tick one second, you could go
ahead and do that and remove all of this and just have it output the value. But
the problem is, the meters, when they move too quickly, they kind of swing
around a whole bunch. And so by having it move smoothly,
it can move very smoothly. But if you have it go from here and then one second
there, it doesn’t just go like this, it goes ---- and it’s very hard to read.
So having a nice smooth movement across, it’s much easier to read. So that’s
why we do it this way. So what we want to try to do is calculate how many ticks
it has been since the top of the second, alright. So we’re going to go ahead
and- the current Millis minus the Millis at the top of the second. So that will
give us the number of milliseconds that have elapsed in this second and we
divide it by 250. And that will give us how many quarter second ticks it’s been
since the top of the second. If that value has changed since the last time we
went through the loop, then we’re going to go ahead and update it, so we don’t
just go through this if statement over and over again. And then we will set the
analog output values. So I mentioned earlier we have an LED. There’s actually
an LED on the Arduino board on PIN 13. And what I have it set doing right now
is just tick tocking. So if the seconds ends in a zero, it
will go to a low value, if it ends in a one it’ll go to a high value. So
it just turns on for a second, off for a second. It’s just another output you
can get that was easy to do in a single line. But we’re going to set the analog
value for the second’s hand. So we’re going to take this Tn, which is the time
element, we’re going to take the seconds out of there, we’re going to multiply
it by 4 because there are 4 ticks per second, and then we’re going to add the
number of ticks since the last second. So its ticks are quarters of a second.
And so we’re calculating how many quarters of a second do we want to display on
the meter. And then we just analog write that value to that PWM output on the
meter. And that’s it. And then we go down and do the same thing for minute. 4 ticks per minute plus 1 tick for every 15 seconds. So
ticks = minutes x 4 + tm seconds divided by 15. Which this is integer division
so every 15 seconds you’ll get another one. And that allows the minutes to do a
very smooth movement as well. Similarly for the hours. This one is a little more complex because the data structure represents it in
24 hour time. But I want to do a 12 hour clock. So I want to take the 0-23
modulo 12, so it goes 0-12, 0-12. And then we’re multiplying it by 20 because
there are 20 ticks per hour. There are 12 hours in full scale, 240/12 is 20. So
there are 20 ticks per hour. And then it is 1 additional tick for every 3
minutes. Because we want to take the 60 minutes of the previous one and divide
it by 20 because we want to know how many minutes per tick between the hours.
See it gets a little bit complex. It’s just math. It’s all in the comments.
Fr. Robert: You’ve actually seen code like this.
This is the same thing as writing to screen. No matter what language we
covered, there’s always some sort of function that lets us write out to screen.
The only difference here is that instead of writing out to the screen, we’re
writing out to a pin. Which is connected to a physical
device. So the math is the math, but it’ll be in the show notes.
Otherwise this is actually quite simple.
Mark: Very simple. So you’ve got a little bit
of math, just take modulo 12 to make it a 12 hour clock, multiply by 20 to get
20 ticks per hour and then 1 additional tick for every 3 minutes. And that ends
up being a very smooth time movement for the hours.
Fr. Robert: What I would suggest is they go ahead
and write this in a simpler way and just let it tick up per minute. See what
the meters do and you’ll find out why he did it this way. Because he likes the
smooth motion so that the meter isn’t constantly bouncing back and forth. Now
if they’re going to start to do this, they’re also going to have to think about
a project box. We’re not going to cover that here, we might cover that in Know
How at some point in the near future.
Mark: The other thing we’re not going to
cover is the artwork on the panels. Because these are reading
0-15 volts. You actually want them to read hours, minutes and seconds
like they are over here.
Fr. Robert: Right. So you’re going to have to do
that on your own, figure out a YouTube. We’re going to show you the hardware
and software you would need to make something like this, but Mark, this is
fantastic. Obviously I asked you to create something with Arduino, with an
embedded processor, that would leave with a project
that they could do. I think you’ve done that. But let me ask you this. Let’s
say they get through this and say wow, this is nice, and I like this. I like
being able to program something that has an effect in the real world like this.
What resources would you suggest for our audience? What would you tell them to
try next?
Mark: That’s one of those things that I would
have a hard time saying because I don’t know what they need in their life. So
the project that works best for you is the project that you will be motivated
to do. So find something in your life that you want to make. Whether
it’s something crazy stupid like an analog panel meter clock, that’s cool but
doesn’t really serve a real function. You can buy a clock for a lot less
money than you’ll spend on all of these parts. But this is just a fun project
to do. Either something like this or something
functional where I think my refrigerator is failing. And so I want to put it on
the internet so that I can measure the temperature inside of it and graph it
over time or something like that. Find something in your life that you want to
do that you think something like this could do for you. Those are the best
projects to do. if you are thinking of learning a new technology, be it Arduino
or a new programming language or anything else, I personally have a very hard
time trying to learn something new if I’m doing it just academically. If I’m not doing it practically. The far easier way for me
to learn something is to have a project, a goal in mind, I need to accomplish
this, whatever this is, and I want to at the same time learn a new programming
language or learn how to use Arduinos or whatever. And so rather than just
saying I’m going to go through this coursework that has these exercises on how
to learn Python or C for an Arduino or whatever it is that they give you some
code that might teach you the subject matter but don’t really do anything
useful, that doesn’t sink into me. Whereas if I say I’ve got a goal, I’ve got a
thing I need to build, let me learn the bits and pieces I need to do that, that
sinks in way better than just the random exercises.
Fr. Robert: Just listening to you, there has been
one project I’ve been wanting to do for a while, and
that’s the Arduino controlled blinds. And actually, it’s a fantastic analog.
Because we’ve got switches, and we know how to deal
with switches and take that input. I could replace that with a photo cell. So whether or not the photo cell is getting lit or not. And
then the output is very easy to connect to a relay that can connect to a motor
either in a high or a low condition. When there’s light, open up the motor that
lets it close the shades, when there’s not, reverse that.
Mark: I was going to go even better and say
have vertical blinds or Venetian blinds and use a servo to adjust.
Fr. Robert: The possibility is really limitless.
And now that you’ve seen a very good example of taking inputs and pushing
outputs, the sky is the limit. Mark, thank you very much for
doing this project. This is so much fun. We’re going to have you back at
some point. I don’t know if I can ask you about the fish tank. Can you bring
the fish tank at some point?
Mark: I don’t think I can bring it. It’s
awfully heavy. 55 gal is a lot of water. But we can talk about it and I can
show you some of the technology that I used and I can probably take some videos
at home so you can watch the sunrise and sunset that my fish have.
Fr. Robert: Or we can just buy a fish tank. Could
you tell the folks at home where they can find you? Because this is a lot of
work and I really appreciate it. I want them to be able to follow you and see
what you’ve been putting together.
Mark: I usually tweet about my projects and
escapades on @smittyhalibut on twitter. I don’t really have a whole lot to
plug, but you can find me there on twitter. Show me your cool stuff. If you
have been inspired to make something by this show, please tweet me and let me
know what it is you’ve done. I’d love to see it and I’d love to see how excited
you are and the cool stuff that you’ve built. Even if you don’t think it’s
cool, whatever, I don’t care. If you made it, it’s awesome. That’s what I want
to see. Please show me.
Fr. Robert: One last note, he is a fan of both ham
nation and Steve Gibson. So coders out there, if you can throw a note to both
of those shows, to Steve Gibson and to the folks of ham nation and tell them
they need Mark on the show, that’d be fantastic. Until the next time, we’ve got
an Arduino powered unit, that’s been Mark Smith, I’m father Robert Ballecer,
and now we go back to me. That project was a lot of fun and I’ve already
repurposed a lot of that hardware. I’m not sure if I told you about this, I
talked about this on Know How, I hooked up the same 3 leads to the tri-color
leads on one of those strips of LEDs and it just changes the color of the clock
throughout the day. It’s very fun. Once you actually understand how the
hardware works and how the software integrates with the software, the sky is
the limit. Lou, have you done any work with Arduino?
Lou: I’ve done a couple projects around
detection and infrared sensors.
Fr. Robert: We’ve got someone in the chatroom
asking if you could recreate one of those ticks’ clocks. You couldn’t do it
directly by connecting one input to every LED, but you could use a combination
of relays with different pins in order to achieve the same effect. We’re
definitely going to do more of these crossovers. And speaking of crossovers, if
you’re watching these episodes of Coding 101 with the Arduino clock, that’s the
last 4 episodes, you’re also going to want to watch the last episode of Coding
101 and the next 3 episodes of Coding 101 because we go farther into the
hardware on that show. This is supposed to be a crossover so if you’re watching
one show make sure you’re watching the other show so you get the entire
picture. (I think he means Know How, not Coding 101 there) Lou, do you want to
leave the audience with any parting shots about you, what you do, you’re here
our code warrior and now you’re our guest host, I really love having you on. I
want people to know more about where they can find your work.
Lou: On Twitter, @LouMM,
and about me, Lou MM as well. And all of my work during my day job at Microsoft
is at crm.dynamics.com. And Loumm@outlook.com. Feel free to do that. I am sending you my email because I am so confident that
the new tools that we have on there are going to be able to filter it out for
me. So send me an email.
Fr. Robert: Get out there and send email to Lou. Until
then there is some information that we need to let you know. We know that this
is a lot of information and we want to make it easy for you to follow along on
the projects. So we’re going to make sure that in our show notes we’ll have
links to the places you can buy the individual pieces as well as where you get
to download the Arduino IDE and a few helpful hint sites so if you want to move
ahead in the class, you can do that. But in order to get that information, drop
by our show notes page, at twit.tv/code. You can find our entire back catalogue
of episodes which is important because it’ll let you download entire modules if
you want to learn what we did in C Sharp or Perl or PHP, it’s all right there.
It also gives you a place where you can use that little dropdown menu to get
every episode of Coding 101 automatically downloaded into your device of
choice. We make it easy because we love you. You can find me on twitter,
@padresj. If you follow me you’ll find out what we’re doing each week for
Coding 101. I always announce out topics and guests and you’ll see what I do in-between
shows. Also, we do this show live every week. Now it’s at 2:30 pacific time on
Mondays. You can join us at live.twit.tv. And as long as you’re watching live,
jump into our chatroom at irc.twit.tv. Until next time, he’s Lou Maresca, I’m Robert Ballecer, end
of line!