Building a Dedicated Home Theater for ~$12,000
AI-generated, human-reviewed.
If you're planning to convert a spare room or basement into a dedicated home theater, learn from the experience of Andy Z, a listener featured on Home Theater Geeks. Host Scott Wilkinson breaks down Andy’s full renovation, his choices, challenges, and successes while providing actionable recommendations. Whether you’re tackling HVAC obstacles, working with a modest budget, or seeking audio upgrades, this episode delivers practical strategies for movie lovers and tech enthusiasts ready for a home cinema makeover.
Quick Summary: The Listener’s Journey
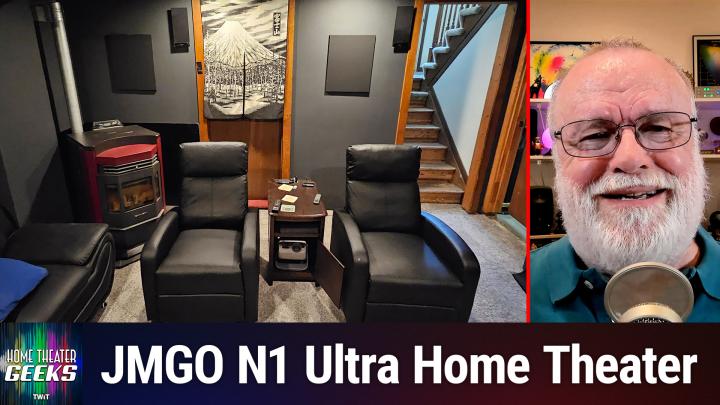
Andy Z started with a room limited by ceiling height and a prominent HVAC duct, aiming to fit a JMGO N1 Ultra Projector (affiliate link) and surround sound system. He stripped the walls to the studs, replaced flooring and drywall, painted the room black for optimal image quality, and installed budget-conscious audio-visual equipment. His renovation was completed for about $12,000, all DIY.
On Home Theater Geeks, Scott Wilkinson highlighted both Andy's success and the smart compromises needed for a small space.
Overcoming Real Room Challenges
Projector Placement:
When ducts, beams, or room shape limit your setup, consider ultra-short throw or flexible placement projectors like the JMGO N1 Ultra (around $1,000). Andy’s projector was positioned near the floor, requiring digital keystone corrections. These adjustments are sometimes necessary, though they may slightly reduce image sharpness. If possible, aim for the projector’s lens axis to be perpendicular to the screen to optimize focus.
Room Treatments:
Painting the room black or dark gray is highly recommended to enhance picture contrast and reduce reflections. Avoid light-colored rugs or surfaces near the screen to minimize glare.
DIY on a Budget:
- Reusing existing audio gear (like Andy’s inherited Klipsch FS3 speakers and Denon AVR X4400H receiver) lowers costs.
- Value brands such as Silver Ticket (for projection screens) and SVS (subwoofers) help maximize quality for modest investment.
Smart Controls:
Andy leveraged a TP-Link dimmer and voice commands through his smart watch, allowing hands-free lighting adjustments (modern home theaters benefit from integrated smart home controls.
Speaker Placement:
- Move speakers away from walls and corners for balanced bass.
- Mount surround speakers ideally to the sides and slightly behind listening positions.
- If possible, add more surrounds (to create a 7.1 system) or ceiling speakers for Dolby Atmos. The Denon AVR X4400H supports advanced configurations.
Audio Upgrades:
If your home theater has a drop ceiling or enough access, ceiling speakers are recommended for immersive sound, even with physical obstacles like ducts.
Takeaways to Remember
- You can build a high-quality home theater for approximately $12,000 with careful planning and some DIY work.
- Flexible projector placement solves room design obstacles; just be aware of keystone limitations.
- Prioritize dark room surfaces and right-size audio gear for maximum performance.
- Smart lighting controls enhance your theater experience.
Andy’s project, assembled and advised on Home Theater Geeks, proves that stunning home theaters are possible in almost any space, provided you adapt creatively and use the right gear. For best results, plan your audio layout before construction, and don’t be afraid to compromise on placement if necessary—modern projectors and receivers can accommodate most home configurations.
Ready to tackle your own media room? Subscribe for more expert episodes:
https://twit.tv/shows/home-theater-geeks/episodes/507