Coding 101 56 (Transcript)
Netcasts you love, from people you trust. This is TWIT!
Bandwidth for Coding 101 Is provided by CacheFly. At
cachefly.com.
This
episode of Coding 101 is brought to you by HipChat Plus. Collaborate, save time
and be more productive with your teams. HipChat Plus is IM, video chat, plus
file, code and screen sharing all in one place. Invite your team members and
get a free 30 day trail of HipChat Plus at hipchat.com/c101.
And by Squarespace. The all in one platform that makes it fast and easy to create your
own professional website or online portfolio. Now
introducing SquareSpace 7 with even better site management tools and other
improvements. For a free two week trail and 10% off, go to
squarespace.com and use the offer code C101.
Father Robert Ballecer: Today on
Coding 101 we continue our Arduino steam clock with Mark Smith. Let’s get
coding. Welcome to Coding 101. It’s the TWIT show where we let you into the
wonderful world of the code monkey. I’m Father Robert Ballecer, the digital
Jesuit and with me today is super special guest cohost Lou Maresca. A senior
software lead from Microsoft. Lou, it’s great to have you back. Thanks for
coming back on the show.
Lou Maresca: Yeah
thanks for having me back, I appreciate it.
Fr. Robert: Now Lou, before we get into this
wonderful Arduino crossover that we’re doing with Coding 101 and Know How, I
thought it would be very important to talk about an idea that is central to the
code that goes into the time library. When I was speaking with Mark Smith he
talked about using a library to get information from the real time clock. And
in doing that he took it in something called a structure. What is a structure?
Lou: So I think Joe Heck in the Google+
community for Coding 101, he had a really good post on this so I urge you to go
check it out. But one thing that he said and the way he explained it was a
structure is a record, right. It’s containing one or more pieces of data that
are grouped together. That’s a quote from his. And that’s really exactly what
it is. It’s a record that- I like to think of it as a book that keeps track of
its attributes like its title and its author and its subject and spoke ID. And
that’s really how you kind of describe that record. And you can define a
structure in languages like C++, C, C Sharp, that represents that record and
all of its attributes and you can kind of define that and then you can add the
data to it. And the data can really be any type.
Fr. Robert: Right. Now there’s people who might say
wait a minute, why can’t I just have variables. I have variables, I already
know how to do that, why do I need a new structure in order to hold all of
those variables together?
Lou: So like structure in many languages are
very similar to like we’ve talked before about like classes and objects. And so
the way that structure works is basically it allows you to define and describe
something so that it’s reusable in many different ways. And structures and
classes are kind of identical in a way in many different languages. And like
many people use the word class to kind of define both of them. But when you
actually define a class you can create an instance of that and then you can
kind of use different instances. For instance I created a class called book and
then I have its attribute called title and its author and its number. And then
I can create many different instances of those books and have different titles
and authors and then I can store that somewhere like if I wanted to store it in
a list or some collection. And then I can go and retrieve that information from
your application. So it’s really just a way to classify what you’re actually
trying to do. It’s a way to describe your intentions when you’re building an
application.
Fr. Robert: Right and actually that would be the
second question I would have for you, which is, we’ve already talked about
structures and how we use classes. And it seems to me that there is a lot of
similarities, this idea of grouping together similar objects, similar pieces of
data, similar functions into one place so that I can declare it multiple times.
So I guess someone who went through the C Sharp module, the second one, and
learned all about classes, they’d be asking wait a minute, can’t I do
everything in a class that I would do in a structure?
Lou: Yeah and so structure is sort of like a
subset- so classes are like supersets of substructures I like to think of it
that way. Because structures are- everything you define in a structure is
normally what we call public. So like for instance, if you define a title or an
author, it’s public. Its public information so if you go and try to use an
instance of that book structure and create an instance of it, you can access
the title and author. Classes are kind of like a way to- you know you can
create a class- it’s identical to kind of to a structure but it allows you to
kind of define other things in the class. Like for instance, accessibility and
other things or you can privatize things and not have it accessible externally.
So if you want to like under the covers maybe change the language of the title
localization wise, under the covers, depending on what machine language they
have. So if they have like Chinese on their computer it would turn into Mandarin
or whatever. So there’s different ways to do that and classes can do that in
private methods or functions. So structures, everything is kind of public in a
way. So that’s kind of how they’re similar, but depending on what language you’re
using, like C and C ++ are very similar, but for instance in a language like C
Sharp, a structure is stored differently and its memory structure because C
Sharp is built on top of a run time. We go all into that in the C Sharp module,
so check that out. But they’re pretty much similar, it’s
just that the way that they kind of declare their stuff is a little different.
Fr. Robert: Right, exactly. I remember that
structures, at least in C Sharp, are always stored contiguously right. So you’re
going to have all those bits and pieces of data that are associated with each
other next to each other in contiguous memory blocks. Now here’s something else
I’d like to know. When we did Santa’s Little Helper, we talked about using this
JSON blob. This idea that we would get a bunch of information
and then somehow we had to parse it out. It seems to me that if we had a
way to pull a structure rather than a JSON blob, we wouldn’t have to go through
the process of parsing because it comes pre parsed.
Lou: Right. So the way that you kind of
define a structure, again, very similar to a class, you’re basically declaring
your intentions of what that’s supposed to look like and I guess JSON is kind
of the same way. It’s just text format or string format of your actually in
memory version. So like for instance, if I had a JSON blob of books and it has
different attributes in it, or properties, it would define a book and its title
or whatever, and that’s a big long string so you would store it in a piece of
memory and it would become one long stream. But with a structure you can define
an actual object that defines each property, each attribute, and again, like
you said, it’s stored in a continuous block of memory so if we ever did an
actual size of that object id be able to tell what
that is. And again, I’m defining exactly what it is, the compiler can say okay
this is the book and it’s got an author and a title and if I try to store like
a number within the title it’ll say no, you can’t store a number in the title
unless it’s a string and that kind of thing. So it creates a way for you to
describe your intentions when you’re building your application.
Fr. Robert: When I was learning C++ way back when,
one of the differentiating pieces of data that I took was that I would use
structures whenever I needed to separate different records. But as we move into
object oriented programming, I can have structures that contain data and
behaviors as well, which again, I’m going to go back to this, I know that you
answered this but I want a clearer answer for the people who are going to
struggle with this as they start to look at structures vs. classes, and that
again is, where do you use a structure and where do you use a class? If I can
have a structure that basically acts like a class, because it’s not just
handling data, but behaviors, then why do I need a structure? And vice versa. If I have a class that contains data and
behaviors, why do I need a structure?
Lou: That’s a good question. So classes allow you to do a lot of other things that normally
structures don’t do. for instance, you can hide things in them, you can
create different versions, you can create inheritance structures where you can
have many different versions of it so you can have a book and then you can have
another version of that where you can create a large format book or maybe a
Kindle book, that kind of thing and so you can create different inversions of
that using classes. Structures are really kind of basically defined for small
little things. For instance if you’re doing something in an application that
might require you to store small pieces of data or small functions or methods,
then that’s for when people use structures because they’re very easy to define.
You know that they’re a continuous block of memory so you’re not going to
fragment your memory. And so it’s very easy to use and they’re really made to
do very small things. Now classes on the other hand, are made to do potentially
a lot of different things so you can have a class that might be a book but then
you have another class that is made to sort the books and do other things. So they’re
made to do more functionality and they’re a little easier to define. You can
define things under the covers as well as above the covers. So it’s kind of
like if you have an audio receiver and on the outside you have a bunch of dials
and controls, but on the inside there is all these
different electronic components. So a class can define those internal
components and the dials on the outside. But a structure, really there is no
internal stuff. It’s just the outside. So it’s just a black box and you see all
the outside, you can define all the dials and controls but there is no internal
stuff. There is nothing hidden. So with a class you can hide a bunch of stuff
and you can hide a whole bunch of implementation and a bunch of details that
you don’t want somebody who like they were saying you can use a different class
and different libraries, and what it does, you can hide a bunch of things under
the covers that it actually does. So if you want to talk to hardware you can
hide all the hardware code and just have an interface for people to say send
signal or send a beep or that sort of thing. Very simple
things. So really kind of hiding things with classes, structures are more smaller function and very clear, concise function.
Fr. Robert: Yeah, absolutely. Thanks Lou. If you
want to know a bit more, I would suggest that you go to our G+ group, look for
Joe Hecht’s post. I believe that was last November. Because he does a really
good job of explaining why he would use a structure, what it is, and how it
works. Joe Hecht is a member of our community, really good guy, we’ve been
trying to get him on the show but he doesn’t answer emails. Joe, if you’re listening, reach out, because you’re actually quite a good
teacher and we want you on Coding 101. Lou, when we come back we’re going to be
going into our Arduino clock build. This is episode 3 of 4. We’re starting to
put everything together. In the last two episodes we explained what an Arduino
was, what embedded programming was. We showed you how it worked, how you can do
hello world and how you can get information off of the real time clock. Now
we’re going to start moving into how you actually put the bits and pieces
together and get the right inputs to the right outputs after being processed by
our software. Lou, are you interested at all in seeing that?
Lou: Absolutely, looking forward to it.
Fr. Robert: But before we do that can we take just a
moment to thank the first sponsor of Coding 101? Let me ask you a question. How
do you communicate? I know that’s a silly question in this day and age because
we’ve got so many different tools to communicate. It’s not just the phone and
email and text, but there’s every kind of social platform, both social and
business oriented that gives you so many different options. From video and
voice to text to screen sharing to data sharing that it’s funny these questions
that people don’t often ask. But let me ask you, how do you communicate
effectively? Here in the brick house we use HipChat. Now what is HipChat? It’s
fantastic. It’s business communications. I know there’s going to be people out
there going wait a minute, we communicate in my business. We’ve got email,
we’ve got text, and some of us have pagers. We have voicemail, we have video
calls. But even though that may work and even though that’s a good way to
communicate, there are plenty of sweets out there, HipChat is specifically
designed for businesses. And businesses are the ones who are going to love
HipChat because it allows you to keep a history of what your communication
looks like. I’ll explain why that’s important. When your team communicates,
when they use a variety of programs, from email, IM, texting, cloud storage,
document sharing apps, they have little bits of pieces of the answer
everywhere. And if you’ve ever had to do forensics on your project planning to
figure out where a good idea came from, or where a bad idea came from, you know
that you want an easy way to look back through time. Through the time of your
communications and figure out what happened when. That’s what HipChat lets you
do. It gives you a time machine so you can see the genesis of that next great
idea. They give you IM, video chat, document sharing, screen sharing, system
updates, and code sharing integration, which is important for our audience, in
one simple platform. Email is too slow, meetings get sidetracked and regular IM
doesn’t work well for groups, but HipChat keeps your team in synch. And it
works from any device no matter where you are. The best part is that HipChat
integrates with the top developer tools like GitHub, Gira, Zen Desk and more.
You go to their website and check out the 57 services that HipChat plays nice
with to see if maybe you don’t have to do much integration at all. Just turn on
HipChat and start working better. They bring your entire project and team
together in one communication suite. It’s easy to set up, its fun to use, and it makes you productive. Now here’s what we want you to do. We
want you to try HipChat Plus. You can get your team on the same page in
seconds. I want you to try them for free, no credit card required. Visit
HipChat.com/c101, click on “start chatting” to sign up now. Then invite a few
team members and all the features are free for 30 days. After the free trial
you can always stick with the freemium version. Remember, that’s
hipchat.com/c101 and here is a super-secret piece for everyone who wants to act
now. If you sign up now the first 100 signups are going to get their free trial
extended to 90 days. That’s hipchat.com/c101. Hipchat.com/c101. HipChat, your team, your project, in synch, instantly. And we thank HipChat for their support of Coding 101. Let’s get right to it.
We’ve got our code warrior, Mark Smith, back and he’s going to give us a little
Arduino action. When we last left this project Mark, we had just assembled the
shield on top of the Arduino, we had added the real time clock, added the
library so that we could get the data from the real time clock and you showed
us a very simple program that took that data, parsed it out so that we could
just get hours, minutes and seconds. Now of course, we want to end up with
something like this, so although it’s nice that we could get the time out of
the real time clock, eventually we’re going to have to push that to the outside
world. Going back to the first module, we have our inputs, now we need to
figure out our outputs.
Mark Smith: Before that though we also need to
confirm that the time is correct. They don’t actually set the time on the
modules when they leave the factory. And if they did you don’t know what time
zone you’re in, blah, blah blah. It’s not correct, you’ve got to set it. So what we’re going to do first is hook up some buttons
to our Arduino and tell it what time it is. So I have a button here. It’s the
same button we looked at last week. And I’m just going to put this on the
breadboard. Put the button on the breadboard there and we’ll go ahead and do
the other two while we’re at it. Just because. There’s
the third one. Like so. Now we need to hook those
buttons up to the Arduino. So I’m going to take some of these wires, these hook up wires that we have. And I’m going to take one
side of this button and I’m going to connect it to one of the digital inputs.
But before we do that, let’s look at which inputs we’re going to use. Now
remember last week or the week before we were talking about the PWN digital lode
lines and the ones that can do PWN, the analog outputs and the ones that can’t.
For buttons we don’t want to take one of the PWN lines because we’re going to
use those for the analog meters. So we’re going to use the lines that cannot do
PWN. So I’m going to start with 2, 4 and 7. I’m going to put the shield back on
top, and I’m going to hook up the wire between 0, 1 and 2. Right
there. Then I’m going to take that wire from another button, that’s 2,
3, 4 and 7. 4 and then we’ll take the 3rd button, push it back on the breadboard, from there to 7 which is the last one on that
block. So I’ve hooked up those 3 wires to their digital inputs. Now I’ve got to
hook up the other side of the buttons to somewhere. And we’re going to use
ground on the other side. So the buttons, when you push them, will connect that
digital IO pin to ground. And this big block of connectors up here, all 10 of
these are ground, so I can just plug in to any one of
them, it doesn’t matter which one. So now I’ve got 3 buttons hooked up to the 3
different inputs and they will connect to ground when you push that button.
Normally you would also hook up a resistor between the positive side, the blue
wire here, and the plus voltage over here. It’s called a pull up resistor. So
that when the button is not connected, the inputs to the Arduino will see a
high voltage instead of just a disconnected voltage with no voltage at all. It’s
called a pull up resistor. The Arduino can do internal pull ups. So we’re not
going to bother with that. We’ll see in the code where we turn on the internal
pull ups so that we don’t have to worry about that.
Fr. Robert: Okay so that’s the hardware that will
give us ground when we push the buttons. But now we need to do something inside
the sketch to actually get that in. let’s take a look.
Mark: So this is an updated version of the
sketch that we looked at last week. You’ll see the same #includes and some of the
same #defines, although I think I changed the name. I added PIN in front of it.
It’s more descriptive. But I added a couple of new ones. BUTTON_MINUTE
and BUTTON_HOUR. And we chose pins 2 and 4 for those. So those are the
digital inputs that we used to connect up those buttons. So we have a couple
more #defines. I am defining a few variables here, these are globally defined variables which means they will be available in both
the set up function and the loop function. If we defined them inside either set
up or loop, they could only be used inside that particular function. But
defining them outside of those functions, they are globally available. You can
be anywhere. If you’re writing normal software that’s not in an embedded
environment, you generally want to avoid globally scoped variables.
Fr. Robert: We’re using it here for ease of
programming.
Mark: For ease of programming and because the
scope is less than 100 lines of code. We can keep track of the scope of all of
the stuff in our head. It’s a small enough program we can get away with that. So
right here we are doing very similar- there’s the power to the RTC which we saw
last week. So we’re providing power to the RTC. Then we are configuring the
buttons that we just hooked up. So we’re saying BUTTON_MINUTE and BUTTON_HOUR
are inputs. So we are going to be reading data from those pins. And so we set
that in the pin mode. Then digitalWrite. So we are
writing to an input pin. Which seems somewhat
counterintuitive. But this is how you enable the pull up resistors. So
this is an 18 mega feature. If you write a high value to an input pin, that
will enable the internal pull up resistors.
Fr. Robert: Right. In other words, if it doesn’t
see anything, it doesn’t say there’s nothing there, it says oh, its high voltage
there.
Mark: Correct. It’s a high. It’s a high
input. And then when you push the button it’ll read a low. So that’s what we’re
going to do. Then we set up the serial port, just like we did last time. We do
our hello world but I say 02, so that I make sure that we know that we’re
reading the 2nd program that we’ve written. And then we’ve
initialized some of the global scoped variables that we defined earlier. The
lastTime, what the time was the last time we went through this loop, and then
what the state of the buttons was last time we went through the loop. Whether it was high or low. Remember, high means we are not
pushing it, low means we are pushing it. So we’re going to use that later to
detect when the button has been changed. Then we go into our loop. We are going
to, at the top of our loop, get the current time and put it into a variable
called thisTime. So that says right now, this time we’ve gone through the loop,
this is the time that it is. There are 2 different types of variables that time
can be put in. one is called a time_t, and one of them is the TM elements that
we saw last week. In this particular version of the code we’re going to want to
use both of them. They each have their advantages and disadvantages. The time elements makes it very easy to pull out minutes, seconds,
hours, and so on. But the time_t is just a giant integer. It is the number of
seconds since a given epoch. In eunuchs time_t is the number of seconds since
Jan 1st at midnight in 1970. It’s just an arbitrary date they said
and they’re going to count seconds all the way from there. That is very easy
for things like is this time greater than that time? Because then it’s just a
comparison of 2 different numbers. So I’m keeping time in both different
variables to make it easier. In some cases I want to use one, in some cases I
want to use the other. It does mean that we have to make sure to keep them in
synch, and we’ll see some code where I do that a little bit later. So we are
reading it as a time_t and then we are creating an element from it. So now we
have both of those. So again, here we are looking for an error from RTC.get. If
this time is = 0, that means that RTC.get returned an error. It said somethings
wrong, I don’t know what time it is and we do our error checking just like we
did last time. And then if we did get an error we return out of the loop and
start the loop again. We don’t do the rest of the processing. But if we didn’t
get an error then we have good time so we continue on. So we are going to look
for whether any of the time setting buttons have been
pressed. Remember, I put a comment here to remember that HIGH means it is not
being pushed, LOW means that it is being pressed. So I’m going to define a
temporary variable that we’re going to use. I’m going to do a digital read on
the button for the minute. ButtonMinute is the variable that holds what this
value was last time, so if before it was not being pressed, and now it is, that
means that this time through the loop, someone has
just pressed that button. So we are going to do something. Button was open, now
it’s being pushed. So we are going to figure out what time, what minute the
time objects thinks it is right now, we’re going to add 1 to it, so we’re going
to increment it by 1. But if it was 59 before, we don’t want it to read 60 now.
So we have to take modulo 60, 59+1=0. So this is the little bit of math that
we’re doing to set the variables. And then we’re going to assign that back to
the variable. And then we’re going to set this Tm.Minute=tmpMin. Now in reality
I could combine all three of these lines into a single line. But it’s a little
bit harder to understand.
Fr. Robert: Yeah. This is much easier for people to
actually figure out what’s going on.
Mark: Exactly. And honestly, for a compiler,
the compiler will optimize that into the exact same code. So there’s no need to
make your code overly complex to read, thinking that it’ll make the compiled
code more optimized, it’s not true. The compilers will optimize all of this out for you.
Fr. Robert: That’s actually worth noting because
there are some people who think your code gets uploaded into the Arduino. That
actually doesn’t happen. That’s why you’ve got the IDE. That’s the sketch you’re
making. Your sketch will be translated into something that actually can be
uploaded to the Arduino. So yeah, as Mark was saying, write it in one line or
three lines, the developer environment is going to turn it back into one line
of code for the Arduino.
Mark: Right. The important part is to write
it in a way that makes it easy for you to understand and for other people to understand
so that when you come back to this code 5 years from now and you’ve completely
forgotten about all the things that you did, you can easily figure out what it
was doing. That’s the most important part. So let’s keep going. So we have done
that. And then once we have made that change, we have incremented the minute,
we are going to then create a time T back from it using the makeTime function.
And all of these functions, the breakTime and makeTime, they’re documented in
the time library, which is one of the libraries that we installed last week. When we were talking about the RTC. So breakTime and
makeTime are from the time library. So we are going to take the time elements
which we just changed, and we’re going to create a timeT back out of it. And then
we’re going to tell the RTC this is your new time. So we have programmed the
RTC with the new value. We have to push it back out otherwise next time we read
it it’s just going to undo what it did. And then we
set buttonMinute, which is the variable we use to track whether the button has
been pressed or not. We set it to the value that we just wrote. So it is now
low. Effectively. Then we go down and do the exact
same thing for the button hour. So we’re reading from a different pin, we’re
using a different state variable. We’re setting thisTm.Hour instead of
thisTm.Minute. And otherwise it’s exactly the same code as right above it. Now
we have set the time. We’ve looked at the buttons and we’ve set the time. Then
if the time has changed since the last time we were through, and that’s where
we’re using thisTime and lastTime, so the lastTime was the global state
variable, thisTime was the time that we got at the top of this loop. If those
two are not the same, either because we’ve changed the time by hitting a button
or because the seconds have incremented since the time has changed from the
RTC, then we want to set lastTime to thisTime and then we want to output our
time to the serial console just like we did last time. So then we delay by 100.
So its 10 times a second.
Fr. Robert: And you would need this to guarantee
that it’s only going to update whenever there’s actually a change. Because otherwise, since this thing does loop 20 times a second, it
would just keep going.
Mark: It would just print 10 times a second
for every output. So I only want it to update when it needs to update. I am
going to go ahead and upload that code to the Arduino. So we got the time. I’m
going to go ahead and press the minute’s button. See how its incrementing the
minutes? Then I will press the hour’s button.
Fr. Robert: This shows you a couple of different
parts of the program. First is that it’s updated only every second. But also,
when you press a button, it does change it. So you could make this output as
many times as you can press it, even when it’s not taking the tick.
Mark: Correct. In fact, it will output it
every time I press the button. Even if it’s more than once a
second. Because remember, the code says I’m going to change if you press
a button, and then at the bottom below that it’s going to say if the time
changed. So every time you press the button it’ll immediately trigger a new
output.
Fr. Robert: Up to 20 times a second.
Mark: Up to 10. So it’s laying up 100 milliseconds
between each one. So 10 times a second.
Fr. Robert: Okay, so now we now the buttons are
working. They’re interacting with the code. Are we just limited to the screen?
Could we push this out elsewhere?
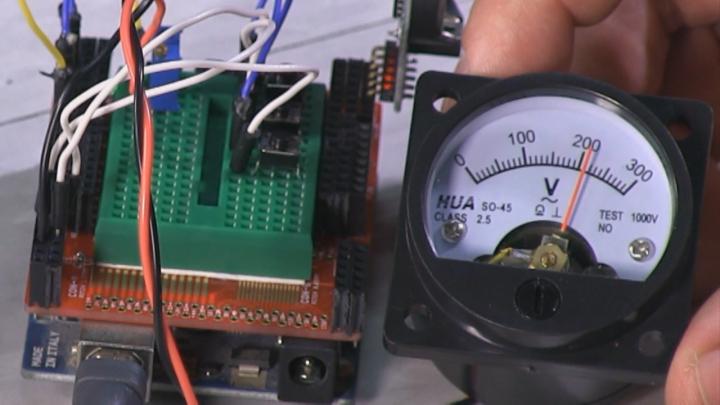
Mark: Let’s look out some meters. So this is
an analog panel meter. It is a meter- you’ve seen these. It’s an electro
magnet, it’s down here. And you pass a certain amount of current through that
and it deflects this needle around here. More current, more
deflection. Now you’ll notice that this one is measuring volts, and the
straight line means its DC volts. And it’s between 0 and 15. So that means that
this meter is configured to measure 15 volts DC full scale. But I just told you
that that meter is measuring current. All analog panel meters are actually
measuring current. And the way you can configure a current device like this to
measure voltage is by sticking a resistor in series with it.
Fr. Robert: If you actually want to see Mark do the
alterations to the meter so that it can measure current rather than voltage, go
ahead and jump over to Know How. This is a cross promotional series. He’s going
to be giving you exactly the step by step that you need to be able to take out
a certain resistor, and make sure that it’s going to measure the current which
is what we can actually output from the Arduino. Now Mark, having done that, we
now have a meter that can be used with the Arduino,
but we don’t have a connection between the Arduino and the meter. So how do we
do that?
Mark: So we had that resistor in there before
and it was set up to read 15 volts. We can’t get 15 volts and we don’t actually
know- some meters are 1 milliamp, some are 5, some are 100 micro amps, they all
vary. And so what we want is a circuit here that we can adjust to be able to
put out the correct amount of current for the meter that we’re using. So what I’m
going to do is use a 10killaohm resistor, potentiometer, a variable resistor
here, and I’m going to put it into our breadboard. Kind of part these wires
here. Remember that when you put these in, you want to put them in this way so
that they’re not shorted. If you put them in like this then
all three of the pins will be across on the same row. Each one of these
row of holes is all connected to each other. And so if I want to be able to get
to each of the pins, I need to put them in like that. So we are now looking at
the 3rd set of code. So we #defined the PWM pins. There they are. So
we are using 5, 6, and 9. I think I chose not to use 3 because it was kind of
huddled between some of the other pins and soldering was going to make it more
interesting. So we’re going to use 5, 6, and 9. So I’m going to take a pin from
0,1,2,3,4,5. Take that one there. Put it into one side of the resistor. I’m
going to go for seconds because it’s easier to see. So I’m going to move it
over to pin 9 where the seconds are. And then I’ve got that variable resistor
in there. And then I’ve got this one meter that I already rigged up with some
wires on the back. I just wrapped them around. And I’m going to hook this up to
the output of the potentiometer. And ground. Like that.
Fr. Robert: So this is the output that we see from
the Arduino right now. We’ve just connected the meter but we need to be able to
calibrate it so that it shows us the right output. Go ahead and show us what
we’re seeing on the meter. So what is this motion?
Mark: So you’ll notice that the meter is
changing ever so slowly. So what it’s doing is if we
were to open this up and change the facing of this meter to read seconds, 0-60,
then that’s what the meter would be showing you what second is on display right
now.
Fr. Robert: So at some point it’s going to hit 60
seconds, go back to 0 and that meter should drop back down.
Mark: Correct. So we’re doing this by sending
an analog voltage. Now I have it going through the 10killaohm potentiometer and
it’s kind of unset right now and it happens to be in a good enough area that we
can see it going up. I’m looking at the console and we’ve got 20 more seconds
before it kicks over. But it doesn’t look like it’s going to make it all the
way up in the time.
Fr. Robert: What I really want is I want 0 to be 0 seconds, I want 300 to be 60 seconds.
Mark: Exactly. And we’re going to get it
right now. You’ll notice the needle went back down.
Fr. Robert: So I need a way to be able to calibrate
this so that it will do the right range of motion. How do I do that?
Mark: So the way to do that is by adjusting
this resistor here.
Fr. Robert: I’m changing the resistance because it
is a potentiometer. Why does that allow me to calibrate?
Mark: So Ohm’s law, remember. V=IR. Voltage=
the current x resistance. So I’ve got a certain voltage that comes out of the
Arduino at “full scale”. So when the Arduino thinks I am pointing at 60, or
actually 59, that is full scale. You want that to be all the way over on the
right hand side of your dial. So what we need is a way to
tell the Arduino give me full scale on my meter. And then what we’ll do
is go in and adjust the potentiometer so that it is reading full scale. So go
back over to the code for a second, I want to show the code that we used to do
that. So we’ve added a few other things in here. Because I needed to be able to
count ticks, quarters of a second. The RTC doesn’t know about quarters of a
second. So I am using the imprecise clock on the Arduino counting the number of
milliseconds that the Arduino thinks has passed, just to count 200
milliseconds, 500 milliseconds, 750 milliseconds, and then we reset at the top
of each second. So there’s some extra code in here to do all of that. Which we can go over if we want. But otherwise, the code is
very similar. Here’s our set up. We have added another button for the calibrate
mode. Which we’ll go to in a second. Serial ports and some other things. And
then the loop, much of the same code. Calibrate the meters. So we’re
doing another thing. Digital read. If the calibrate button is low, that means
we are pushing the calibrate button. What I’m going to do is print out to the
console, calibration mode, adjust the potentiometer so that the needles read
full scale. Then I’m going to analogWrite an analog voltage of the PWM_MAX. It’s
a #define that I defined earlier. It defines what value is written at full
scale. And so we’re going to go ahead and analogWrite full scale out to all
three of the meters. And then we’re going to wait for the button to be
released, and then pushed again. And then when it is done being pushed, it will
have been released and that completes the calibration mode and it goes on with
life.
Fr. Robert: We’ll go through this code more in
depth in the next episode, but for now, let’s show them exactly how this works.
So you have added this code so it’s looking for a key press. And when you do
that key press, it goes low, it’s going to allow you to set the values for max
so you can calibrate that potentiometer to put the needle exactly where it
needs to be.
Mark: So I’m going to push this button, and
it swings the needle over to full scale. So then we’re going to take our
screwdriver and we’re going adjust that potentiometer. It has a 25 turn which
means it adjust very slowly. So you can get to it very precisely. And we’re
going to get that until right about there. That’s full scale.
Fr. Robert: So when it’s at its max current, it
will be at the max level on the meter, and when it goes to 0, it goes back to
0.
Mark: Exactly. So there is one other
calibration point we need to do. If you remove power, the meter will go down to
zero. Most meters come pretty well calibrated but that one actually looks a little
tiny bit off. There is a screw hole on the front and so you can physically
adjust the zero point down to actually zero. So that’s the zero point. You want
to adjust the zero point first. We’ve got it powered back up, it’s ticking. Let’s
press the calibrate button again. Now we need to recalibrate this because we’ve
changed the low end. And right there. That’s full scale. We are now calibrated.
You push the button to turn the calibration mode off and it goes back.
Fr. Robert: Now we are going to show them the code
that made all this possible in the next segment, but I’m afraid that’s all the
time we have for this week. Again, if you could tease the audience into what
they’ll be learning next week… yeah I think that’s all the tease you’re going
to have to do. Thank you again Mark Smith for being our code warrior. It is
always so much fun to talk to you because this is the programming I really get
into. Because it is hardware and software at the same time. Could you tell the folks at home where they can find you, where they can find
your work if they want to find out more about the things that you build?
Mark: I spend most of my time on twitter. @smittyhalibut. I don’t really have a blog or anything else.
Most of my online life is spent on twitter.
Fr. Robert: If you don’t follow him on twitter, it
means that you hate life and a cat has died. Thanks Mark for coming on. Back to you Padre. Thank you Padre. Remember, if you are
following along in this project you need to watch Know How episode 132. That’s
the one we just did before this show in order to find out how to mod the meters
so that you can make it register properly. This is a crossover so you’re going
to want to watch know how and Coding 101 to get the full experience of how you
do the hardware and the software and turn it into something magical. Speaking
of something magical, if you are working on a project, if you’ve got a special
passion that you want to get out to the world, you’re going to need a place to
put it on the internet. And we know it’s all about location, and about how you
present that information. Which is why we’ve got Squarespace
as the second sponsor of this episode of Coding 101. Squarespace is that
one place you can go to on the internet to easily get your project or portfolio
on the internet and I love Square Space because they’re always improving their
platform. In fact they just released Squarespace 7. That makes getting started
much easier and they have a unique web presence that is built up over templates
that they give you. It’s now more all in one, it’s simpler to navigate and it’s
simpler to operate in 1 seamless experience. Squarespace 7 allows you easier
editing. You can edit on 1 screen which means you no longer have to toggle
between site manager and preview mode. You can even preview designs in divide
modes - that you see exactly how it will look on tablets and mobiles. Now it
also offers instant access to professional stock photography from… It’s now
integrated into the package. They’ll allow direct purchases inside the platform
from getting images at just $10 each for your site. No more having to jump out,
get an image imported into Squarespace, make sure all your licensing is taken
care of. It’s all in 1 interface. You can get google branded email with
Squarespace 7 so you can have the branded email for your small business and
it’s automatically set up when you set up your Squarespace account. They’ve got
templates, designed for specific professions which this is a big one. All their
templates have been beautiful but now they give you the option to switch
between different classes of templates. You can move between templates for
musicians, artists, architects, chefs. They designed those templates, those
category specific templates so that you can find the one that looks right for
the project, for the business, for the industry that you’re trying to
represent. On Squarespace 7 the developer platform is now on a beta which means
that you can customize your site exactly as you wish. If you’re a developer you
have access to the same platform that Squarespace uses for its own site –
complete code control They also give you e-commerce with all subscription plan
levels that includes the ability to accept donations which is great for
non-profits, cash wedding registries and school fund drives and it’s easy to
use. Yes, sometimes you’ll run into a ram but it’s easy to get it solved
because Squarespace offers you support; 24 hours a day 7 days a week. They’ve
got an army of folk in their forums giving you self-help articles and video
workshops to browse at your leisure. It also starts at just $8 a month so it’s
not going to break the bank. That includes a free domain if you sign up for a
year. The Squarespace portfolio, the note, metric and blog mobile apps are on
the go extensions of your website so that you can monitor and make changes from
anywhere. They include the hosting so again it becomes a 1 stop shop. You don’t
have to worry about buying different services from different providers. It’s
all from 1 place. It’s all in a square space. Here’s what we want you to do. We
want you to start a free 2 week trial with no credit card required and start
building your website today. When you decide to sign up for Squarespace make
sure to use the offer code c101 to get 10% off and to show your support for
Coding 101. To begin using Squarespace 7 now existing customers can go to the
setting tab to activate all of your new features. We thank Squarespace for
their support of Coding 101. A better web awaits and it starts with your new
Squarespace website. Squarespace, start here, go anywhere. Lou, next week is
going to be the last episode we do with this embedded programming module, one
the things I’m not sure if all of our audience knows, when you do Arduino
programming, it’s really just C right?
Lou: Exactly. Really easy
C.
Fr. Robert: Exactly. So if you’ve done any sort of
programming in C or any of the C frameworks, Arduino programming is really not
anything new. In fact, it uses all of the same components that you’ve seen in
the modules here on Coding 101. Loops and variables and
if/then statements. So go ahead and give it a try. It’s really, really
hard to break an Arduino project. Pretty much the only way you could do it is
if you physically break the board. Go ahead, upload bad code, upload horrible
code, upload whatever it is that your mind is thinking of and don’t forget that
you can always get all of the code tidbits that we use in our episodes on our
show page and alter them. See what you can come up with. Lou, anything you want
to add before we send the audience off to do their homework?
Lou: No, I think like you said, the really easy C, check out some of the C programming that’s out there. We
just talked about – in the beginning of the show and I think there are some
really great articles and some really great blog posts out there about it and it’ll
get you going on just normal C style programming too. So Arduino is a great
example of implementing your own project and getting you out there and trying
new things.
Fr. Robert: Lou Maresca,
again, our super special cohost. We want to thank you
for coming back. Could you tell our audience where they can find you and your
work?
Lou: Absolutely. On Twitter, @LouMM, and
about me, Lou MM as well. And all of my work during my day job is at
crm.dynamics.com.
Fr. Robert: And we’ve seen you on This Week in Enterprise
Tech, Coding 101, some of our news programs, and my understanding is that we’re
going to start seeing you do reviews for Before You Buy. Is there any truth to
that rumor?
Lou: Yeah, I’m super excited about that. I
get to play with toys.
Fr. Robert: Lou Maresca,
follow him, see what he’s doing, he’s a good guy. Speaking of good guys, we
want to do something for all of you good guys. And gals. And geeks. We want to give you a place where you can
get all of our episodes and all of our show notes in one easy place. Go to our
show page at twit.tv/code. . You can find our entire back catalogue of episodes
which is important because it’ll let you download entire modules if you want to
learn what we did in C Sharp or Perl or PHP, it’s all right there. It also
gives you a place where you can use that little dropdown menu to get every
episode of Coding 101 automatically downloaded into your device of choice. We
make it easy because we love you. Also you can find us on Google+. In fact,
this is a great place to go. We’ve got almost 2000 members of this community. It’s
got experts, intermediates, and newbies. It’s a place to go if you ever want to
ask questions or answer a couple of questions. Coding is best when you do it in
a community and that’s what Google+ is for us. Find me on twitter,
twitter.com/padresj. @padresj. If you follow me there you’ll
see what I do during the week, even when I’m not on TWIT TV. You’ll see the
next episodes and topics for Coding 101 or Know How or This Week in Enterprise
Tech or Padre’s Corner or for Before You Buy. Also, we do this show live every
week. Now it’s on Thursday at 1:30 pacific time. Starting in March, we’ll move
to 2:30 pacific time on Mondays. You can join us at live.twit.tv. And as long
as you’re watching live, jump into our chatroom at irc.twit.tv. Until next
time, he’s Lou Maresca, I’m Robert Ballecer,
end of line!